Navigate Here: Utilities > Classifications > Classification-Entity Associations > click the Add icon or Utilities > Classifications > Manage Classifications > click the Add Classification-Entity Association link
You can add a classification-entity association on the Add Classification-Entity Association page.
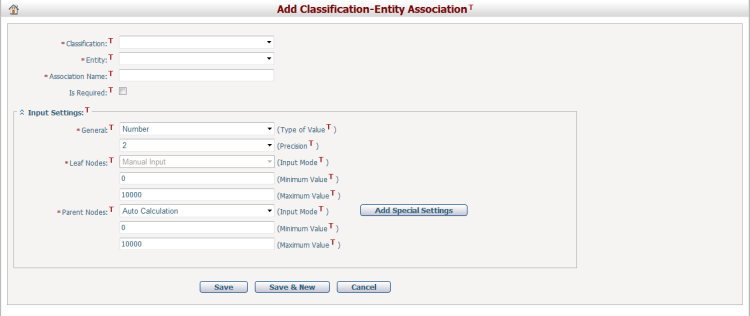
To add a classification-entity association, you need to fill in following fields:
The required fields are noted with an asterisk (*).
Classification*: select an active classification from the dropdown list (if you enter this page from Classification Management page, the classification you selected on that page will be selected by default for this dropdown list on this page)
Entity*: select an entity from the dropdown list (all entities that have been configured for use in classification-entity associations are listed in the dropdown list)
Association Name*: enter a unique name for the association
Is Required: check this option if you want to make the corresponding field on entity form required (i.e. values must be provided for at least one node of the classification)
Input Settings: multiple setting fields are included in this field set.
General*: select Type of Value and Precision
Type of Value: it includes two options "Number" and "Percentage", and "Number" is selected by default. The difference between these two options are that, a symbol "%" will be added to the right of the entered node value on entity form if "Percentage" is selected.
Precision: it defines the precision of the entered node values and includes five options "0" through "4". The default selection is "2" when Type of Value is "Number", and the default selection is "0" when Type of Value is "Percentage".
Leaf Nodes*: enter the allowed Minimum Value and Maximum Value for all leaf nodes of the classification (Leaf Node refers to a node that has no child node in the classification)
Input Mode: the input mode for leaf nodes is always "Manual Input" and cannot be changed.
Minimum Value: it defines the minimum number that can be entered for leaf nodes. The default input is "0" whatever Type of Value is.
Maximum Value: it defines the maximum number that can be entered for leaf nodes. The default input is "10000" when Type of Value is "Number", and the default selection is "100" when Type of Value is "Percentage".
Parent Nodes*: select Input Mode and enter the allowed Minimum Value and Maximum Value for parent nodes at all levels (Parent Node refers to a node that has at least one child node in the classification)
Input Mode: it includes two options "Manual Input" and "Auto Calculation", and defines whether the node value is manually inputted or automatically calculated by summing up values of its child nodes.
Minimum Value: it defines the minimum number that can be entered for parent nodes. The default input is "0" whatever Type of Value is.
Maximum Value: it defines the maximum number that can be entered for parent nodes. The default input is "10000" when Type of Value is "Number", and the default selection is "100" when Type of Value is "Percentage".
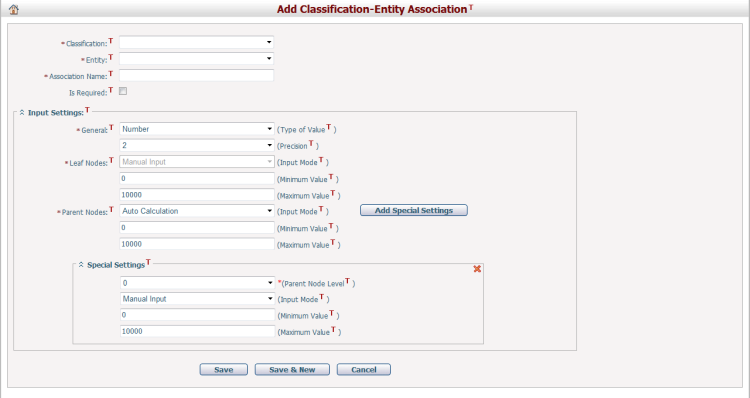
If you don't want to apply the same settings to parent nodes at all levels (i.e. you want to apply special settings to parent nodes at certain levels), you can click the Add Special Settings button, and a field set named "Special Settings" will be added below. (Notes: Every time you click on this button, a Special Settings field set will be added below. You can click on the Remove icon ![]() to remove the Special Settings field set.)
to remove the Special Settings field set.)
Parent Node Level*: it specifies for parent nodes at which level you want to add the special settings. It has nine options "0" through "8", and "0" is selected by default.
Parent nodes at Level 1 refer to root nodes of the classification that have at least one child node, parent nodes at Level 2 refer to child nodes of parent nodes at Level 1 that have at least one child node, parent nodes at Level 3 refer to child nodes of parent nodes at Level 2 that have at least one child node, and so forth.
Note that, parent nodes at Level 0 don't really exist in a classification. The option "0" is used to set restrictions for parent nodes at Level 1.
Input Mode: it includes two options "Manual Input" and "Auto Calculation", and defines whether the node value is manually inputted or automatically calculated by summing up values of its child nodes.
Note that, if Parent Node Level is "0", the Input Mode must be "Auto Calculation". It won't take effect if "Manual Input" is selected, because parent nodes at Level 0 don't really exist in a classification and we cannot enter values for them.
Minimum Value: it defines the minimum number that can be entered for parent nodes. The default input is "0" whatever Type of Value is.
Maximum Value: it defines the maximum number that can be entered for parent nodes. The default input is "10000" when Type of Value is "Number", and the default selection is "100" when Type of Value is "Percentage".
After you have completed necessary settings for the to-be-added classification-entity association, you can:
Click on Save button to save the classification-entity association and return to Browse Classification-Entity Associations page.
Click on Save & New button to save the classification-entity association and stay on the current page to add another classification-entity association.
Click on Cancel button to abort saving the classification-entity association and directly return to Browse Classification-Entity Associations page.