Navigate Here: Implementation > Meeting Minutes > Browse Meeting Minutes; select Meeting Minutes
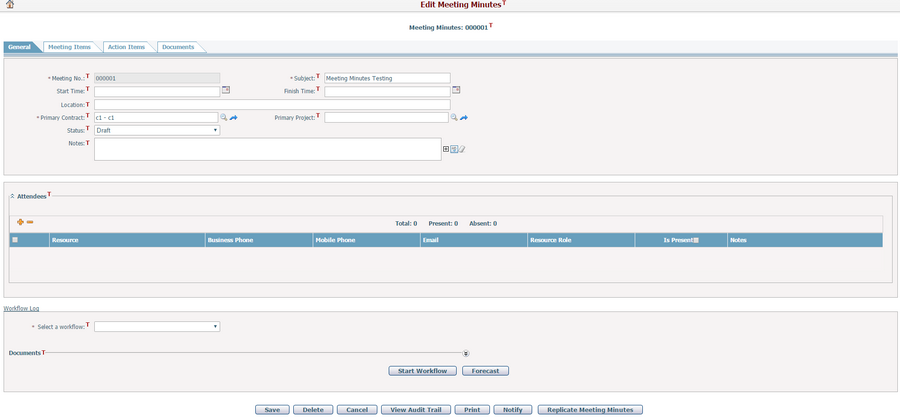
You can manage meeting minutes on the Meeting Minutes-General tab.

To edit the meeting minutes, modify the following fields:
Meeting No.*: It is automatically generated by system and must be unique.
Subject*: The subject of the meeting.
Start Time: The start date and time of the meeting.
Finish Time: The finish date and time of the meeting.
Location: The location where the meeting holds.
Primary Contract*: The particular contract for which the meeting minutes is created.
Primary Project: The particular project for which the meeting minutes is created.
Status: System statuses for meeting minutes: Draft, Under Review, Approved and Rejected. When adding a new meeting minutes, the initial status is always set to Draft.
Notes: Notes for the meeting.
The Attendees grid layout is configured underneath the main panel of the meeting minutes, where you can add or remove an attendee who is linked to a resource of labor type in system. Relevant information of each attendee includes Resource, Business Phone, Mobile Phone, Email, Resource Role, Is Present and Notes.
Resource: The resource name of the resource the attendee is linked to.
Business Phone: The business phone number of the resource the attendee is linked to.
Mobile Phone: The mobile phone of the resource the attendee is linked to.
Email: The email address of the resource the attendee is linked to.
Resource Role: The role of the resource the attendee is linked to.
Is Present: This field is to specify whether this attendee is present or absent for this meeting.
Notes: The notes for other information.
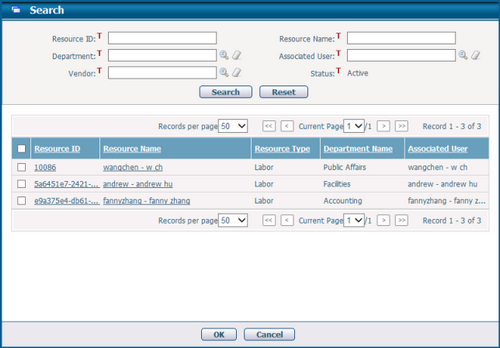
You can click ![]() to add an attendee and the following window will pop up immediately for you to load a resource as the attendee.
to add an attendee and the following window will pop up immediately for you to load a resource as the attendee.

You can also select an attendee and then click ![]() to remove it.
to remove it.
Click the Save button to save the meeting minutes.
Click the Delete button to delete the meeting minutes The system will then go to the Browse Meeting Minutes page.
Click the Cancel button to abort current operation and go to the Browse Meeting Minutes page or return to the original entrance.
Click the View Audit Trail button to view change history of this meeting minutes. System will then open Browse Audit Trail Details page in a new window.
Click the Print button to print the meeting minutes through predefined document template. The system will then open Generate Dynamic Document page.
Click the Notify button to send notification to relevant persons. System will then go to Send Notification page.
Replicate Meeting Minutes
You can create a new meeting minutes by replicating from the current meeting minutes and its related data.
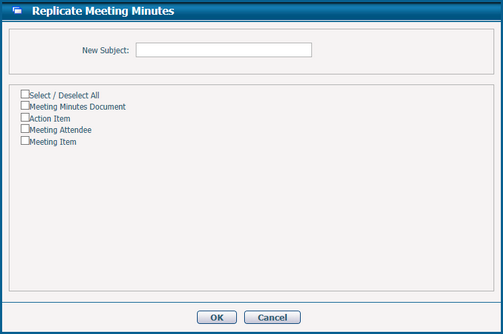
Click the Replicate Meeting Minutes button, a popup window will be displayed for replication process.

To replicate a meeting minutes, input the following fields or options:
New Subject: The subject of the replicated contract. It is a required field.
Other related data to be replicated: Select the relative data to be replicated. The system offers dynamic options which can be configured by the system administrator, you can select any one by checking its checkbox or select / deselect all by checking the checkbox of Select / Deselect All.
Meeting Attendee / Meeting Item / Action Item: These data are subordinate to meeting minutes, by checking their checkboxes, the system will duplicate the data in the replicated meeting minutes.
Document: It is associated with meeting minutes, by checking the checkbox, the system will establish the associated data relationship with the replicated meeting minutes instead of copying them.
Click the OK button to start creating the new meeting minutes.
Click the Cancel button to cancel your operation and return to the Edit Meeting Minutes page.