Navigate Here: Implementation > Project Statuses > Browse Project Statuses; select a project status
You can edit the project status information on the Project Status Management page.
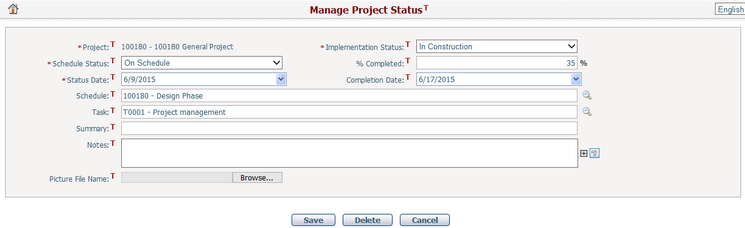
To edit the basic information of the project status, modify any of the following fields:
The required fields are noted with an asterisk (*).
Project*: The name of the project. The project name is grayed out and cannot be modified.
Schedule Status*: Select a schedule status of the project. There are four system defined schedule statuses for selection: On Schedule, Behind Schedule, On Hold, and Completed.
Implementation Status*: The current status of the project's implementation. You can configure the options in Dropdown List Management.
Percent Completed: The progress of the project's implementation.
Status Date*: The date when the project status was assigned. Note: if the date is LATER THAN the "As of" date in Schedule Status of the selected project, the current Schedule Status ("Schedule Status", "Percent Complete", and "As of" fields) of the project will be updated with information in the current project status ("Schedule Status", "Percent Completed", and "Status Date" fields); otherwise, the current Schedule Status will NOT be updated.
Completion Date: The planned date that the project is finished.
Schedule: Browse and select a schedule by clicking ![]() . Only schedules associated with the chosen project will be available for selection.
. Only schedules associated with the chosen project will be available for selection.
Task: Browse and select a task of the selected project by clicking ![]() . All tasks in the schedule of the selected project are available for selection. Selecting a task means to associate the status information with a specific project task.
. All tasks in the schedule of the selected project are available for selection. Selecting a task means to associate the status information with a specific project task.
Summary: Brief summary of the project status.
Notes: Description of the project status.
Picture File Name: The picture size is limited to 1MB. Click the Browse button to browse and select a file to upload to the project. Click the View Picture link to open the picture in the new window.
Click the Save button to save the changes. The system will then go to the Browse Project Statuses page.
Click the Delete button to delete the record. The system will then go to the Browse Project Statuses page.
Click the Cancel button to cancel the updated record. The system will then go to the Browse Project Statuses page.