Navigate Here: Documents > Add Document or Documents > Browse Documents>click the Add icon ![]() or (Business Entities) > Documents tab page> click the Add icon
or (Business Entities) > Documents tab page> click the Add icon ![]()
You can upload files as new documents by Add document by uploading file or copy existing documents as new documents by Add document by copying existing document on the Add Document page.
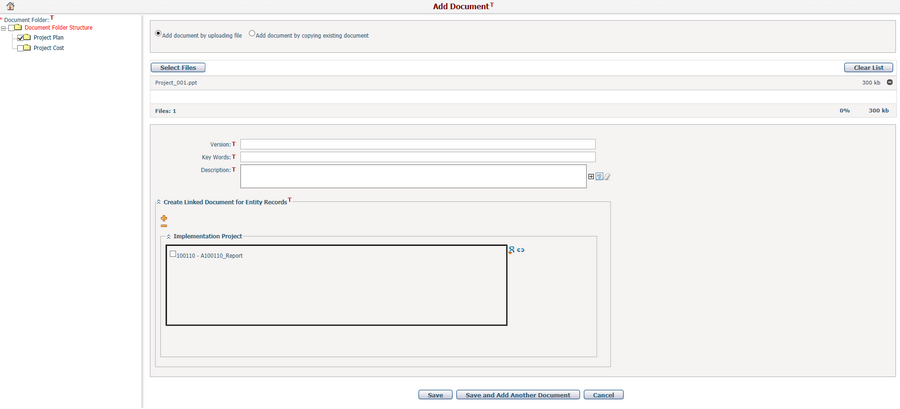
Add document by uploading file
To add new document(s) by uploading file, select the radio button Add document by uploading file (it is selected by default) and then fill in the following fields:
The required fields are noted with an asterisk (*).
Document Folder: Specifies where new added document(s) will be placed. Authorized users can configure "Document Folder Structure" node in Utilities > Classifications.
- One document can only be placed under one folder. So selecting the root folder or a parent folder does not means to select all its child folders at the same time.
- If enters this page by clicking the Add icon
Select Files*: Select files from your local PC folder to upload.
- All selected files will be shown in a list box under the button with total count, each row represents a file by its file name and size, you can remove a file by click the icon
- You can double click the file name to enter into editing mode, and press enter to save the updates, but if the file name contains the following characters “\”, “/”, “:”, “*”, “?”, “<”, “>”, “|”, the system will show alert message and bypass the updates.
Version: The version of the document.
Key Words: Any key words to identify with the document, they can be used for searching purpose.
Description: The description of the document.
Create Linked Document for Entity Records: Manage the document association relationships with different business entity records.
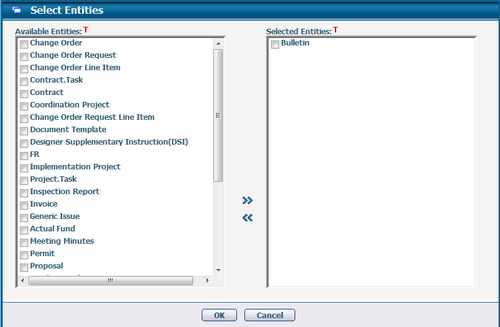
- Click the Add icon
The left panel is a list of "Available Entities". You can select one or more business entities and click the icon
Click the OK button to close the screen, subsections of the selected business entities will be displayed in the Create Linked Document for Entity Records section.
- You can collapse a subsection by clicking the icon
- You can click the icon
- You can select the associated data records by their checkboxes in each subsection and click the icon - You can click the icon
Note, if you enter this page by clicking the Add icon
Click the Save button to save the new document(s). The system will go to the Browse Documents page. If you enter this page from the Documents tab page of a business entity, the system will then return to the Documents tab page.
Click the Save & Add Another Document button to save the new document(s), and then add another one.
Click the Cancel button to abort the current operation without saving, and the system will go to the Browse Documents page. If you enter this page from the Documents tab page of a business entity, the system will then return to the the Documents tab page.
|
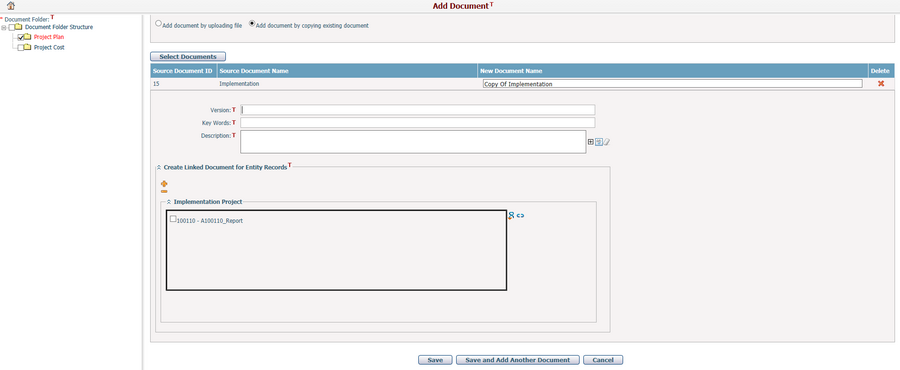
Add document by copying existing document
To add new document(s) by copying existing document, select the radio button Add document by copying existing document.
The operations are mostly as the same as Add document by uploading file, the only difference is the Selected Documents function:
- When click the button, the Select Document page will be opened for you to search and select the existing documents in the system.
- All selected documents will be displayed in a data grid under the button with a brief summary including Source Document ID, Source Document Name and New Document Name.
- The New Document Name will be initiated as “Copy of [Source Document Name]”, and you can change it for your own purpose, but the following characters “\”, “/”, “:”, “*”, “?”, “<”, “>”, “|” in the name is invalid.
|