Navigate Here: Utilities > Templates > Spending Curve Templates, click Edit icon ![]() at the end of the row
at the end of the row
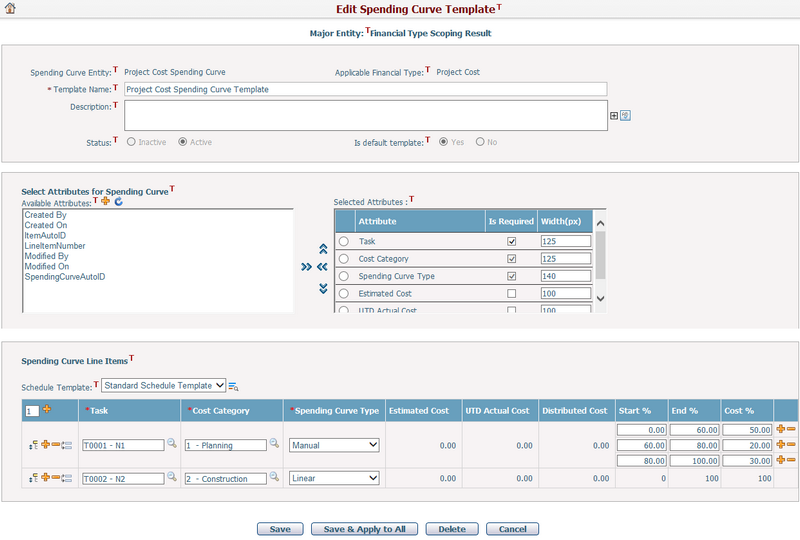
You can edit a spending curve template on the Edit Spending Curve Template page.
To edit a spending curve template, fill in the information in the following three sections:
General Information
The required fields are noted with an asterisk (*).
Spending Curve Entity: The selected spending curve entity. It is a read-only field.
Applicable Financial Type: The financial type to which the spending curve entity is matched. It is a read-only field.
Template Name*: The name of the template. It should be unique under the same spending curve entity & financial type.
Description: The detail description of the template.
Status: The status of the template. Only Active templates can be used by spending curves.
Is default template: Marks the current template as the default template for its specific spending curve entity. Note: There has to be one template set as the default template for a spending curve entity. So when you add a template for a spending curve entity for the first time, it will be set as Active and Default automatically.
Select Attributes for Spending Curve
You can move available attributes between two list boxes - Available Attributes & Selected Attributes by clicking ![]() and
and ![]() . The selected attributes will be displayed as line items in the list box on the right. The required attributes will be automatically selected by the system and cannot be removed.
. The selected attributes will be displayed as line items in the list box on the right. The required attributes will be automatically selected by the system and cannot be removed.
You can mark the selected attributes as Required or change their widths (measured in pixels). You can also change the order of the selected attributes by clicking ![]() and
and ![]() .
.
If you cannot find the attributes you want in the Available Attributes list box, you can add custom attributes by clicking the Add a New Attribute icon ![]() above the list box, then system will pop up the Add Attribute page.
above the list box, then system will pop up the Add Attribute page.
Once a new attribute has been added, go back to this page and click the Refresh Attributes List icon ![]() . The newly added attributes will be shown in the Available Attributes list box.
. The newly added attributes will be shown in the Available Attributes list box.
You can pre-define spending curve line items with specified cost distribution method based on the duration of schedule template tasks. These line items will be automatically loaded into corresponding spending curves when this template is applied.
The required fields are noted with an asterisk (*).
Schedule Template: The schedule template assigned to this spending curve template. You can select one of the available schedule templates in the dropdown list.
Task: A task from the selected schedule template for a spending curve line item. You can click ![]() to load a task from the selected schedule template into the current spending curve line item.
to load a task from the selected schedule template into the current spending curve line item.
Cost Category*: The classifications of costs. Each cost category will be assigned to a task for cost distribution purpose, and duplicated cost categories are not allowed in all current spending curve line items.
Spending Curve Type: The type of the spending curve. There are two types:
❖Manual: User can input multiple spending curve rates manually.
❖Linear: The cost will be distributed evenly. Only a fixed percentage distribution (which is, 0%-100%-100%) will be automatically populated and it is read-only.
Estimated Cost: The total cost will be distributed by each spending curve line item. It cannot be edited in a spending curve template.
UTD Actual Cost: The up to date actual cost. It cannot be edited in a spending curve template.
Distributed Cost: The cost to be distributed. It cannot be edited in a spending curve template.
Start %, End % and Cost %: The spending curve rates for cost distribution purpose. E.g. "0%-50%-50%" means in the task duration period 0%~50%, 50% of total cost will be consumed. Note: When you manually input these rates, you should follow the rules below:
❖The Start % and End % ranges should be consecutive without any overlap. For example, 0-30%, 30%-50%, 50%-100%.
❖The sum of Cost % must be 100%.
❖The final End % must be 100%.
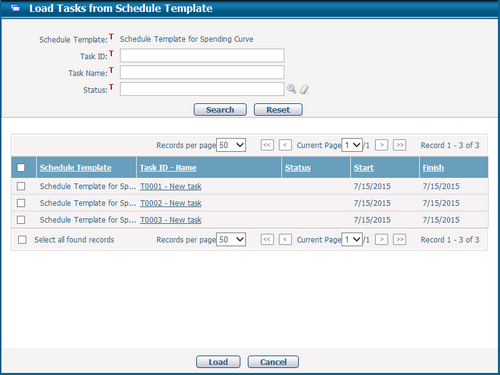
You can load multiple tasks from a selected schedule template into spending curve line items by clicking ![]() icon, and a popup screen will be shown as below. After you select the tasks and click Load button, the new spending curve line items will be added with the selected tasks' information.
icon, and a popup screen will be shown as below. After you select the tasks and click Load button, the new spending curve line items will be added with the selected tasks' information.
You can enter a number in the Lines text box and then click the Add Row icon ![]() on its right, and the specified number of new line items will be added below all existing items.
on its right, and the specified number of new line items will be added below all existing items.
You can rearrange a line item by clicking and holding Drag and Drop icon ![]() , and then drag it before or after another line item.
, and then drag it before or after another line item.
You can click the Add a New Line Item icon ![]() on the left of a line item, and a new line item will be inserted after the selected line item.
on the left of a line item, and a new line item will be inserted after the selected line item.
You can click the Remove This Line Item icon ![]() on the left of a line item, and the selected line item will be removed.
on the left of a line item, and the selected line item will be removed.
You can click the Duplicate This Line Item icon ![]() on the left of a line item, and a new line item same as the selected line item will be inserted after it.
on the left of a line item, and a new line item same as the selected line item will be inserted after it.
You can click the Add a New Rate icon ![]() next to the Cost% column, and a new rate will be inserted after the selected rate.
next to the Cost% column, and a new rate will be inserted after the selected rate.
You can click the Remove This Rate icon ![]() next to the Cost% column, and the selected rate will be removed.
next to the Cost% column, and the selected rate will be removed.
Once you've finished editing, click the Save button to save the spending curve template.
Note: If you have changed the spending curve line item structure for a template already in use, you need to save it in a new template name or you can click Save & Apply to All button to save and apply the change to all spending curves using this template, and a popup screen will be shown for you to choose which option should be used to handle the existing spending curves when applying this template.
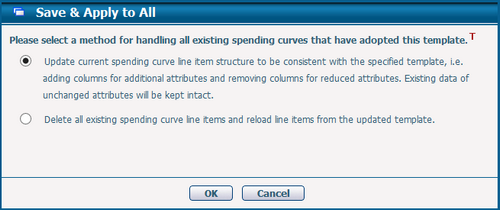
- Option 1: Update spending curve line item structure to be the same as the selected template and convert previously entered line item data automatically.
- Option 2: Clear all previously entered spending curve data and update spending curve line item structure. Then the system will populate the pre-defined line items automatically from the selected template if they can be matched to the tasks of the current schedule with the same source schedule template task IDs (that means the current schedule must be sourced from the same schedule template defined in the selected spending curve template). If no schedule tasks can be matched by this rule or the current schedule is unselected, the spending line item grid will be empty and user will need to manually input new line items.
Click the Delete button to delete the current template and return to the Browse Spending Curve Templates page. Note: You cannot delete a template which is in use.
Click the Cancel button to abort the current edit and return to the Browse Spending Curve Templates page.