Navigate Here: Utilities > Custom Field Management > Add Attribute
You can add an attribute/custom field to data entry and edit pages on the Add Attribute page.
If you access this page by clicking the Add Attribute icon ![]() on the Browse Attributes page, the Entity Name will default to the selected entity on that page.
on the Browse Attributes page, the Entity Name will default to the selected entity on that page.
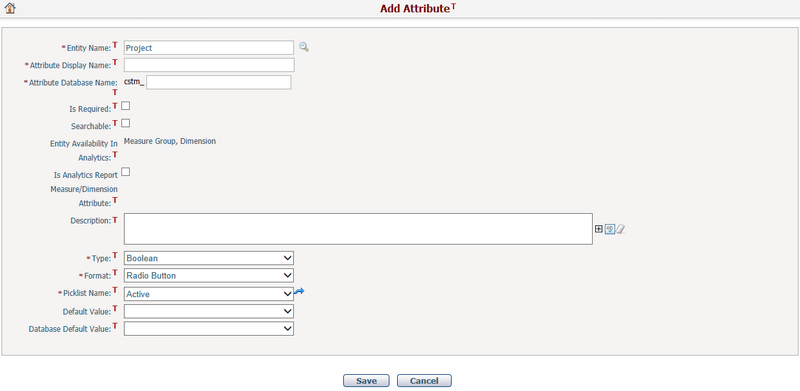
To add an attribute, fill in the following fields:
The required fields are noted with an asterisk (*).
Entity Name*: The entity in which the attribute will be located. Click ![]() to show the entities which are currently available for selection.
to show the entities which are currently available for selection.
Attribute Display Name*: The name of the attribute which will be displayed on the page.
Attribute Database Name*: The name of the attribute which will be used as an identifier in the system database.
Is Required: Checking this checkbox means that data input is required for this attribute; not checking this checkbox means that it is optional.
Searchable: Checking this checkbox means to display this field in the search result table on the Browse this Entity page.
Description: Additional notes or description on the attribute.
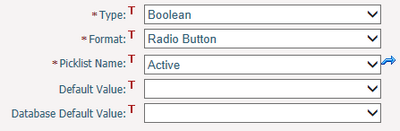
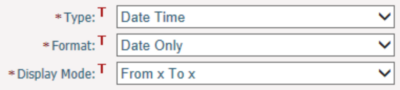
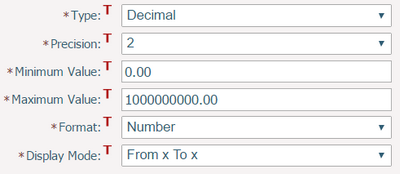
Type*: The data type of the attribute.
The system will load different configurable attribute settings base on the attribute type selected. There are nine attribute types available as listed below:
Boolean data type is for "one way or the other" data entries.
There are four Format options can be selected for the pick list showing on the form:
❑ Radio Button ❑ Checkbox (label on the left side) ❑ Checkbox (label on the right side) ❑ Checkbox (description on the right side)
You can select a Boolean type Picklist by the name from the drop down list which can be defined in Manage Picklists function.
For example: Active, with options Active and Inactive.
Then you can set the Default Value of the pick list as well.
|
Date Time data type is for recording date and time.
For the Format, you can select either Date Only or Date and Time.
For the Display Mode, you can decide how this date/time will be displayed when it is used as a searching criterion. "From x To x" means that you'll be looking for data within a certain time period. "From x" means that you'll be looking for data after a certain date. "To x" means that you'll be looking for data takes place before a certain data.
|
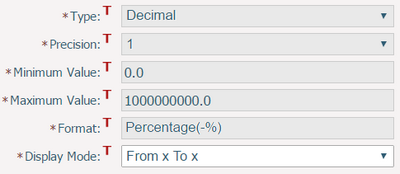
Decimal data type is for numbers with digits behind the decimal point.
You can specify below settings for a Decimal attribute:
Precision: The digits behind the decimal point, by default it is 2.
Minimum / Maximum Value: The range of the input value, by default it is 0 ~ 1000000000.
Format: There are two options:
❑ Number: The decimal will be displayed in number format with decimal point. ❑ Percentage % (decimal input): The inputted decimal will be converted into a percentage format by the system automatically. For example, 0.1 will be displayed as 10% and -0.1 will be displayed as (10%).
Note, there is another format as "Percentage (-%)" that is reserved for system attribute use only, so it cannot be selected for a new decimal.
|
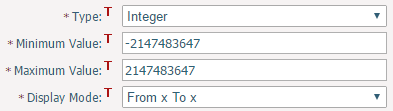
Integer data type is for whole numbers.
You may set the Minimum and Maximum values allowed for an integer attribute within the range of the system default minimum and maximum values shown. |
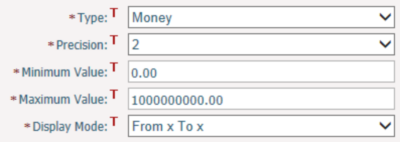
Money data type is for currency values.
You may set the Minimum and Maximum values allowed for a money attribute within the range of the system default minimum and maximum values shown. |
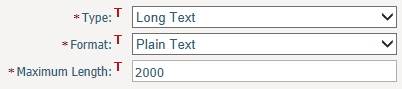
Long Text data type is for entering large amount of text data.
You may set the Maximum Length allowed for a text attribute within the range of the system default maximum length shown. You may select one of the two formats:
❖Plain Text: It allows plain text entry only. ❖Rich Text: It allows rich text entry including formatted texts and images. |
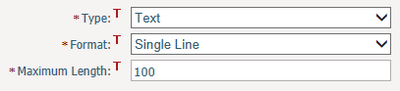
Text data type is for entering simple text data.
You may set the Maximum Length allowed for a text attribute within the range of the system default maximum length shown. You may select one of the five Text type formats:
❖Single Line: It allows data entry in a single line. ❖Multiple Lines: It allows data entry in multiple lines. ❖Regular Expression: It allows data entry in a single line with the addition of format verification. Enter the data format in the Regular Expression field. For example, regular expression format for email is \w+([-+.]\w+)*@\w+([-.]\w+)*\.\w+([-.]\w+)*. ❖Hyperlink: It allows data entry as a hyperlink, clicking the hyperlink will open a new window. ❖Image: It allows image placement. |
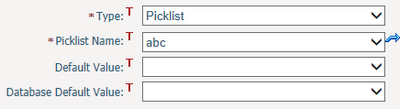
Picklist data type is for dropdown list fields.
You can select a picklist from the Picklist Name dropdown field as well as its default display value to deploy that picklist in the selected entity. Available picklists for selection are those Normal type picklists listed in Manage Picklists page. |
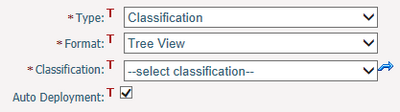
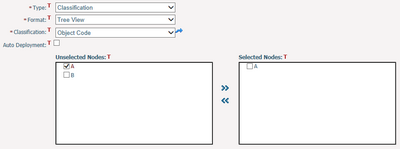
Classification data type is for creating a dropdown list field from existing classifications. Unlike Picklist data type, you can select which nodes of the selected classification will be used as values in the dropdown list. The name of an attribute of this data type will be the same as that of the selected classification.
Auto Deployment: It will be checked by default, meaning that all active nodes of the selected classification will be automatically selected whenever new nodes are added to the classification. If it is unchecked, you can select the particular nodes from Unselected Nodes box into Selected Nodes box manually as shown below. All the selected nodes will be highlighted in red in the Unselected Nodes box.
|
Click the Save button to save the new attribute and the system will go to the Browse Entities page for this entity.
Click the Cancel button to go to the Browse Attributes page without saving the new attribute.
Note: The attribute added on this page is NOT a system attribute of the selected entity. You can delete it on the Browse Attributes page or Manage Attribute page. System attributes cannot be deleted.