Navigate Here: Users > User Management > Import Domain Accounts
You can import domain accounts to the system on the Import Domain Accounts page.

To import domain accounts and associate them with CIPAce accounts, follow these steps:
Domain*: Select a domain from the Domain dropdown list. If the domain isn't in the dropdown list, you can click the Add icon
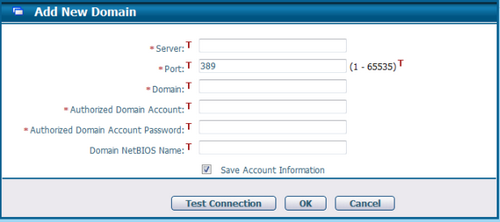
To add a new domain, fill in the following fields:
The required fields are noted with an asterisk (*).
Server*: The name of the Server.
Port*: Default port number is 389 generated by system. You can enter non-default port number (must be integer) between 1 and 65535.
Domain*: The name of the Domain.
Authorized Domain Account*: An account in the domain.
Authorized Domain Account Password*: The password of the domain account.
Domain NetBIOS Name: .
Save Account Information: Whether to save the account information provided above into database. With the account information saved, you will no longer need to provide the account information when you want to connect to the domain on other pages. But if you don't want to save the account information for security concerns, you can make this option unchecked. In that case, you will be required to provide account information every time when you intend to connect to the domain.
Click the Test Connection button, the system will test the connection to the domain by the account and password you entered.
Click the OK button to save the information. The system will also perform the validation of the domain before saving the information. It will not save the domain if it fails the validation. After saving the domain successfully, the system returns the Import Domain Accounts page and the Domain dropdown list will show the newly added domain. (If you want to abort adding the new domain, you can click the Cancel button to close the pop-up window.)
Authorized Domain Account*: Enter a domain account to connect to the selected domain. This field is invisible if the selected domain already has a saved account in database.
Authorized Domain Account Password*: Enter the password of the authorized domain account. This field is invisible if the selected domain already has a saved account in database.
Click the Connect button, the system will connect to the domain, and show the Search Domain Accounts section. |
OU/Group*: Select one or multiple OUs or groups from the hierarchy of the selected domain by clicking the lookup icon
Domain Account, First Name, Last Name, Department: You can refine your search by filling in these criteria.
Result Filter: It has two options "Non-Existing Domain Accounts" and "Existing Domain Accounts". By default, the former option is selected, meaning that only domain accounts that haven't been associated with CIPAce accounts will be listed in the result table. If the latter option is selected, it means that only domain accounts that have already been associated with CIPAce accounts will be listed in the result table.
Click the Search button, the domain accounts matching search criteria will be listed in a table below. (You can clear your entries of search criteria by clicking the Reset button.) |
If Result Filter is "Non-Existing Domain Accounts", you have two options to import the listed domain accounts.
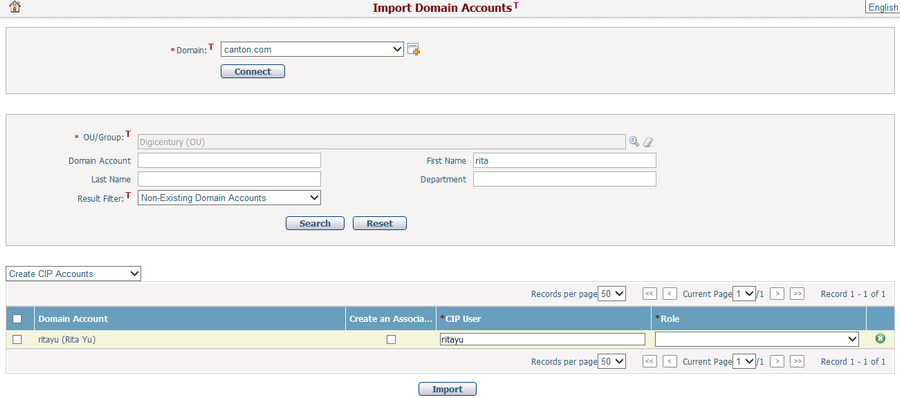
Option 1: Create CIP Accounts (this option is selected by default)
For this option, the result table contains four columns as introduced below:
Domain Account: It shows the user ID and full name of each domain account listed.
Create an Associated Resource and Update Resource Info: Check this checkbox to create a resource for the to-be-created CIP Account when importing the domain account.
CIP User*: It shows the user ID of each domain account listed by default. You can modify the default value if necessary. Value of the textbox will be the User Login Name of the to-be-created CIP account.
Role*: It shows all user roles in the system. You can select an appropriate role for the to-be-created CIP account.
Exist (shown as
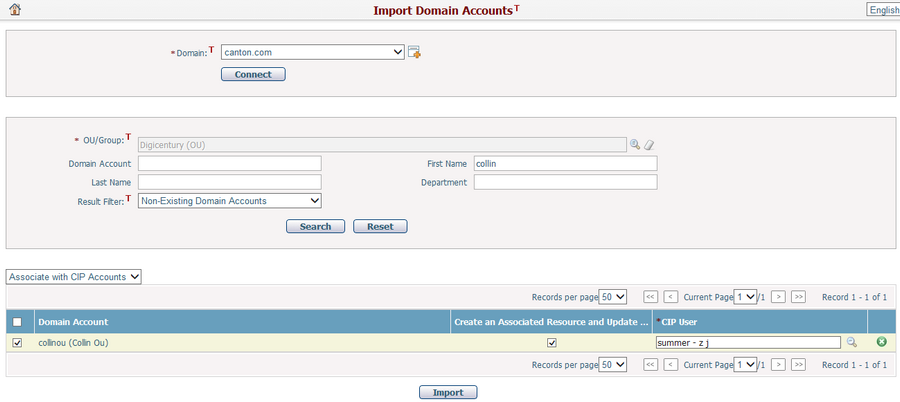
Option 2: Associate with CIP Accounts
For this option, the result table contains three columns as introduced below:
Domain Account: It shows the user ID and full name of each domain account listed.
Create an Associated Resource and Update Resource Info: Check this checkbox to update corresponding resource when associating the domain account with an existing user.
CIP User*: You can select a user in the system to associate with the domain account by clicking the magnifier icon
Exist (shown as
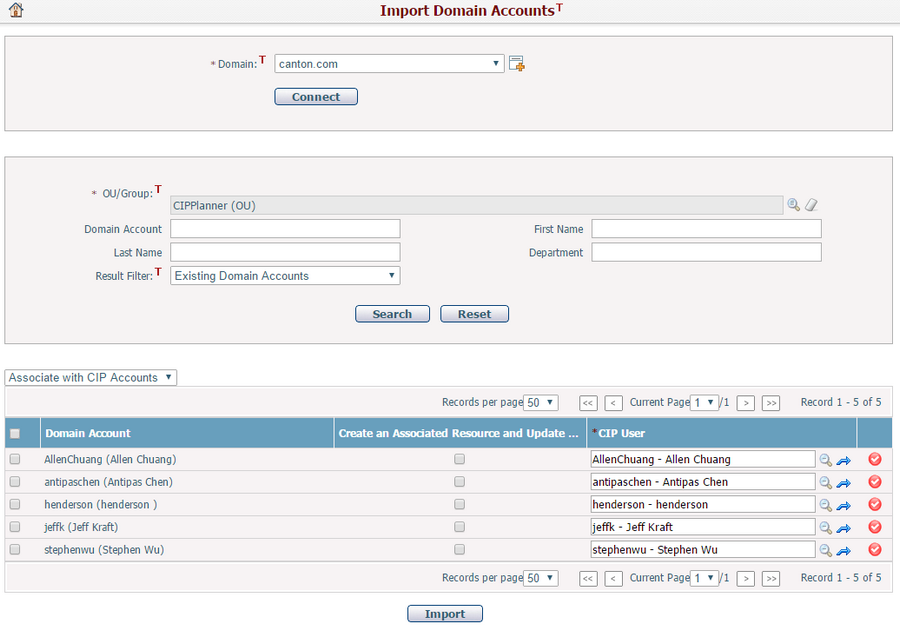
If Result Filter is "Existing Domain Accounts", you have only one option to import the domain accounts, that is "Associate with CIP Accounts".
For this option, the result table contains three columns as introduced below:
Domain Account: It shows the user ID and full name of each domain account listed.
Create an Associated Resource and Update Resource Info: Check this checkbox to update corresponding resource when associating the domain account with an existing user.
CIP User*: It shows the User Full Name of the associated CIP account. If necessary, you can select another user in the system to associate with the domain account by clicking the magnifier icon
Exist (shown as
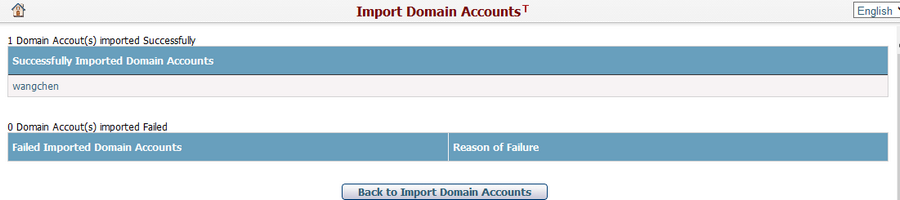
Select the domain accounts you want to import, and then click the Import button. The system will import the accounts you selected and go to the Import Result page. It shows which accounts have been successfully imported, which ones failed and the reason for failure:
Click the Back to Import Domain Accounts button to go back to the Import Domain Accounts page.
|