Navigate Here: Users > User Management > Browse Domain Accounts
You can browse all domain accounts that are associated with CIPAce accounts on the Browse Domain Accounts page. Each domain account can only be associated with one CIPAce account.
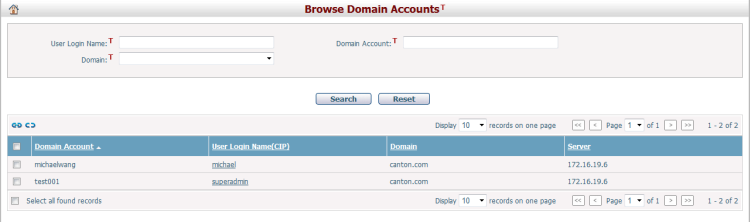
A brief summary of each domain account displays in the table. The summary includes Domain Account, User Login Name(CIP), Domain, and Server. You can sort the accounts by clicking the linked column headers. If there are too many records to display on one page, you can use the navigation control to view another page. Each domain account can only be associated with one CIPAce account.
You can quickly find the accounts you want by using the search function. Enter search conditions in the search fields and click the Search button. The search result table will show the records that match the search conditions. Click the Reset button to clear the conditions in the search fields.
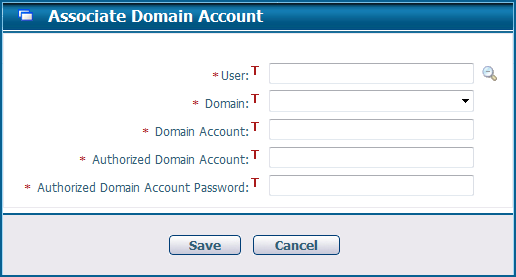
To create an association, click the Associate icon
Fill in the following fields:
The required fields are noted with an asterisk (*).
User *: Select a CIPAce user by clicking the Magnifier icon
Domain *: Select a domain from the Domain dropdown list.
Domain Account *: Enter a domain account from the domain you selected.
Authorized Domain Account *: Enter a domain account to connect to the selected domain. This field is invisible if the selected domain already has a saved account in database.
Authorized Domain Account Password *: Enter the password of the authorized domain account. This field is invisible if the selected domain already has a saved account in database.
Click the Save button to create the association. The system will validate the domain account before creating the association. If validation fails, there will be no association. |
To disassociate a domain account from a user, select an account from the table and click the Disassociate icon
If you want to remove all associations in the system, you can check the Select all found records checkbox to select all items in the table and then click the Disassociate icon
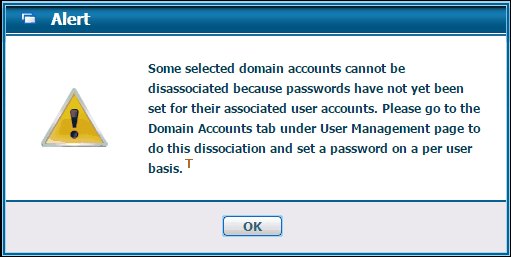
If users select and disassociate a domain account whose associated user account has no passwords, an alert will be prompted:
For this case, please go to the Domain Accounts tab under User Management page for dissociation and set up passwords for each disassociated user account.
|