Navigate Here: Utilities > Custom Field Management > Browse Entities, click the Manage Views link of an entity > Browse Views, click the View Name link
You can edit a dynamic view of an entity on the View Management page.
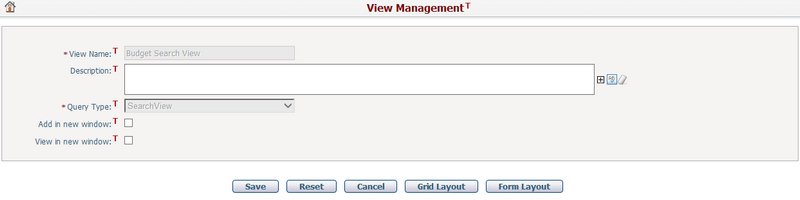
You can view or update the following fields:
The required fields are noted with an asterisk (*).
View Name*: The name of the view. It is a read-only field.
Description: The detail description of the view.
Query Type*: The type of the view. It is a read-only field.
Add in new window: This option controls if the system will open a new tab page in the browser when clicking the Add icon ![]() in the view.
in the view.
View in new window: This option controls if the system will open a new tab page in the browser when clicking the Edit icon ![]() in the view.
in the view.
Click the Save button to save the changes and the system will return the Browse Views page.
Click the Reset button to clear the latest inputs.
Click the Cancel button to return to the Browse Views page without saving.
Click the Grid Layout button to edit the grid layout of the view in a new window.
Click the Form Layout button to edit the form layout of the view in a new window.
You can modify the grid layout of a view through the view editor.
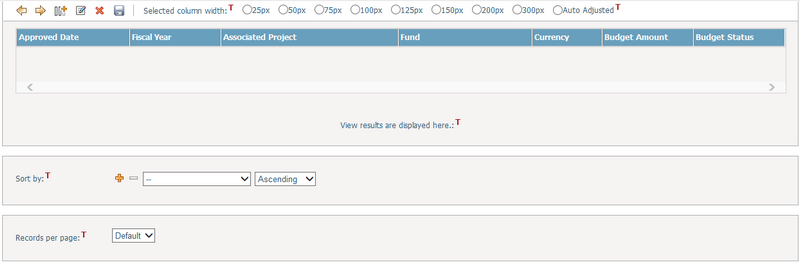
To add columns, click on the view result area, and click the Add Fields icon ![]() in the tool bar. The system will pop up the Add Fields window, and you can select the available attributes and click the OK button to put them into your Grid Layout. The columns of the selected fields will be inserted after the selected column in the view results area.
in the tool bar. The system will pop up the Add Fields window, and you can select the available attributes and click the OK button to put them into your Grid Layout. The columns of the selected fields will be inserted after the selected column in the view results area.
To change a column's alias name, select the column and click the Modify Field Name icon ![]() in the tool bar. The system will pop up the Modify Field Name window for you to update the alias name.
in the tool bar. The system will pop up the Modify Field Name window for you to update the alias name.
To remove a column, select the column and then click the Remove icon ![]() .
.
To reorder a column, select the column and then click the Move Left icon ![]() or the Move Right icon
or the Move Right icon ![]() .
.
To specify a column's width, select the column and then select a width value (in pixels) from the corresponding radio buttons on top of the view result area. If Auto Adjusted is selected, the column's width will automatically fit the table. The administrator can also configure the minimum width for the auto-adjusted columns and the displaying format for column names with long text (either wrapped or shrink).
To set the default sorting, select a sorting field in the "Sort by" section with either ascending or descending method or click ![]() to add additional sorting fields.
to add additional sorting fields.
To set the default Records per page, select the number of records from the dropdown list.
Click the Save icon ![]() to save the grid layout.
to save the grid layout.
You can modify the form layout of the searching conditions of a view through the form editor.
A search form is composed of titles, sections and fields.
Title
Click the Change Form Titles icon ![]() to pop up Form Titles screen.
to pop up Form Titles screen.
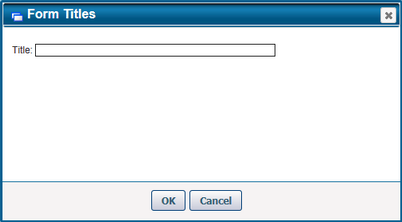
You can input a new title in the textbox to replace the pre-defined title and click the OK button to return to the form editor.
Section
To add a section, click the Add a Section icon ![]() in the tool bar. The system will pop up the Section Property window for your new section.
in the tool bar. The system will pop up the Section Property window for your new section.
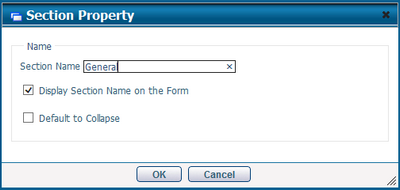
Fill in the following fields or options:
Section Name: The name of the section.
Display section name on the form: This option controls if the section name will be displayed on the search form. It is checked by default.
Default to Collapse: This option controls if this section will be expanded or collapsed on the search form.
Once finished, clicks the OK button and the new section will be shown at the bottom of the form.
To edit a section's properties, select a section by clicking on the section area, then click the Change Property icon ![]() . The system will pop up the Section Property window for your modification.
. The system will pop up the Section Property window for your modification.
Field
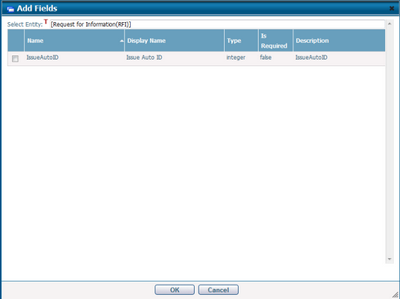
To add fields into a section, select a section by clicking on the section area, then click the Add Fields icon ![]() . The system will pop up the Add Fields window. Select the available fields and click the OK button, and they will be add to the bottom of the selected section. Note, the display name of the field will be shown as field label, and its database name will be shown in the textbox for your reference.
. The system will pop up the Add Fields window. Select the available fields and click the OK button, and they will be add to the bottom of the selected section. Note, the display name of the field will be shown as field label, and its database name will be shown in the textbox for your reference.
To edit field property, select a field and click the Change Property icon ![]() . The system will pop up the Field Property window.
. The system will pop up the Field Property window.
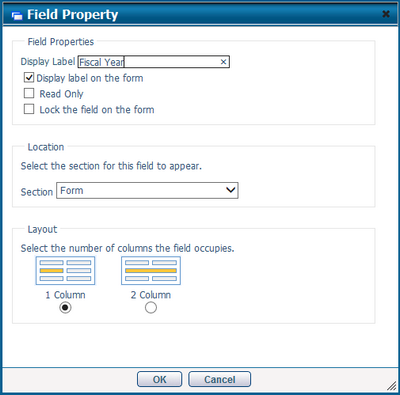
Fill in the following fields or options:
Display Label: By default, it is the display name of the field. You can change its field label for this form only.
Display label on the form: If it is checked, the label will be shown on the form, or it will be hidden. It is checked by default.
Read-only: If it is checked, the field is read-only on the form, or it is editable.
Lock the field on the form: If it is checked, the field cannot be deleted from the form editor.
Location: You can set which section the field will be located on the form, select an existing section from the Section list and the field will be repositioned to the bottom of the section.
Layout: You can set the layout of the field on the form, there are two options: 1 Column or 2 Column.
Once finished, click the OK button to return to the form editor with changes applied.
To remove a field or a section, select the field or the section and then click the Remove icon ![]() .
.
To reorder a field or a section, select the field or the section and then click the Move Left icon ![]() , the Move Right icon
, the Move Right icon ![]() , the Move Up icon
, the Move Up icon ![]() , or the Move Down icon
, or the Move Down icon ![]() .
.
To remove the empty rows in a section, select the section and click the Remove Empty Row icon ![]() .
.
Click the Save icon ![]() to save the form layout.
to save the form layout.