Navigate Here: Users > Access Control > Add Data Access Control Rule
Administrators can set a data access control rule on the Add Data Access Control Rule page.
To add a data access control rule, first provide the general information by filling in the following fields on the General Information tab.
The required fields are noted with an asterisk (*).
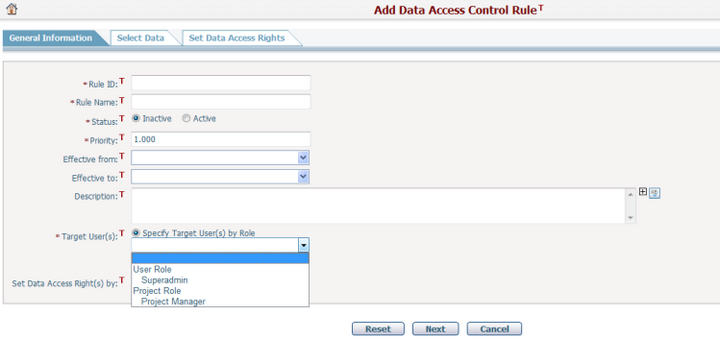
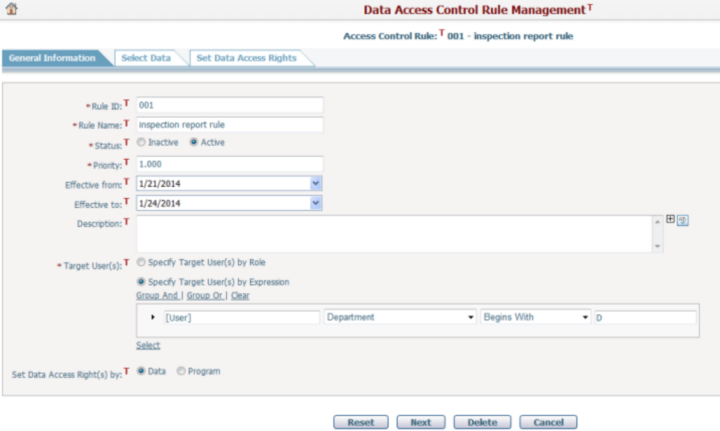
Rule ID*: The ID of the rule and it must be unique among all data access rules.
Rule Name*: The name of the rule and it must be unique among all data access rules.
Status*: Specify whether the rule is active or inactive. By default is Inactive.
Priority*: The priority of the rule. The priority value must be unique in all data access rules. The smaller the number, the higher priority the rule has. The default value is set to 0.1 plus the largest number of the existing rules. If there is no existing rule, the default priority is 1.000.
Effective from: The start date of the effective period of the rule. If it is not set, the rule is effective from the create date.
Effective to: The end date of the effective period of the rule. If not set, the rule is effective from the Effective from date and has no end date.
Description: Description of the rule.
Target User(s): Select the target user(s) the rule will apply to. You can select user(s) by: Specify Target User(s) by Role or Specify Target User(s) by Expression.
❖Specify Target User(s) by Role: You can select a user role or project role from the dropdown list.
❖Specify Target User(s) by Expression: You can select user(s) by defining an expression.
Set Data Access Right(s) by: you can set how you want to set data access rights. There are two options: by Data or by Program. If you want to set what programs can access specific data, select Data; if you want to set what data can be accessed by specific programs, select Program.
Click the Reset button to clear all inputs.
When the general information is done, click the Next button to go to the next tab. The next tab will be either Select Data or Select Program base on your selection on Set Data Access Right(s) by. |

Set Data Access Right(s) by Data
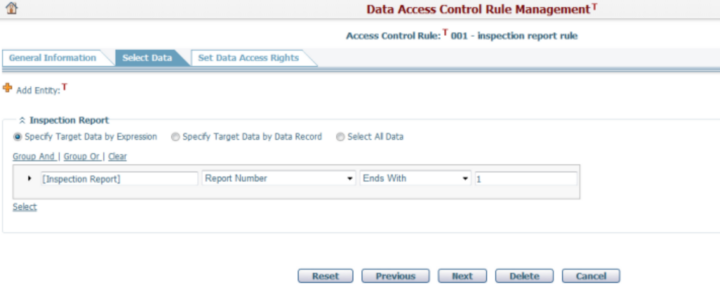
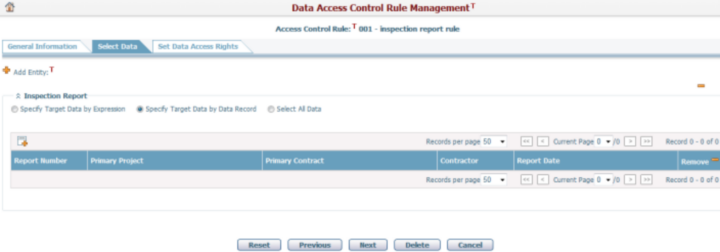
Select Data
If you select Set Data Access Right(s) by Data under the General Information tab, you will see the following screen under the Select Data tab.
Please click
After entity is selected, you can select Specify Target Data by Expression, Specify Target Data by Data Record or Select All Data
❖Specify Target Data by Expression: you can specify target data by defining an expression.
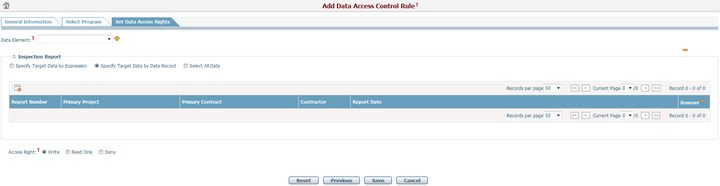
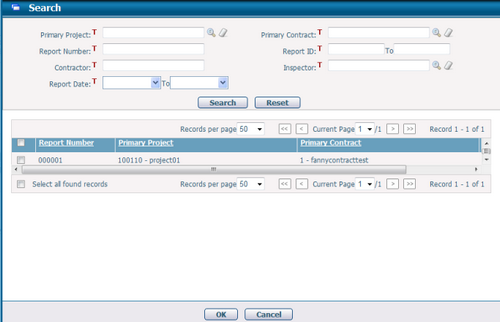
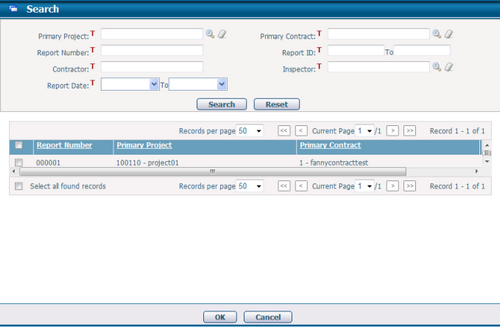
❖Specify Target Data by Data Record: you will see a data record table if you select Specify Target Data by Data Record.
- Click
- When the selection is done, click the OK button to close the window and return to the Select Data tab.
- You can click
- After you specified the data element, you can click
❖Select All Data: All data listed under your selected entity will be selected.
Click the Previous button to go back to the General Information tab.
Click the Reset button to clear all inputs.
When you are done with Select Data, click the Next button to go to the Set Data Access Rights tab.
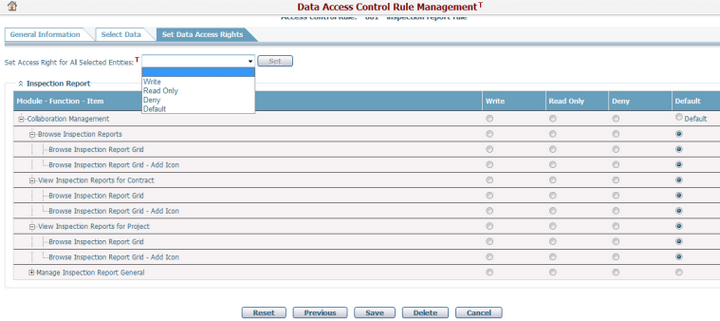
Set Data Access Rights
A field Set Access Right for All Selected Entities is on top of this grid with five options: Blank option/Write/Read only/Deny/Default. You can set same access rights in terms of Module-Function-Item for all selected entities in the current access control rule.
The table lists all controllable programs related to the selected data (for example, inspection report as shown here) on the Select Data tab and their access settings by three levels: Module - Function – Item. You can click
There are three categories of access rights: Read Only, Write, and Deny.
❖When Read Only is selected all the content is read-only by default, which means new content cannot be added and the current content cannot be modified. ❖When Write is selected, all relative content becomes editable by default which means that new content can be added and the current content can be modified. ❖When Deny is selected, access to that content is denied.
Click the Previous button to go back to the Select Data tab.
Click the Reset button to clear all inputs.
When the settings are done, click the Save button to save the rule and the system will go to the Manage Data Access Control Rules page. |


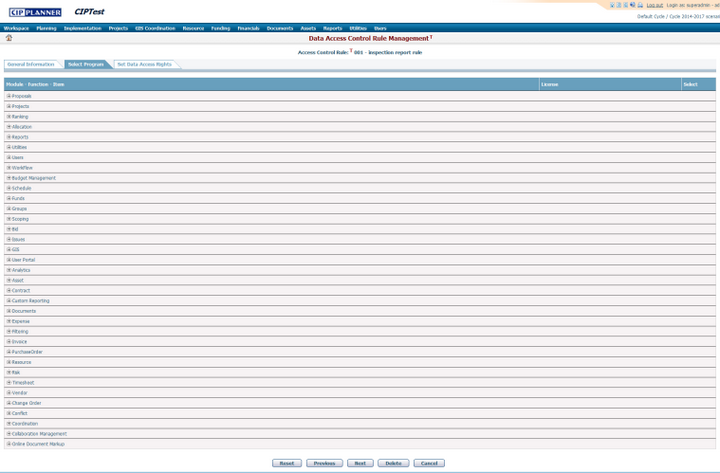
Set Data Access Right(s) by Program
Select Program
If you select Set Data Access Right(s) by Program on the General Information tab, you will see the following screen under the Select Program tab.
The table lists all programs of which data is controllable by three levels: Module - Function – Item and the relative License of each function. You can click
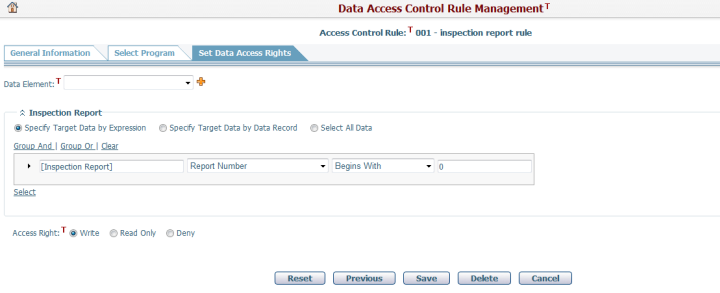
Set Data Access Rights
You can find all data elements of the selected program are listed in the dropdown list under the Set Data Access Rights tab.
Select a data element from the dropdown list and click
Click
After a data element is selected, you can select Specify Target Data by Expression, Specify Target Data by Data Record or Select All Data.
❖Specify Target Data by Expression: you can specify target data by defining an expression.
❖Specify Target Data by Data Record: you will see a data record table if you select Specify Target Data by Data Record.
- Click
- When the selection is done, click the OK button to close the window and return to the Set Data Access Rights tab. You can also click
- After specify target data, you can set the access rights for the specified target data.
❖Select All Data: All data listed under your selected entity will be selected.
Access Right: the Access Right setting of the data element is under each data element section and there are three options: Read Only, Write, and Deny.
❖When Read Only is selected all the content is read-only by default, which means new content cannot be added and the current content cannot be modified. ❖When Write is selected, all the content becomes editable by default which means that new content can be added and the current content can be modified. ❖When Deny is selected, access to that content is denied. When finish the access right setting of the data element, you can click
Click the Previous button to go back to the Select Program tab.
Click the Reset button to clear all inputs.
When the settings are done, click the Save button to save the rule and the system will go to the Manage Data Access Control Rules page. |