Navigate Here: Implementation > Change Order Management > Browse Change Order Requests; select a COR > Financial Impact tab.
You can manage COR Line Items on Edit Change Order Request page - Financial Impact tab.
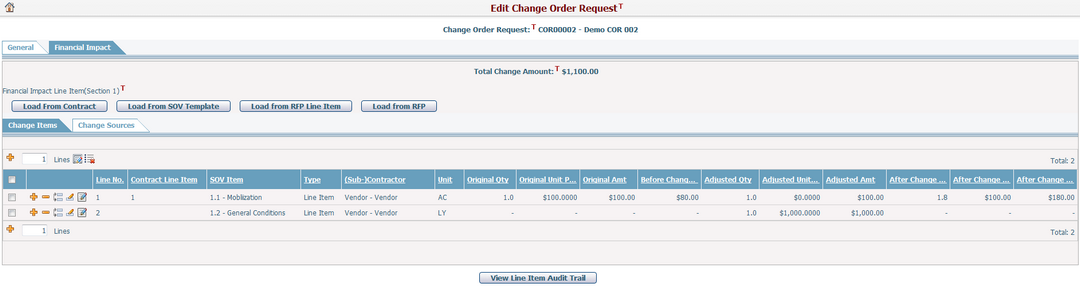
COR line items can be edited when COR status is Draft, Under Review or Rejected.
You can add new COR line items by any of the following ways:
1. Enter a number in the "Lines" textbox and then click the Add icon ![]() in front of it. The specified number of blank line items will be appended to the bottom of the list for you to edit.
in front of it. The specified number of blank line items will be appended to the bottom of the list for you to edit.
2. Click ![]() at the beginning of a line item. A blank line item will be inserted below for you to edit.
at the beginning of a line item. A blank line item will be inserted below for you to edit.
3. Click the Duplicate icon ![]() at the beginning of a line item. A new line item will be copied from this line item and inserted below for you to edit.
at the beginning of a line item. A new line item will be copied from this line item and inserted below for you to edit.
4. Load source line items by clicking the Load From … buttons.
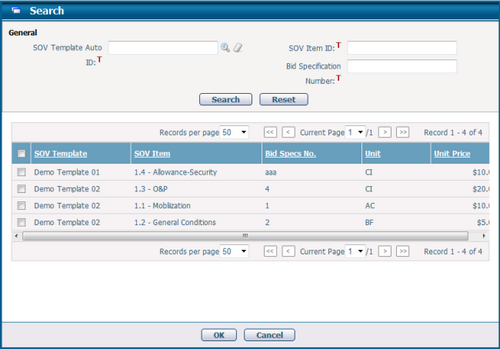
❖Click the Load From SOV Template button: A popup window will be displayed, where you can select SOV template items by a search view. Click the OK button, the popup window will be closed and the selected SOV template items will be inserted as new COR line items with default values of SOV Item, Unit, and Unit Price (if these fields exist in COR line item and configured with Attribute Mapping).
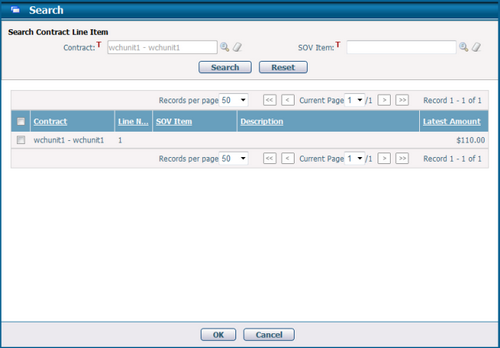
❖Click the Load From Contract button: A popup window will be displayed, where you can select contract line items by a search view. Click the OK button, the popup window will be closed and the selected contract line items will be inserted as new COR line items with default values of (Sub-)Contractor, SOV Item, Unit and related amount fields (if these fields exist in COR line item and configured with Attribute Mapping).
❖Click the Load From Request for Proposal Line Item button: A popup window will be displayed, where you can select RFP line items by a search view. Click the OK button, the popup window will be closed and the selected RFP line items will be inserted as new COR line items with default values of (Sub-)Contractor, SOV Item, Unit and related amount fields (if these fields exist in COR line item and configured with Attribute Mapping).

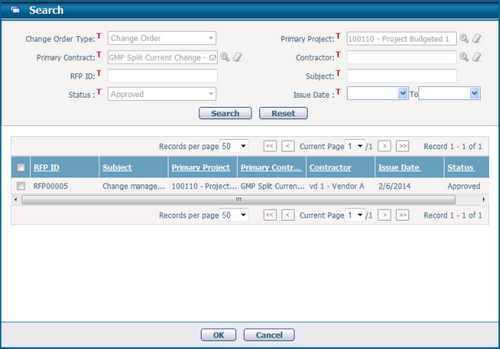
❖Click the Load From Request for Proposal button: A popup window will be displayed, where you can select RFPs by a search view. Click the OK button, the popup window will be closed and all RFP line items under the selected RFPs will be inserted in a batch as new COR line items with default values of (Sub-)Contractor, SOV Item, Unit and related amount fields (if these fields exist in COR line item and configured with Attribute Mapping).
The COR line items are in viewing mode by default. To edit a COR line item, you need to enter editing mode by clicking the Edit icon ![]() at the front of the line or double-clicking the line.
at the front of the line or double-clicking the line.
Line No.: Unique number of the COR line item. It is automatically generated by system and cannot be edited.
SOV Item: Schedule of Value item that describes the work. Browse and select a SOV Item by clicking ![]() .
.
Type: General type of the COR line item, the same type will be applied to contract line item as well. You can manage it on the Manage Picklist page.
(Sub-)Contractor: The Vendor that performs the work of the line item. Browse and select a vendor by clicking ![]() .
.
Unit: The unit of the work for the line item.
Original Unit Price, Quantity and Amount: The initial values of the associated contract line item.
Before Change Amount: The latest value of the associated contract line item.
Adjusted Unit Price, Quantity and Amount: The adjusted values of the COR line item.
After Change Unit Price, Quantity and Amount: The new values of the associated contract line item after applying change from the current COR line item. Its value = [(Original Unit Price + Adjusted Unit Price) x (Original Quantity + Adjusted Quantity)].
Note:
1. If the primary contract of the COR has fallen into below specific contract types, below fields will be shown by COR line item structure configuration.
Cost Type: It is used for NTE contract only. You can manage it on the Manage Picklist page.
Category: It is used for Job Costing Master and Job Order contracts only. You can manage it on the Manage Picklist page.
2. If the new COR line item has no association with any contract line item, its basic information (e.g. SOV Item, Type, (Sub-)Contractor, Unit, etc.) and Adjusted Values should be editable. Otherwise only Adjusted Values can be edited while other fields will be automatically populated to be the same as the associated contract line item. Such population should be setup by Entity Attribute Mapping.
Once you've finished editing a COR line item, click the Update icon ![]() at the front of the line. If you want to discard the editing, click the Cancel icon
at the front of the line. If you want to discard the editing, click the Cancel icon ![]() .
.
You can click the Popup to Edit icon ![]() to enter the Edit Line Item Detail page.
to enter the Edit Line Item Detail page.
You can remove a COR line item by clicking the Remove icon ![]() at the front of the row.
at the front of the row.
You can edit COR line items in batch mode in the following ways:
1. Select line items and click the Batch Delete icon ![]() . These line items will be deleted in a batch.
. These line items will be deleted in a batch.
2. Select line items and click the Batch Update icon ![]() . The following batch update screen will be shown.
. The following batch update screen will be shown.
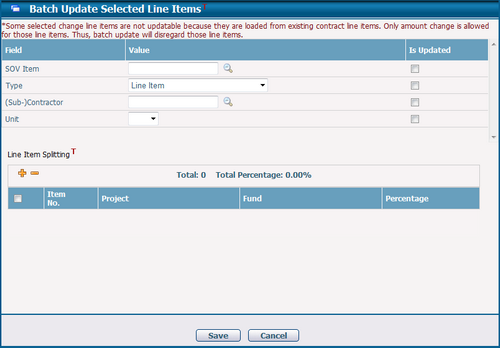
- You can fill in the batch update values and click the Save button at the bottom of the page to save the changes made on selected COR line item(s).
- You can uncheck the “Is Updated” checkbox to deselect any unwanted values from the batch update.
- You can force blank value to overwrite the existing values by checking the “Is Updated” checkbox of that particular field.
- You can add ![]() or delete
or delete![]() split line item(s) if line item splitting is enabled, which will override the existing split line item(s) of the selected COR line item(s).
split line item(s) if line item splitting is enabled, which will override the existing split line item(s) of the selected COR line item(s).
Note: You cannot update the line item which is associated with a specified contract line item. If you select such line items, system will show the warning message on the top of the screen.
You can view COR line items in groups by change sources in Change Sources Tab.

- The system will show all change sources by default, you can select any single change source in the “Group By” dropdown list which is applicable to the current COR line items, the system will then filter the grouping result by your selection.
- You can remove a COR line item group by clicking the Remove icon ![]() at the front of the line, all the COR line items in the group will be deleted in a batch.
at the front of the line, all the COR line items in the group will be deleted in a batch.
You can view the change history of COR Line Items by clicking View Line Item Audit Trail button. The system will then open the Browse Audit Trail Details page in a new window.
Edit Financial Impacts for Parent-Sub Contracts
If the Primary Contract of this COR is a parent contract, the UI of Financial Impact tab will be switched to the following:
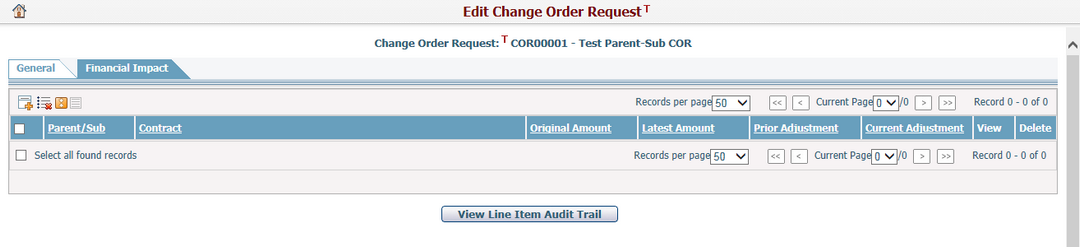
A Change Summary grid is shown on top of the page for you to control the scope of contract changes for this COR:
1. Click the Add ![]() icon to select which contract(s) among the parent-sub contract family you would be involved into the current COR.
icon to select which contract(s) among the parent-sub contract family you would be involved into the current COR.
2. A pop up will show up to allow you to select one or multiple contracts from this family to make changes.
3. Selected contracts will be shown in the grid.
4. Click on the View Detail ![]() icon of a contract in the grid to show its line item sections respectively.
icon of a contract in the grid to show its line item sections respectively.
5. Click the Load From Contract button to load the source contract line items into each section for change purpose.
6. Selected contract line items will be loaded into the line item section grid as new change line items.

To adjust the scope of this COR regarding the number of contracts, you can check one or more contracts in the Change Summary grid and click on the Batch Delete ![]() icon to remove these contracts from the COR, all associated sections and change line items will be removed at the same time. Or you can delete one contract by clicking the Delete
icon to remove these contracts from the COR, all associated sections and change line items will be removed at the same time. Or you can delete one contract by clicking the Delete ![]() icon in the grid.
icon in the grid.
You can click click the Collapse/Expand ![]() icon to collapse/expand the Change Summary grid.
icon to collapse/expand the Change Summary grid.
You can click the Generate Change Details Report ![]() icon to generate a change details report about this COR.
icon to generate a change details report about this COR.