Navigate Here: Utilities > Workflow > Manage Workflows; or Utilities > Workflow > Manage Workflow Types, click Define link
The Steps Required to Build a Workflow
Step 1: Business Process Modeling
A workflow is a model to represent real work for further assessment, e.g., for describing a reliably repeatable sequence of operations. Business process modeling is the activity of representing processes of an enterprise, so that the current process may be analyzed and improved in CIPAce. Business users can use business process modeling tools to model their business processes, implement and execute those models, and refine the models based on as-executed data.
Step 2: Select a Workflow Process Type
Currently there are several dozens of workflow processes in CIPAce which are made available to satisfy different business requirements. You may select the one which fits your requirements the most.
Step 3: Process Definition
A workflow process is a series of steps through which work is routed. A workflow process contains a start node, at least one activity and one stop node. Workflow processes can have many steps.
Step 4: Deploy Workflow Process
After you define a workflow process for use in CIPAce, you must deploy it as the current process and make sure the workflow process type is active. |
Understanding The Workflow Designer Toolbar
Copy Process Definition from the Current Version
Click on this icon to copy all information of the current version of the workflow process definition to the version named Latest Definition (Listed in the Version Name dropdown box)
Reset
Click on this icon to reset the current version of the workflow process definition to its original state.
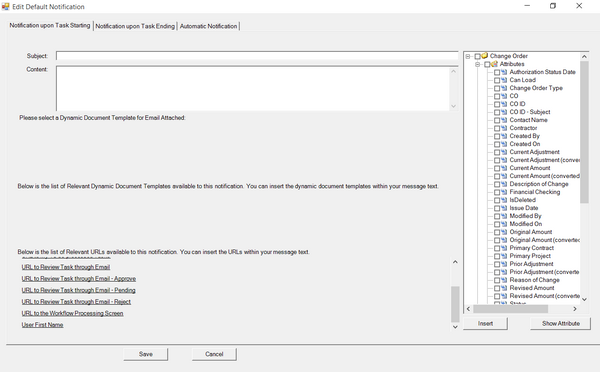
Default Notifications
Click on this icon to setup the following default notifications:
❖Notification Upon Task Starting - default notification(s) sent upon the start of Manual Activities or Replicator Activities ❖Notification Upon Task Ending - default for notification(s) sent upon the end of Manual Activities or Replicator Activities ❖Automatic Notifications - default notification(s) sent upon execution of Auto Email Activities
Newly created Manual, Replicator and Auto Email activities will employ the corresponding notification by default. The interface for configuring all three default notifications are similar:
Subject: specifies the subject of the email notification. Dynamic values can be inserted into the subject.
Content: the main body of the email notification. Dynamic values can be inserted into the main body.
Metadata Tree: is the tree structure that lists all attributes and related entities(and their attributes) of the primary entity of the workflow process. These attributes are the dynamic values that can be inserted into the subject and content of the email notification. To insert a dynamic value, you should:
❖Select attribute(s) from the Metadata Tree. The attributes of the primary entity are displayed by default. You can also find attributes of the related entities by expanding the rest of the tree. ❖Once you have selected the desired attributes, move the text cursor to where you want the dynamic values to appear (in either the subject or content textbox). ❖Click on the Insert button; a text code in curly brackets (such as {A5: [Contract No.]}) representing the attribute(s) will be inserted to the location of the text cursor as dynamic values.
Show Attribute: press this button to view the full path(s) of the attribute(s) that have been inserted into the notification.
Attach Dynamic Document Templates: if there are dynamic document templates already associated with the primary entity, they will be displayed in this section. You can select them as email attachments in PDF or Word Format.
Insert Dynamic Document Templates: if there are dynamic document templates already associated with the primary entity, they will be displayed in this section. You can click the links of these dynamic document templates to insert their content into the email content.
Insert Relevant URLs: commonly used links are available (located at the bottom of the tab) for you to insert into the content of your email notification. They are:
❖URL to My Completed Tasks - link to My Completed Tasks tab ❖URL to My New Tasks - link to My New Tasks tab ❖URL to My To-be-processed Tasks - link to My To-be-processed Tasks tab ❖User First Name - variable to display the participant's first name
Save
Click on this icon to save the current workflow process definition.
Deploy
Click on this icon to deploy the current workflow process definition. You will be prompted to enter the name and description of the deployment version. Please note that a workflow process definition will not become available for usage until it is deployed.
Step
Acts as a container to a group of activities that is executed.
Initial Step
Represents an initialization activity of a step. You can drag and drop this to a step which has no stateInitializationActivity.
Flow Control
A movement from one activity to another activity within a workflow, reflecting a change in the status of the workflow, for example initiating a particular activity.
Condition Control
The conditional logic in the transitions that controls the flow from one activity to another when a workflow process is executed.
Parallel Activity
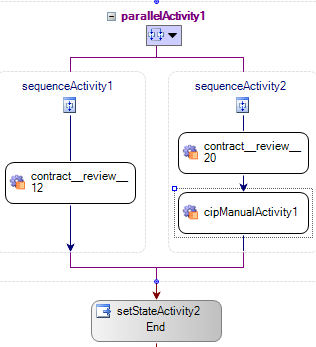
A segment of a process instance, where two or more activity instances are executing in parallel within the workflow, giving rise to multiple threads of control. All activities instances executing in parallel must be completed before the workflow can proceed to the next activity. The number of activity instances has already been specified when defining a workflow process. For example, in the following diagram of a parallel activity, activities instances under contract_review_12, contract_review_20, and cipManualActivity1 must be completed before the workflow can continue to step "End".
Manual Activity
Represents an activity that requires manual intervention or inputs by a user before it can be completed.
Replicator Activity
Replicator activity enables you to create an arbitrary number of instances of a single activity during run time. The number of activity instances cannot be specified when defining a workflow process. For example, a rule can say that the project managers must review their projects. But it is not known which project belongs to how many project managers when defining the workflow process. This will be known only when a workflow instance is running. The activity instances generated by a Replicator Activity will be executed in parallel and they must all be completed before the workflow can proceed to the next activity.
Auto Email Activity
Represents an automatic activity for sending email notifications that will be executed by the system that does not require manual intervention.
Auto Attribute Update Activity
Represents an automatic activity for updating certain entity attributes (in most cases, the attribute indicates business status of the entity; e.g. the approval status of a contract) that will be executed by the system without the need for manual intervention.
Auto Processing Activity
Represents an automatic activity for running a predefined business process (e.g. generate budgets after financial scoping of a project is approved) that will be executed by the system without the need for manual intervention.
|
Understanding Workflow Participants
A workflow may contain activities that require manual intervention or input by a user before it can be completed. This user is called a workflow participant. (Note: one exception is that, in Auto Email Activity, workflow participant refers to users who will receive the email notifications.)
Workflow participants can be specified by User, by Role, and by Dynamic Role. You can specify participants by using one or more ways.
By User
Select participants from a list of system users.
By Role
Select participants from users of a specific organizational role. A role is a class of users who perform the same type of work, such as clerks or managers. Roles can direct the work to a class of system users. Your business rules typically specify the work to be performed by a role. For example, a rule may specify that department managers (a role) must approve external course requests.
Roles remain unchanged even as people change jobs. For example, if an employee in the Research and Development (R&D) department requests an external class, the system will forward the request to the R&D Manager. Therefore, even Vic Rumpel, the current R&D manager, gets promoted to a different position meanwhile, the new R&D Manager will still receive the request.
By Dynamic Role
You can select participants by specifying a dynamic expression. Roles of the participants are dynamic in an organization. For example, some employees can be architects of the R&D department and the project managers of a construction project at the same time. With Dynamic expression, you can select those employees as participants by constructing a dynamic expression that selects users that are under both the architect role and project manager role. |
Take Budget Initial Record Review for example. Go to Utilitles>>Workflow>>Manage Workflow
1.Select Budget Initial Record Review from the Workflow List dropdown list. If the workflow process type has never been defined, there will two steps (Start and End) in the design area.
2.Drag two Steps from the tool bar on the left side into the design area, and enter “PMReview” and “FinancialManagerReview” respectively into the ActivityName field in the properties box on the left side.
3.Double-click on the Start step box. The design area refreshes and a link named "CIP Workflow" will be on the left top of the design area, while the middle of the Start step box changes to its editable status.
4.Drag Flow control into the Start step box and select "PMReview" from the TargetStateName list in the properties box on the left side, and then click on the CIP Workflow link. An arrow connecting from Start step box to PMReview step box has been established.
5.Double-click on the PMReview step box and drag a "Manual activity" to where it says "Drop Activities Here". A Manual activity with default name "cipManualactivity1" has been added to the "PMReview" step box.
6.Right click on "cipManualActivity1" and select "Edit Activity". A window named "Edit Activity" pops up.
7.Enter "PM Review" as the Activity Name, select "User" as Participant Type, check "admin super" as the participant, specify "Budget Change Record Review" from " Invoked Application", select the "Review" checkbox, and then navigate to the "Status" tab, select “Pre-approved” and “Pre-rejected” statuses, and click Save. A message "Activity has been saved successfully" pops up and the "Edit Manual Activity" window will be closed after "OK" is clicked.
8.Drag Condition control into the PMReview step box. By default two “ifElseBranchActivities” are displayed.
9.Select “ifElseBranchActivity1”, right click your mouse, and select “Edit Activity”. A window named “Edit Transition” pops up.
10.Create a Conditional Expression “budget change.Status ID Equals Pre-approved”, and click Save. A message "Transition has been saved successfully" pops up and the "Edit Transition" window will be closed after "OK" is clicked.
11.Select “ifElseBranchActivity2”, right click your mouse, and select “Edit Activity”. A message “The current branch is the end branch of the “ifelse”, so it will be set the current branch is a Catch All Routing.” pops up. Click OK. A message "Transition has been saved successfully" will pop up.
12.Drag Flow control into the ifElseBranchActivity1 box and select "FinancialManagerReview" from the "TargetStateName" list.
13.Drag Flow control into the ifElseBranchActivity2 box and select "End" from the "TargetStateName" list, and then click on the CIP Workflow link.
An arrow connecting from the PMReview step box to the FinancialManagerReview step box and another arrow connecting from the PMReview step box to End step box have been established.
14.Double-click on the FinancialManagerReview step box and drag a "Manual activity" into it. A Manual activity with default name "cipManualactivity2" will be added to the "FinancialManagerReview" step box.
15.Right click on "cipManualActivity2" and select "Edit Activity". A window named "Edit Activity" will pop up.
16.Enter "Financial Manager Review" as the Activity Name, select "User" as Participant Type, check "admin super" as the participant, specify "Budget Change Record Review" from " Invoked Application", select the "Review" checkbox, and then navigate to the "Status" tab, select “Pre-approved” and “Pre-rejected” statuses, and click Save. A message "Activity has been saved successfully" pops up and the "Edit Manual Activity" window will be closed after "OK" is clicked.
17.Drag Flow control into the FinancialManagerReview step box and select "End" from the TargetStateName list in the properties box on the left side, and then click on the CIP Workflow link. An arrow connecting from FinancialManagerReview step box to End step box will be established.
18.Click the Save icon. A message "Workflow Process has been saved successfully" will pop up.
19.Click on the Deploy icon. A window named "Deployment Version" will pop up.
20.Enter the Version of the workflow, then click Deploy. A message "Workflow has been deployed successfully" will pop up.
21.Go to the Process Type Management screen and find the Budget Initial Record Review Workflow, check the "Is Active" box. The Budget Initial Record Review Workflow is now active.
|
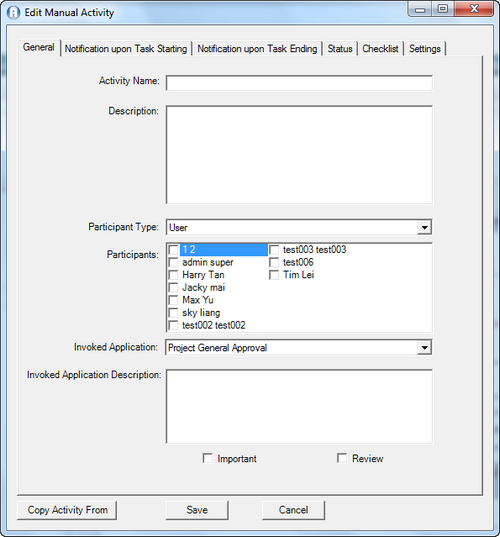
Edit Manual/Replicator Activity
General tab page
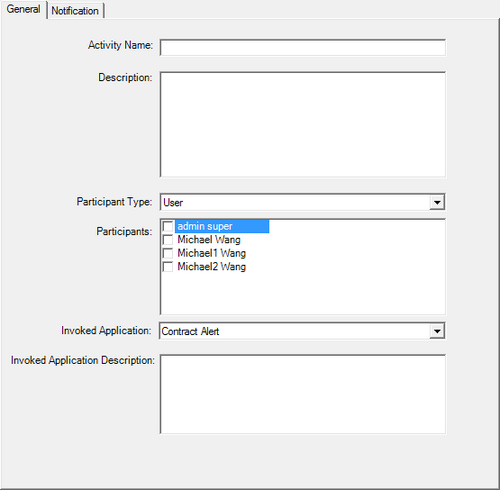
Activity Name: The name of this activity.
Description: The description of this activity.
Participant type: Includes User, Role and Dynamic Role. If you select User, individual users in the system will be listed for your selection. If you select Role, the pre-defined roles in the system will be listed for your selection. If you select Dynamic Role, you can select participants by using conditional expressions. You can specify participants using one or more types.
Invoked Application: An Invoked Application is an existing system solution, which is being integrated into one or more activities of a workflow model. The application is executed during the invocation of the workflow activity in order to provide the workflow participant with the tools necessary to fulfill the given task. In this course data can be exchanged between the workflow management system and the invoked application.
Invoked Application Description: The description of the invoked application.
Important: By checking this check box, this activity will be marked "high importance".
Review: Check this checkbox if the activity is a “Review” type task. Information in the Status tab must be completed before this activity can be saved. If it is not checked, the fields such as Review Result and Review Notes will not be displayed for this activity when a workflow instance is running.
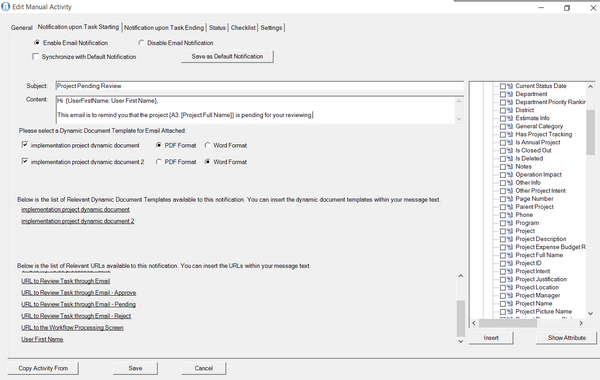
Notification Upon Task Starting page
On this tab page, you can configure auto email notification to workflow participants when a workflow task starts.
Save As Default Notification: when this button is pressed, the current notification will become the default notification for all Notification Upon Task Starting tabs of all the activities under the current workflow. In addition, changes will be reflected in:
❖Notification Upon Task Starting tab of the Default Notification. ❖All Notification Upon Task Starting tabs of the current workflow using Default Notification.
Subject: specifies the subject of the email notification. Dynamic values can be inserted into the subject.
Content: the main body of the email notification. Dynamic values can be inserted into the main body.
Metadata Tree: is the tree structure that lists all attributes and related entities(and their attributes) of the primary entity of the workflow process. These attributes are the dynamic values that can be inserted into the subject and content of the email notification. To insert a dynamic value, you should:
❖Select attribute(s) from the Metadata Tree. The attributes of the primary entity are displayed by default. You can also find attributes of the related entities by expanding the rest of the tree. ❖Once you have selected the desired attributes, move the text cursor to where you want the dynamic values to appear (in either the subject or content textbox). ❖Click on the Insert button; a text code in curly brackets (such as {A5: [Contract No.]}) representing the attribute(s) will be inserted to the location of the text cursor as dynamic values.
Show Attribute: press this button to view the full path(s) of the attribute(s) that have been inserted into the notification.
Attach Dynamic Document Templates: if there are dynamic document templates already associated with the primary entity, they will be displayed in this section. You can select them as email attachments in PDF or Word Format.
Insert Dynamic Document Templates: if there are dynamic document templates already associated with the primary entity, they will be displayed in this section. You can click the links of these dynamic document templates to insert their content into the email content.
Insert Relevant URLs: there are 8 commonly used links available (located at the bottom of the tab) for you to insert into the content body of your email notification. They are:
❖URL to Accept Task through Email - link to directly Accept the task through email and jump to the processing screen of the workflow task ❖URL to My Completed Tasks - link to My Completed Tasks tab ❖URL to My New Tasks - link to My New Tasks tab ❖URL to My To-be-processed Tasks - link to My To-be-processed Tasks tab ❖URL to Review Tasks through Email - link for reviewing task through email ❖URL to Review Task through Email - Approve - link for directly submitting the review result 'Approve' through email ❖URL to Review Task through Email - Pending - link for directly submitting the review result 'Pending' through email ❖URL to Review Task through Email - Reject - link for directly submitting the review result 'Reject' through email ❖URL to the Workflow Processing Screen - link to the processing screen of the workflow task ❖User First Name - variable to display the participant's first name
To insert, simply move the text cursor to the desired location in the content textbox, then click on one of the links above. A text code in curly brackets (such as {MyToBeProcessingTaskUrl: URL to My To-be-processed Tasks}) should appear at the desired location.
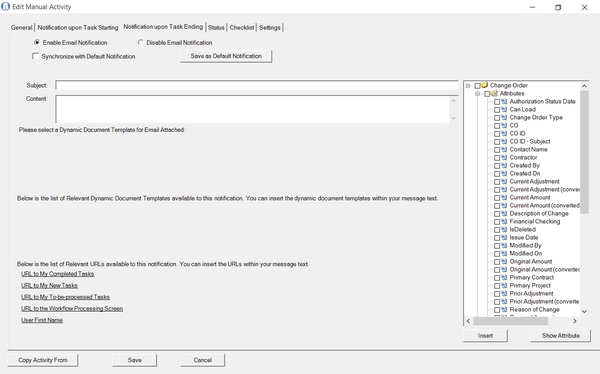
Notification Upon Task Ending tab page
On this tab page, you can configure auto email notification to workflow participants when a workflow task ends.
Save As Default Notification: when this button is pressed, the current notification will become the default notification for all Notification Upon Task Ending tabs of all the activities under the current workflow. In addition, changes will be reflected in:
❖The Notification Upon Task Ending tab of the Default Notification. ❖All Notification Upon Task Ending tabs of the current workflow using Default Notification.
Subject: specifies the subject of the email notification. Dynamic values can be inserted into the subject.
Content: the main body of the email notification. Dynamic values can be inserted into the main body.
Metadata Tree: is the tree structure that lists all attributes and related entities(and their attributes) of the primary entity of the workflow process. These attributes are the dynamic values that can be inserted into the subject and content of the email notification. To insert a dynamic value, you should:
❖Select attribute(s) from the Metadata Tree. The attributes of the primary entity are displayed by default. You can also find attributes of the related entities by expanding the rest of the tree. ❖Once you have selected the desired attributes, move the text cursor to where you want the dynamic values to appear (in either the subject or content textbox). ❖Click on the Insert button; a text code in curly brackets (such as {A5: [Contract No.]}) representing the attribute(s) will be inserted to the location of the text cursor as dynamic values.
Show Attribute: press this button to view the full path(s) of the attribute(s) that have been inserted into the notification.
Attach Dynamic Document Templates: if there are dynamic document templates already associated with the primary entity, they will be displayed in this section. You can select them as email attachments in PDF or Word Format.
Insert Dynamic Document Templates: if there are dynamic document templates already associated with the primary entity, they will be displayed in this section. You can click the links of these dynamic document templates to insert their content into the email content.
Insert Relevant URLs: there are 4 commonly used links available (located at the bottom of the tab) for you to insert into the content body of your email notification. They are:
❖URL to My Completed Tasks - link to My Completed Tasks tab ❖URL to My New Tasks - link to My New Tasks tab ❖URL to My To-be-processed Tasks - link to My To-be-processed Tasks tab ❖URL to the Workflow Processing Screen - link to the processing screen of the workflow task ❖User First Name - variable to display the participant's first name
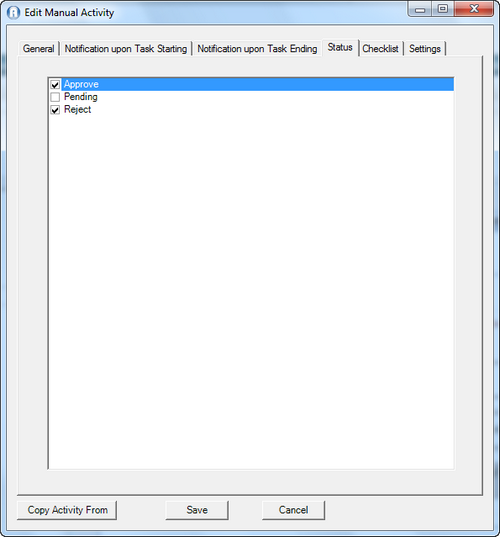
Status tab page
Statues are the review results of a task (related to the entity under review) as part of a workflow process. All available workflow review statuses are listed on this tab, with "Approve" and "Reject" selected by default. The statuses are managed in Utilities > Drop Down List Management > Status Management > select Workflow Review Result Type from the Status Type Name dropdown list.
Only the selected statuses will be shown in the Review Result dropdown list in the task information section of the entity under review .
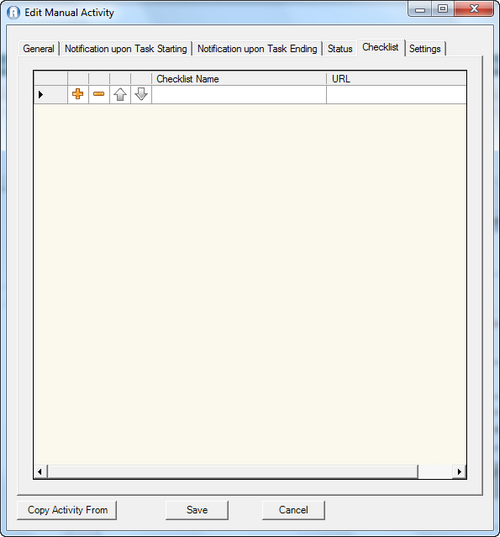
Checklist tab page
Checklist lists information that's useful for the completion of the related task.
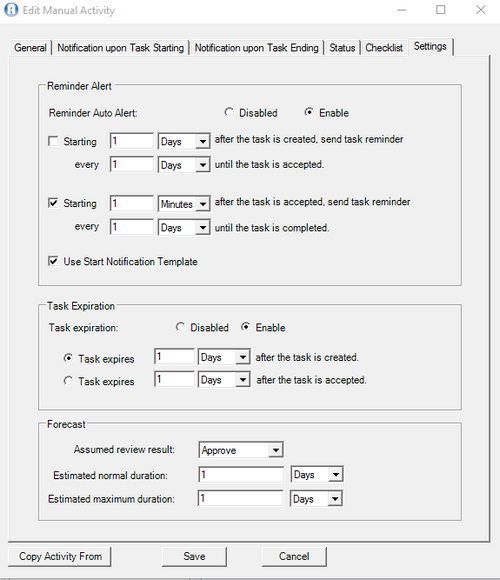
Settings tab page
There are three settings on this page: Reminder Alert, Task Expiration and Forecast. ❖Reminder Alert: This section controls how reminder alerts for the task are sent. Toggle the Enabled/Disabled radio buttons to turn this feature on and off. The reminder alert and its setting items are disabled by default. When switching from Disabled to Enabled, select the situation(s) for applying the auto alert. There are two situations: when it is a new task (option 1) and when it is a to-be-processed task (option 2). You can select one or both situations to apply auto alert. After selecting the situation(s), you can specify the time interval after which an auto alert will be sent. This time interval can be specified by selecting a Time Unit from the dropdown list and specifying a number in the text field. There are three available Time Units: Days, Hours, and Minutes. Default is Days, and default time interval is “0”. You can further specify the frequency of sending email in the second time interval field after “every...”. The Time interval must be a positive integer which is > 0 and ≤ 1000. Otherwise, an alert message “Please enter a value between 0 and 1000 for time intervals.” will display once the Save button is clicked. For Option 1, the alert message will be sent to all predefined participants for the task. It reads “A new task awaits your action. For additional information, please access the following link…”. For Option 2, the alert message will be sent to the participant who has accepted the task. It reads “A pending task awaits your action. For additional information, please access the following link…”. Use Start Notification Template: Select this option to use the content and settings in "Notification upon Task Starting" as email template for reminder alert. ❖Task Expiration: This section controls when a task becomes expired. Toggle the Enabled/Disabled radio buttons to turn this feature on and off. This feature and its corresponding setting items are disabled by default. When switching from Disabled to Enabled, select the situation for applying task expiration. There are two situations: when it is a new task (option 1) and when it is a to-be-processed task (option 2). You can only select one situation to apply task expiration. After selecting a situation, you can specify the time interval after which the task will expire. This time interval can be specified by selecting a Time Unit from the dropdown list and specifying a number in the text field. There are three available Time Units: Days, Hours, and Minutes. And default time interval is “0”. ❖Forecast:The workflow forecast feature generates a table to show information of future tasks based on the settings here. Assumed review result: the dropdown list includes all available workflow review results and by default "Approve" is selected. You can select an assumed review result for workflow forecast based on your selections under Status tab. Estimated normal duration: the estimated normal duration of the task can be specified by selecting a Time Unit from the dropdown list and specifying a number in the text field. There are three available Time Units: Days, Hours, and Minutes. Default is Days, and default time interval is “1”. Estimated maximum duration: the estimated maximum duration of the task can be specified by selecting a Time Unit from the dropdown list and specifying a number in the text field. There are three available Time Units: Days, Hours, and Minutes. Default is Days, and default time interval is “1”. |
General tab page
Activity Name: The name of this activity.
Description: The description of this activity.
Participant type: Includes User, Role and Dynamic Role. If you select User, individual users in the system will be listed for your selection. If you select Role, the defined roles in the system will be listed for your selection. If you select Dynamic Role, you can define the user by using conditional expression. The final participants of this activity will include all participants selected by User, Role, and Dynamic Role.
Invoked Application: An Invoked Application is an existing system solution, which is being integrated into one or more activities of a workflow model. The application is executed during the invocation of the workflow activity in order to provide the workflow participant with the tools necessary to fulfill the given task. In this course data can be exchanged between the workflow management system and the invoked application.
Invoked Application Description: The description of the invoked application.
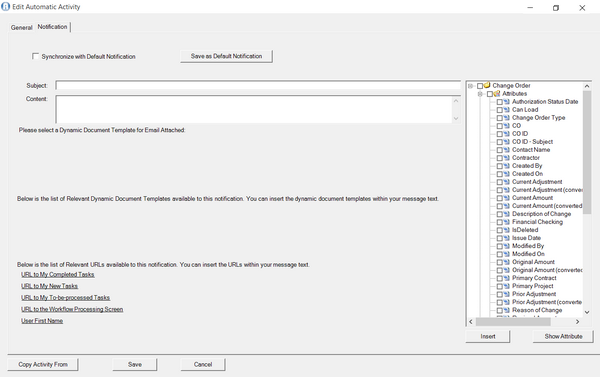
Notification tab page
On this tab page, you can configure auto email notification to the selected workflow participants.
Synchronize with Default Notification: If this option is checked, email notification settings and contents on this tab page will be synchronized with the settings and contents of the Automatic Notification tab of the Default Notification. When you create a new activity, this option is checked by default provided that the Automatic Notification tab of the Default Notification has been setup.
Save As Default Notification: when this button is pressed, the current notification will become the default notification for all Notification tabs of all the Auto Email Activitie(s) under the current workflow. In addition, changes will be reflected in:
❖The Automatic Notification tab of the Default Notification. ❖All Notification tabs of all the Auto Email Activitie(s) current workflow using Default Notification.
Subject: specifies the subject of the email notification. Dynamic values can be inserted into the subject.
Content: the main body of the email notification. Dynamic values can be inserted into the main body.
Metadata Tree: is the tree structure that lists all attributes and related entities(and their attributes) of the primary entity of the workflow process. These attributes are the dynamic values that can be inserted into the subject and content of the email notification. To insert a dynamic value, you should:
❖Select attribute(s) from the Metadata Tree. The attributes of the primary entity are displayed by default. You can also find attributes of the related entities by expanding the rest of the tree. ❖Once you have selected the desired attributes, move the text cursor to where you want the dynamic values to appear (in either the subject or content textbox). ❖Click on the Insert button; a text code in curly brackets (such as {A5: [Contract No.]}) representing the attribute(s) will be inserted to the location of the text cursor as dynamic values.
Show Attribute: press this button to view the full path(s) of the attribute(s) that have been inserted into the notification.
Attach Dynamic Document Templates: if there are dynamic document templates already associated with the primary entity, they will be displayed in this section. You can select them as email attachments in PDF or Word Format.
Insert Dynamic Document Templates: if there are dynamic document templates already associated with the primary entity, they will be displayed in this section. You can click the links of these dynamic document templates to insert their content into the email content.
Insert Relevant URLs: there are 4 commonly used links available (located at the bottom of the tab) for you to insert into the content body of your email notification. They are:
❖URL to my completed tasks - link to My Completed Tasks tab ❖URL to my new tasks - link to My New Tasks tab ❖URL to My To-be-processed Tasks - link to My To-be-processed Tasks tab ❖URL to Workflow Processing Screen - link to processing screen of the workflow task ❖User First Name - variable to display the participant's first name
To insert, simply move the text cursor to the desired location in the content textbox, then click on one of the links above. A text code in curly brackets (such as {MyToBeProcessingTaskUrl: URL to My To-be-processed Tasks}) should appear at the desired location.
|
Edit Auto Attribute Update Activity
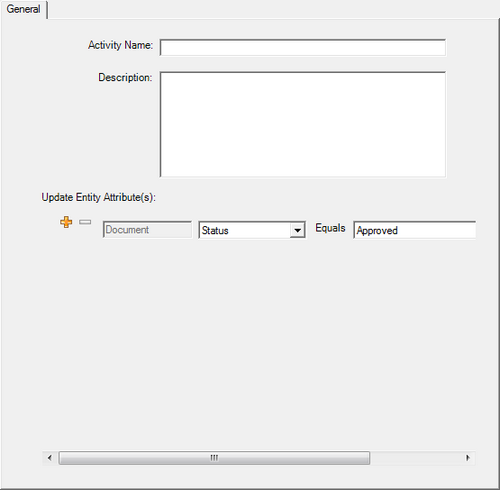
General tab page
Activity Name: The name of this activity.
Description: The description of this activity.
Update Entity Attributes: Expressions used to update selected entity attributes with respective specified values. Click the Add icon to add expressions or the Remove icon to delete expressions. (Note: the attributes of an entity that can be updated via workflow activity are predefined during software implementation by CIPPlanner staff.)
|
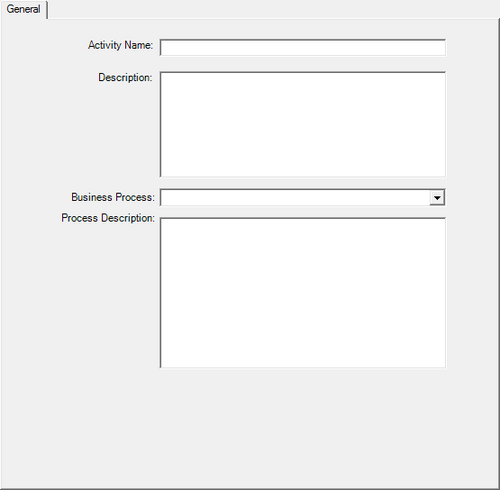
General tab page
Activity Name: The name of this activity.
Description: The description of this activity.
Business Process: A Business Process is a business logic handling application coded by CIPPlanner staff based on the requirements of customer. For example, if you want to promote project scoping amounts as budget line items after they are approved via workflow, you can request CIPPlanner technicians to code a business process and then you can invoke the business process using the auto processing activity.
Process Description: The description of the invoked business process.
|
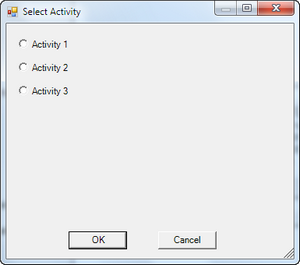
The Copy Activity feature allows you to quickly copy activity information from an existing activity to the current activity.
To start coping from an existing an activity, simply create a new activity or edit an existing activity. At the bottom of the dialogs for Edit Manual Activity, Edit Replicator Activity, Edit Auto Email Activity, Edit Auto Attribute Update Activity and Edit Auto Processing Activity, you can easily find a button named "Copy Activity From". Click on the button, another dialog for selecting the source activity will pop up.
The names of all existing activities of the same type in the current workflow definition are listed in the Select Activity dialog. You can choose the one you want to copy from and then click the OK button. (If you want to abort operations, you can click the Cancel button to directly close the dialog.)
As soon as the OK button is clicked, all information of the selected activity will be copied and populated into corresponding fields of the current activity. If the fields of the current activity already contain data, data will be replaced. Since the duplication of activity name is not allowed, you must modify Activity Name for the current activity. You can also make other necessary modifications before saving the activity.
|

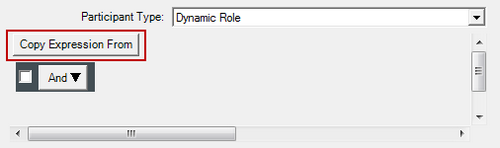
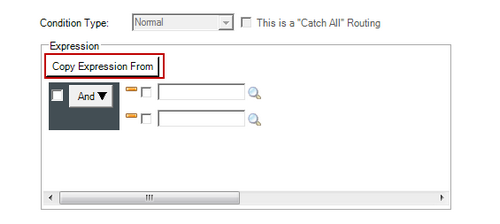
The Copy Expression From feature allows you to quickly copy conditional expressions
❖for defining participants of an activity by Dynamic Role ❖for defining conditions of a conditional control branch
from an existing activity to the current activity.
When you are defining participants of Dynamic Role type in dialogs for Edit Manual Activity, Edit Replicator Activity and Edit Auto Email Activity or when you are defining conditions for branch activities of Condition Control, you can easily find a button named "Copy Expression From". Click on the button, another dialog for selecting the source activity will pop up.
If you are defining participants of Dynamic Role type, the names of all activities in the current workflow definition that contain Dynamic Role expressions will be listed in the Select Activity dialog;
If you are defining conditions for branch activities of Condition Control, the names of all IfElseBrachActivity in the current workflow definition that contain expressions will be listed in the Select Activity dialog.
Select the one you want to copy and then click the OK button. (If you want to abort operations, you can click Cancel button to directly close the dialog.)
As soon as OK button is clicked, the expression(s) of the selected activity will be copied and populated into the current activity. If the current activity already contains expressions, those expressions will be replaced. You can make modifications if necessary. Click the Save button to save changes.
|
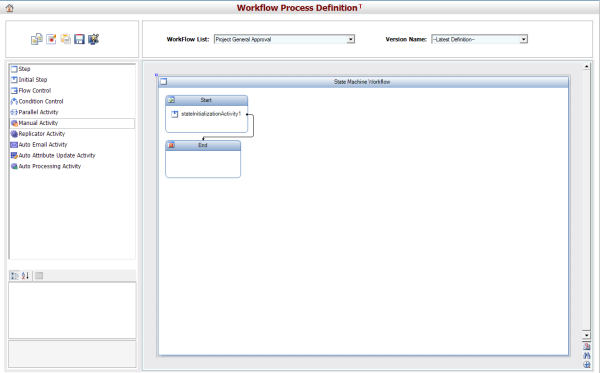
A Sample of Workflow Process Definition
|
