Navigate Here: Resource > Resources > Browse Resources; select a resource or
Project > Browse Projects > Resources tab; select a resource or
Implementation > Contracts > Browse Contracts; select a contract > Resources tab; select a resource or
Implementation > Vendors > Browse Vendors; select a vendor > Resources tab; select a resource
You can view and modify the resource's general information on the Resource General tab page.
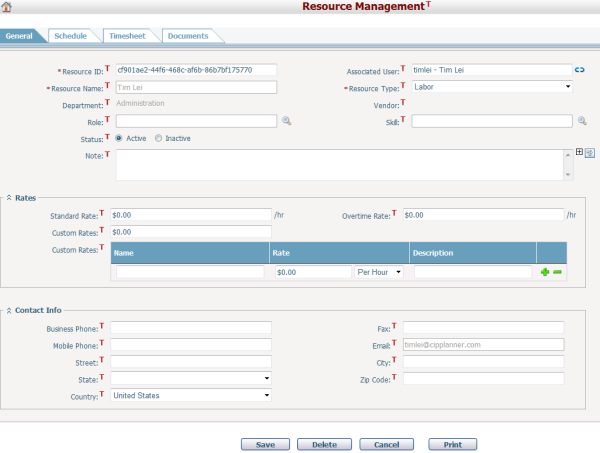
To modify a resource's general information, update any of the following fields:
The required fields are noted with an asterisk (*).
Resource Name and Department can't be edited. If select a Associated User, Resource Name will share the value of User Name(First Name+Last Name of the user), Department and Email will share the corresponding Deaprtment and Email of the associated user.
Resource ID*: The ID of the resource. It must be unique.
Associated User : You may browse and select a user in the system to be associated with the resource being added by clicking ![]() . If the resource is associated with a user, they will share the common information of the following fields: Resource Name (First Name + Last Name of the User), Department and Email. When association happens, the above fields will be synced with the corresponding fields in User Management and cannot be edited here. Notes: User and Resource are a one-one relationship. If a user is already associated with a resource, it cannot be associated with another. When the User Name and Email of a user are modified, the updated values will be synchronized to its associated resource and they cannot be edited in Resource Management page.
. If the resource is associated with a user, they will share the common information of the following fields: Resource Name (First Name + Last Name of the User), Department and Email. When association happens, the above fields will be synced with the corresponding fields in User Management and cannot be edited here. Notes: User and Resource are a one-one relationship. If a user is already associated with a resource, it cannot be associated with another. When the User Name and Email of a user are modified, the updated values will be synchronized to its associated resource and they cannot be edited in Resource Management page.
Resource Type*: The type of the resource. There are two types in the system: Labor and Equipment. By default is Labor.
Vendor: You may browse and select a vendor the resource belongs to by clicking ![]() . You can add a vendor in Add Vendor. If you enter the Resource General page from the Resources tab of a vendor, this field is that vendor's name by default, you can't edit it.
. You can add a vendor in Add Vendor. If you enter the Resource General page from the Resources tab of a vendor, this field is that vendor's name by default, you can't edit it.
Role: You may browse and select multiple roles for the resource by clicking ![]() . Roles can be configured in Classification Management.
. Roles can be configured in Classification Management.
Skill: You may browse and select multiple skills for the resource by clicking ![]() . Skills can be configured in Classification Management.
. Skills can be configured in Classification Management.
Status: There are two statuses: Active and Inactive. Active indicates the resource is available, while Inactive indicates it is unavailable. An inactive resource cannot be assigned to projects.
Note: Description of the resource.
Rates: You can specify the rates for using the resource in standard hours, overtime hours and cost per use. Standard Rate and Overtime Rate are defaulted by Application Settings. You can set more rates for selection in the Custom Rates field. Enter the Name and Rate, and specify how the rate is measured: Per Use or Per Hour. System will save the custom-made rates when you click the Save button. You can add or remove a custom-made rate by clicking ![]() or
or ![]() . This section is collapsible. You can constrict or expand the contents of this section by clicking
. This section is collapsible. You can constrict or expand the contents of this section by clicking ![]() or
or ![]() beside the section title.
beside the section title.
Contact Info: You may enter the contact info of the resource, including: Business Phone, Fax, Mobile Phone, Email, and Address, etc.
Click the Save button to save the changes.
Click the Delete button to delete the resource. If a resource is assigned to projects or associated with timesheets, it cannot be deleted.
Click the Cancel button to withdraw the current operation and return to the Browse Resources page.