Navigate Here: Utilities > Excel Data Management > Import Excel Data or click the Import Data icon ![]() on the Browse page of a particular entity
on the Browse page of a particular entity
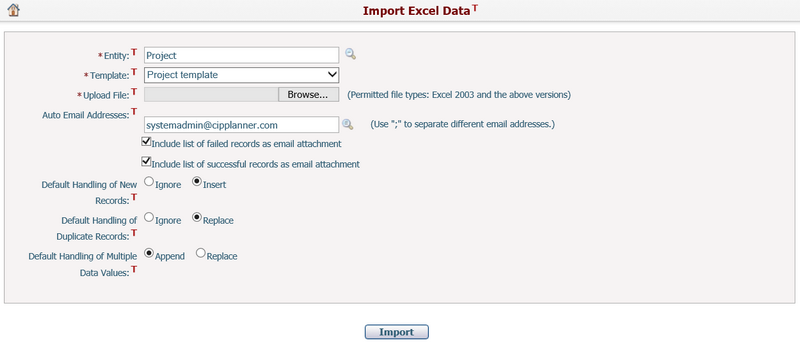
You can import entity data by uploading an Excel file with predefined Excel template on Import Excel Data page.
The required fields are noted with an asterisk (*).
Entity*: The business entity for data importing.
Template*: Select a predefined Excel template under the selected entity.
Upload File*: Click the Browse button and select an Excel file from your local PC folder for uploading.
Auto Email Addresses: The recipients for the email notification of data import result. You can select them from the current users by clicking the icon ![]() and the email notification will be sent to their email addresses automatically by the system.
and the email notification will be sent to their email addresses automatically by the system.
Include list of failed records as email attachment: By default this option is checked. Once enabled, the system will send the list of failed records along with failure reasons as email attachment. The maximum number of records in the email attachment is 500 by default.
Include list of successful records as email attachment: By default this option is checked. Once enabled, the system will send the list of successful records as email attachment. The maximum number of records in the email attachment is 500 by default.
Default Handling of New Records: You can select either Ignore (reject the new record) or Insert (insert the new record) as the default handling method of new records in the uploading Excel file.
Default Handling of Duplicate Records: You can select either Ignore (reject the duplicate record) or Replace (replace the duplicate record in the system) as the default handling method of duplicate records in the uploading Excel file.
Default Handling of Multiple Data Values: This option will appear only when the Default Handling of Duplicate Records is Replace. You can select either Append (append the new values into the existing values in the system) or Replace (replace all the existing values in the system) as the default handing method of the attributes with multiple data values in the uploading Excel file.
Click the Import button to import the Excel file and the system will switch to the Manage Excel Data Import Result screen to show the import progress and the final results.
Note, the system will only import the actual cell values in the Excel file no matter what cell formats have been used, and validate the data by CIPAce metadata configuration.
Once uploading completed, the specified recipients will receive the email notification about the result as well.