To configure a Data workbox, fill in the following fields:
The required fields are noted with an asterisk (*).
Data Type* :Specifies what kind of data the workbox displays.
Title*: The workbox title. It will appear in the workbox title bar.
Grid Layout*: In this field, to give your data table a polished appearance and make your data easy to read and understand, you can add, remove, reorder columns, and specify column width.
To add columns, click the Add icon ![]() in the tool bar, and the system will pop up the Add Columns window. Select check boxes for columns you want to add and click the OK button. The selected columns will appears in the View Results area.
in the tool bar, and the system will pop up the Add Columns window. Select check boxes for columns you want to add and click the OK button. The selected columns will appears in the View Results area.
To remove a column, select the column your want to remove by clicking the column name, and then click the Remove the Selected Column icon ![]() .
.
To change the column name, select the column and click Modify Fields Name icon ![]() , and the system will pop up the Modify Fields Name window. The selected column name will be updated if click Save button. Note that the column display name is different from attribute's display name for the data entities supporting dynamic view and dynamic form.
, and the system will pop up the Modify Fields Name window. The selected column name will be updated if click Save button. Note that the column display name is different from attribute's display name for the data entities supporting dynamic view and dynamic form.
To specify a column width, click the column name of the column your want to specify the column width, and then select a width value by selecting a radio button. If Auto Adjusted is selected, the column width will automatically fit the table.
Filter Data: Specifies which data will be displayed in the workbox. Only data that meets the criteria you specified will be displayed. Click on "Select" link to add a filter. You can group filters by "and" relationship or by "or" relationship. First click on the arrow icon of a row header and choose "Select" to select the filter you want to include in the group. Then specify the group relationship by clicking "Group And" or "Group Or". A grouping box will appear to indicate the filters in the group. To adjust settings of the group, click on the arrow icon in the grouping box. With filters and filter grouping, you can specify very complicated criteria.
Sort by: You may sort data by more than one attribute. For example, for a workbox of Issue data type, you can first sort by Issue Date, and then sort by Issue Priority. To add a sort level, click the Add Level icon![]() . A row will be added below the corresponding row. To remove a sort level, click the Remove Level icon
. A row will be added below the corresponding row. To remove a sort level, click the Remove Level icon ![]() . Attributes higher in the list will be sorted before the lower entries in the list.
. Attributes higher in the list will be sorted before the lower entries in the list.
Show X Items: Specifies the maximum number of items displayed in a workbox. For example, if you select 10 in this field, only the top 10 items will be displayed in the workbox even if 20 items meet the criteria data. You can click Move Link to view all items that meet criteria in a new screen.
Maximum Height*: Between 250px to 500px, maximum height of the workbox. By default 0px means the height of workbox is auto-fit to its contents.
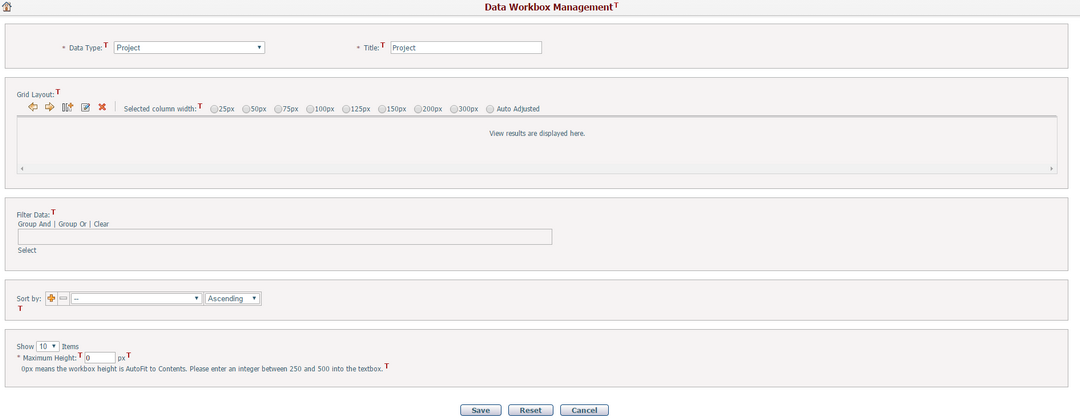
Click the Save button to save the settings.
Click the Reset button to clear all the inputs.
Click the Cancel button to discard the inputs and return to My Dashboard page.