Workbox is a dashboard component used to display specified information. There are eight types of workbox in the system. They are:
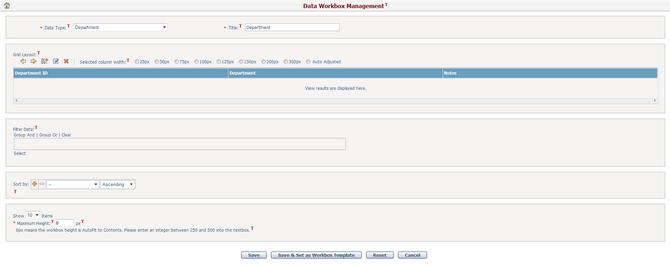
Data workbox: Lists various details of a data type. One workbox can display only one type of data.
Report Workbox: Shows one analytics report or multiple custom report links.
Workflow Tasks Workbox: Lists new workflow tasks, processing tasks, or completed tasks.
Favorite Links Workbox: Lists the links to internal or external web pages for convenient access.
Inbox/Outbox Workbox: Lists inbox notifications or outbox notifications.
My Cycle and Scenario Workbox: Shows workspace and login information.
Embedded Webpage Workbox: Embeds a full HTML page inside the workbox, which gives user a complete view of associated page.
Advanced Analytics Report Workbox: Shows one advanced analytics report.
Add Workbox
Go to the page on which you want to add a workbox by clicking the page tab. Click the Add Workbox in the drop-arrow menu to the right of the section name within the current page where you want to add workboxes.
Select Add Workbox to pop up the corresponding window. Choose the type of workbox you want to add then click OK. If the workbox type you chose is My Cycle and Scenario, the My Cycle and Scenario info will appear in the section. For other workboxes, the system will go to the corresponding workbox management page. Workbox requires personal configuration on your part so that it can present the information based on your specifications. The following sections show how to configure each type of workboxes:
❖Manage Favorite Links Workbox
❖Manage Workflow Tasks Workbox
❖Manage Embedded Webpage Workbox
Note: you cannot add a workbox to a section on the "Reference" type page (that is, a tab page referencing to the corresponding tab page in a dashboard profile template of "Reference" type. Contents of the tab page can only be changed through modifying the corresponding dashboard profile template and republishing it to user dashboard.)
Load Workbox Template
You may add a workbox by loading it from a workbox template. Go to the page on which you want to add a workbox by clicking the page tab. Click the Load Workbox Template in the drop-arrow menu to the right of the section name within the current page where you want to add workboxes. A popup window will allow you to select the workbox template, then click the OK button to load the selected workbox template into the section.
Note: you cannot add a workbox (by loading from a dashboard workbox template) under a tab page of "Reference" type (that is, a tab page referencing to the corresponding tab page in a dashboard profile template of "Reference" type. Contents of the tab page can only be changed through modifying the corresponding dashboard profile template and republishing it to user dashboard.)
Except for the My Cycle & Scenario workbox, all other workboxes can be edited. Move mouse over the drop-arrow in the upper-left corner of the workbox and select Edit Workbox. The system will go to corresponding workbox management pages for the configuration. Please refer to the Add Workbox section for details.
On the Workbox Management page, you can also save and set the workbox currently being edited as a workbox template through the button “Save & Set as Workbox Template” at the bottom of the page.
Click this button to save the workbox currently being edited and then jump to the Save as Workbox Template page as shown below:

Workbox Template ID: The ID of the workbox template which is auto-generated by system. You can also manually enter an ID for the template.
Workbox Template Name: The name of the workbox template, it will be consistent with the workbox title as specified on the Workbox Management page. You can also manually enter an ID for the template.
Workbox Type: A read-only field inherited from the source workbox type.
Description: Further descriptions about the workbox template.
Click the Save button to submit the template. The system will then go back to User Dashboard.
Click the Cancel button to abort any changes made to this page and return to User Dashboard.
Click the Reset button to restore all fields to their default values.
Note: you cannot edit a workbox under a tab page of "Reference" type (that is, a tab page referencing to the corresponding tab page in a dashboard profile template of "Reference" type. Contents of the tab page can only be changed through modifying the corresponding dashboard profile template and republishing it to user dashboard.)
Delete Workbox
Remove a workbox from a section by selecting Delete Workbox from drop-arrow menu in the upper-left corner of a workbox. A window will popup for confirmation.
Note: you cannot remove a workbox under a tab page of "Reference" type (that is, a tab page referencing to the corresponding tab page in a dashboard profile template of "Reference" type. Contents of the tab page can only be changed through modifying the corresponding dashboard profile template and republishing it to user dashboard.)
Rearrange Workbox
a.Within the Same Section
Drag and drop will further support moving a workbox among different columns within a section.
You can arrange workboxes’ sorting and view, but only within the set layout provision of the section concerned.
b. Among Different Sections
The system will also support workboxes’ moving among different sections. You can drag and drop workboxes to wherever you want on the current page into a section. When moved to a new section, a workbox should match the layout of the new section into a column.
Note: you cannot rearrange workboxes under a tab page of "Reference" type (that is, a tab page referencing to the corresponding tab page in a dashboard profile template of "Reference" type. Contents of the tab page can only be changed through modifying the corresponding dashboard profile template and republishing it to user dashboard.)
Move to a Different Tab
You can move a workbox to a different tab page. Click the drop-arrow menu in the upper-left corner of the workbox and select Move to a Different Tab. A popup window will appear where you can select a tab to which you want to move the workbox. Click the OK
Note: you cannot move a workbox to a different tab page from a tab page of "Reference" type (that is, a tab page referencing to the corresponding tab page in a dashboard profile template of "Reference" type. Contents of the tab page can only be changed through modifying the corresponding dashboard profile template and republishing it to user dashboard.) You can not move workboxes to tab pages of 'Reference' type, either.
Set Maximum Height
On the upper left corner of the workbox except for My Cycle and Scenario Workbox and Report Workbox showing Chart graphic, when you hover your mouse cursor over the down arrow icon, the configuration menu of the workbox will appear.
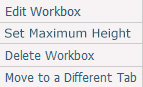
Select the “Set Maximum Height” option from the drop down:

By default the value of maximum height is 0, which means the height is auto adjusted.
After user inputs a number and clicks the “OK” button, the maximum height of the workbox is set. If contents within the workbox have exceeded the set display range, a vertical scroll bar will show up on the right side of the workbox.
The textbox only allows for numeric inputs. The system will perform a data validation check when users finish inputting (The textbox loses focus).
The range of maximum height for the workbox can be set from 250px to 500px. If you input a value less than 250px, the maximum height will be auto-corrected to 250px. Similarly, when you input a value greater than 500px, the system will auto-correct it to 500px.