To configure an Embedded Webpage workbox, fill in the following fields:
The required fields are noted with an asterisk (*).

Workbox Title*: The title of the workbox.
URL*: The webpage address to be embedded in the workbox.
Available Destination*: Select the destination page or section in a tree view format for this Embedded Webpage Workbox. (Note: Reference page cannot be the destination location in the tree view because it is not allowed to be changed by user.)
❖If you select option "-- New Page --", the system will then create a new page named “Home” with section “Default” which contains the new embedded webpage workbox. This new page will be placed as the last tab in the dashboard.
❖If you select an existing page, the system will then create a new section named “Default” which contains the new embedded webpage workbox. This new section will be placed at the bottom of the selected page.
❖If you select an existing section, the system will then create a new embedded webpage workbox on top of other existing workboxes in the selected section.
Note: Because duplicate page or section name is not allowed, if "Home" page or "Default" section already exists, the system will create the new page or section by naming convention "Home(#)" or "Default(#)" (# means a number sequence as 1, 2, ...).
Maximum Height*: The maximum height of the workbox. The default value will be 400px. It only allows integers between 250 and 500.
Click the Save button to save the settings.
Click the Reset button to clear all your inputs.
Click the Cancel button to discard the inputs and return to the previous page.
Another way to add an Embedded Webpage workbox is to Enter any CIP page > Mouse over the Home icon ![]() > Click the option "Add this page to embedded webpage Workbox".
> Click the option "Add this page to embedded webpage Workbox".
The Add to My Embedded Webpage Workbox page will be like:
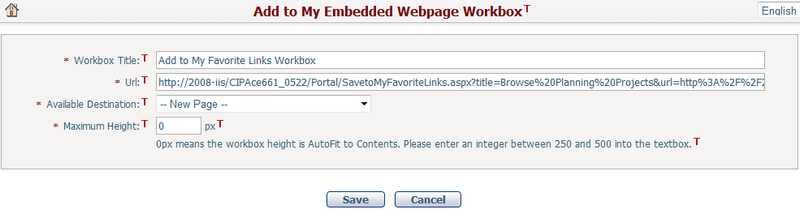
The fields are the same as the ones on the Add/Edit page except the following field. By default the value of the title and URL fields should match the embedded webpage title and URL of the CIP page.
Available Destination*: Select the destination page or section in a tree view format for this embedded webpage workbox. (Note: Reference page cannot be the destination location in the tree view because it is not allowed to be changed by user.)
❖If you select option "-- New Page --", the system will then create a new page named “Home” with section “Default” which contains the new embedded webpage workbox. This new page will be placed as the last tab in the dashboard.
❖If you select an existing page, the system will then create a new section named “Default” which contains the new embedded webpage workbox. This new section will be placed at the bottom of the selected page.
❖If you select an existing section, the system will then create a new embedded webpage workbox on top of other existing workboxes in the selected section.
Note: Because duplicate page or section name is not allowed, if "Home" page or "Default" section already exists, the system will create the new page or section by naming convention "Home(#)" or "Default(#)" (# means a number sequence as 1, 2, ...).
Click Save button to submit and redirect to My Dashboard page. The system will automatically add a HTTP prefix (http ://) to the URL inputs if needed.
When a webpage is embedded to the dashboard, it will show its HTML contents in the workbox, which is similar to a HTML <iframe> Element. In addition, if the embedded webpage is a CIPAce page, the header (top menu and above) and footer (the copyright information) will be hidden.
Click Cancel button to discard changes and go back to the previous page.