
To configure a Workflow Tasks workbox, fill in the following fields:
The required fields are noted with an asterisk (*).
Workbox Title*:The workbox title. It will appear in the workbox title bar.
Workflow Task Type*: Type of workflow tasks that will be displayed in the workbox.
Received Time: You can specify the time period as a filter criteria. Specify the time range using the From and To datetime picker. If the received time of the workflow task is outside of the specified time range, it will not be displayed in the workbox.
Process Type: if the Select All Workflow Process Types option is selected, all process types will be displayed in the workbox.
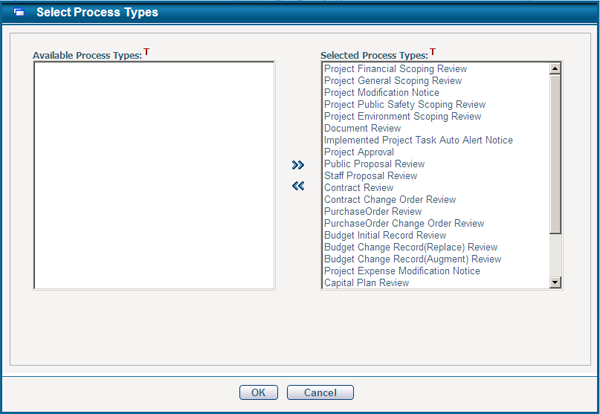
If the Specify Workflow Process Type option is selected, a list of process types will appear below for selection. If the desired process types are not on the list, click on the Add icon ![]() to add to the list. From the Select Process Type window, click on the
to add to the list. From the Select Process Type window, click on the ![]() or
or ![]() icons to move process types between the Available Process Types section and the Selected Process Types section. Only process types appear in the Selected Process Types section will appear on the list. Click on the OK button to save the settings temporarily.
icons to move process types between the Available Process Types section and the Selected Process Types section. Only process types appear in the Selected Process Types section will appear on the list. Click on the OK button to save the settings temporarily.
To remove process type(s) from the list, select the target process type(s), then click on the Remove icon![]() . You can also achieve the same effect by bringing up the Select Process Types window (click the Add icon
. You can also achieve the same effect by bringing up the Select Process Types window (click the Add icon ![]() )and move the target process type(s) from the Selected Process Types section to the Available Process Types section.
)and move the target process type(s) from the Selected Process Types section to the Available Process Types section.
Finally, once the list has been configured as desired, don't forget to select the process types you want to appear in the workbox by clicking on the checkboxes next to process types.
Sort by: You may sort data by more than one attribute. For example, you can first sort by Issue Date Report, and then sort by Issue Priority. To add a sort level, click the Add Level icon ![]() . A row will be added below the corresponding row. To remove a sort level, click the Remove Level icon
. A row will be added below the corresponding row. To remove a sort level, click the Remove Level icon ![]() . Attribute higher in the list will be sorted before the lower entries in the list.
. Attribute higher in the list will be sorted before the lower entries in the list.
Show X Items: Specifies the maximum number of items displayed in the workbox. For example, if you select 10 in this field, only the top 10 items will be displayed in the workbox even if 20 items meet the criteria data. You can click Move Link in the workbox to view all items that meet the criteria on a new screen.
Maximum Height*: Between 250px to 500px, maximum height of the workbox. By default 0px means the height of workbox is auto-fit to its contents.
Filter Data: Specifies which data will be displayed in the workbox. Only data that meet the criteria you specified will be displayed. To add filter criteria, select a Data Element and click the Add icon ![]() , and then configure the Expression.
, and then configure the Expression.
Note: if you want to show tasks of all workflow process types (in this case, when no process type is added, you don't need to manually add it), you can simply use the option Select All Workflow Process Types.
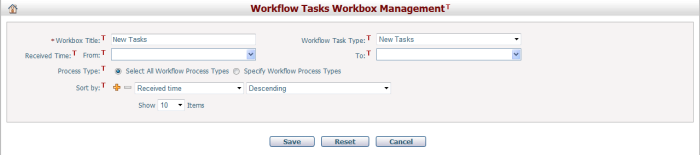
Click the Save button to save the settings.
Click the Reset button to clear all the inputs.
Click the Cancel button to discard the inputs and return to My Dashboard.