Navigate Here: Projects > Browse Projects; select a project > Scoping tab > Financial Scoping tab, click the Define Spending Curve button
You can define a spending curve for a financial scoping type in Spending Curve Management page.
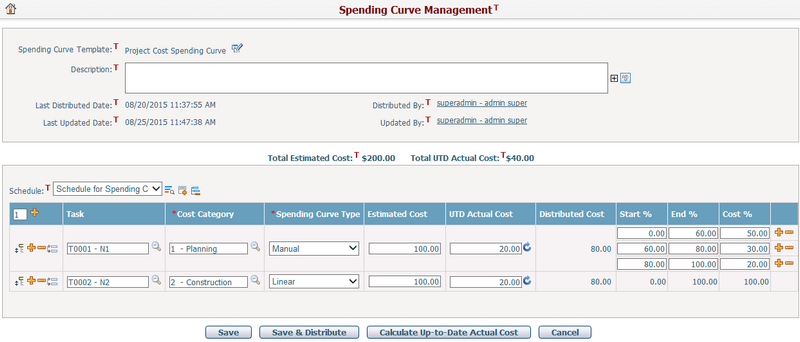
To define a spending curve, fill in the information below:
General Information
Spending Curve Template: The name of the current template applied to this spending curve. When you are defining a new spending curve for the first time, the default template of this financial type will be used. You can configure the spending curve template by clicking the ![]() icon.
icon.
Description: The detail description of the current spending curve.
Last Distributed Date: The last date when this spending curve was distributed to scoping.
Last Distributed By: The user who performed the last distribution to scoping.
Last Updated Date: The last date when this spending curve was updated.
Last Updated By: The user who updated the spending curve last time.
Spending Curve Line Items
The spending curve line item structure is the same as the template definition:
Schedule: The current schedule assigned to the spending curve, all schedules in the current project can be selected from the dropdown list. You can view or edit this schedule by Gantt Chart in a new page by clicking ![]() icon.
icon.
Task: The task selected from the current schedule for a spending curve line item.
Estimated Cost: The total cost will be distributed by each spending curve line item. You can input a positive amount in this field.
UTD Actual Cost: The up to date actual cost. You can input a positive amount in this field or click ![]() icon to calculate this value from Project Expense automatically. You can also click the Calculate Up-to-Date Actual Cost button to calculate all UTD Actual Cost automatically at the same time.
icon to calculate this value from Project Expense automatically. You can also click the Calculate Up-to-Date Actual Cost button to calculate all UTD Actual Cost automatically at the same time.
Distributed Cost: The cost to be distributed. It is a read-only field and automatically calculated as [Estimate Cost - UTD Actual Cost] by the system.
You can add new spending curve line items with pre-loaded tasks in the following ways:
❖Select an existing schedule for the current project: If the schedule is sourced from the same schedule template as defined in the current spending curve template, the pre-defined spending curve line items will be automatically populated from the current spending curve template and matched with the current schedule tasks by source schedule template task IDs.
❖Create a new schedule by clicking Add a New Schedule icon ![]() : The new schedule tasks will be automatically populated with pre-defined spending curve line items from the current spending curve template.
: The new schedule tasks will be automatically populated with pre-defined spending curve line items from the current spending curve template.
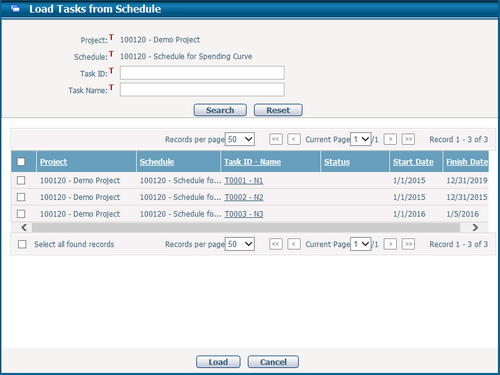
❖Load multiple tasks from the current schedule manually by clicking ![]() icon: A popup screen will be shown as below. After you select the tasks and click Load button, the new spending curve line items will be added with the selected tasks' information.
icon: A popup screen will be shown as below. After you select the tasks and click Load button, the new spending curve line items will be added with the selected tasks' information.
Or you can add new spending curve line items in the following ways and manually assign the tasks by clicking ![]() icon in the Task column:
icon in the Task column:
You can enter a number in the Lines text box and then click the Add Row icon ![]() on its right, and the specified number of new line items will be added below all existing items.
on its right, and the specified number of new line items will be added below all existing items.
You can rearrange a line item by clicking and holding Drag and Drop icon ![]() , and then drag it before or after another line item.
, and then drag it before or after another line item.
You can click the Add a New Line Item icon ![]() on the left of a line item, and a new line item will be inserted after the selected line item.
on the left of a line item, and a new line item will be inserted after the selected line item.
You can click the Remove This Line Item icon ![]() on the left of a line item, and the selected line item will be removed.
on the left of a line item, and the selected line item will be removed.
You can click the Duplicate This Line Item icon ![]() on the left of a line item, and a new line item same as the selected line item will be inserted after it.
on the left of a line item, and a new line item same as the selected line item will be inserted after it.
You can click the Add a New Rate icon ![]() next to the Cost% column, and a new rate will be inserted after the selected rate.
next to the Cost% column, and a new rate will be inserted after the selected rate.
You can click the Remove This Rate icon ![]() next to the Cost% column, and the selected rate will be removed.
next to the Cost% column, and the selected rate will be removed.
You can click the Save button to save the spending curve.
You can click the Cancel button to abort the current operation and return to Scoping Financial tab page.
Once you've finalized the spending curve, you can click Save & Distribute button to distribute the estimated cost to scoping line item immediately.
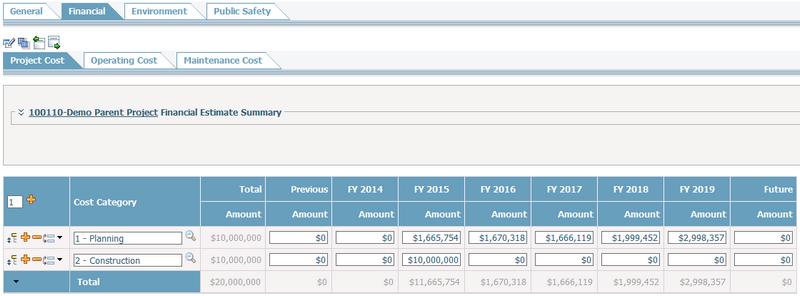
Then you can manually adjust the distribution result or modify the spending curve for distribution again.