You can manage General Information, Query and Schema of a "Query" type data source on the Data Source Management page.
General Information
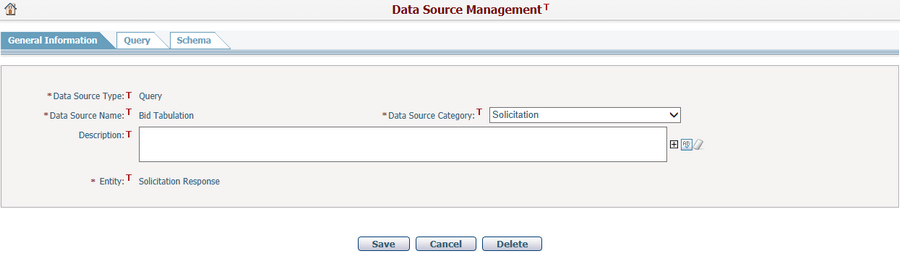
To edit a data source, fill in the following fields:
The required fields are noted with an asterisk (*).
Data Source Type*: It is "Query" and read-only.
Data Source Name*: Name of the data source, it is read-only.
Data Source Category*: The category which the data source belongs to. The available selections in the drop down list are managed under Report Category in Classification Management.
Description: Description of the data source.
Entity*: The business entity which the data source belongs to, it is read-only.
Once you've finished editing, click the Save button to save the data source.
Click the Cancel button to return to the Browse Data Sources page without saving.
Click the Delete button to delete the current data source. A confirmation message will prompt. The system will then go to the Browse Data Sources page after deletion.
Query
You can define the details of the data source and preview the result data in this tab page.
Define Output Fields
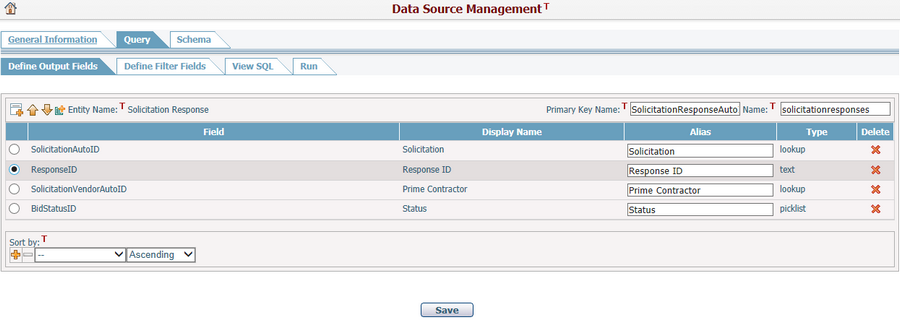
By default, the business entity you've selected in the General Information will be added automatically with a empty data field grid. You can click the Add Output icon ![]() on the top left corner of the grid to add other related business entities by the relationships with this source entity. The system will generate different output for each of them with the data fields according to your selection.
on the top left corner of the grid to add other related business entities by the relationships with this source entity. The system will generate different output for each of them with the data fields according to your selection.
In a data field grid, you can select multiple data fields from the current entity or its associated entities. There will be key field(s) named Primary Key Name (read-only) of the current entity to link records with those associated entities. You can edit its Name as well, but the name must be unique.
You can click the Add Fields icon ![]() on the top left corner of the grid to add multiple new fields into the grid.
on the top left corner of the grid to add multiple new fields into the grid.
The selected fields will be displayed by below fields:
Field: The database name of the data field, it is read-only.
Display Name: The display name of the data field, it is read-only.
Alias: A name is used for output, the system will use Display Name by default. It must be unique under the same entity.
Type: The type of the data field, it is read-only.
You can change the sequence of a data field by selecting it and click the Move Up/Down icons ![]()
![]() on the top left corner of the grid.
on the top left corner of the grid.
You can click the icon ![]() at the end of the row to delete a data field from the grid.
at the end of the row to delete a data field from the grid.
You can set a sorting key of the output records by selecting a data field in the drop down list by Ascending/Descending in the Sort by section under the grid. Multiple sorting keys can be set simultaneously, with the first has the highest priority.
Once you've finished, click the Save button to save the updates.
Define Filter Fields
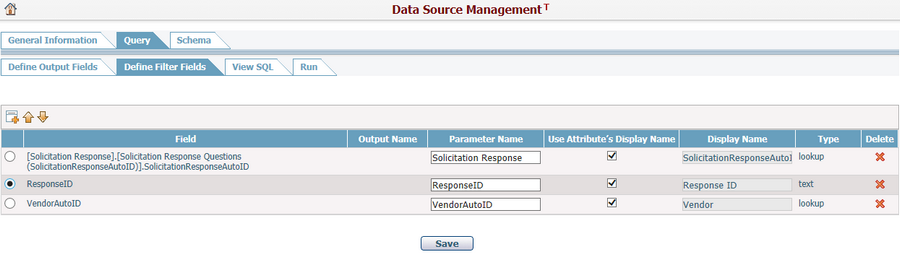
Filtering fields are searching conditions when running the query, you can click the icon ![]() on the top left corner of the grid to add multiple filtering fields into the grid.
on the top left corner of the grid to add multiple filtering fields into the grid.
The selected fields will be displayed by below fields:
Field: The entity relationship and database name of the filtering field, it is read-only.
Parameter Name: The name of the parameter mapping for custom report. The system will set it as database name by default. It must be unique.
Use Attribute's Display Name: If it is checked, the original display name of the filtering field will be used as a searching condition. If not, the Display Name will be used.
Display Name: The new display name of the filtering field as a searching condition. Initially, the system will set it as the original display name of a newly added filtering field. It can be edited only when Use Attribute's Display Name option is unchecked.
You can change the sequence of a filtering field by selecting it and click the Move Up/Down icons ![]()
![]() on the top left of the grid.
on the top left of the grid.
You can click the icon ![]() at the end of the row to delete a filtering field from the grid.
at the end of the row to delete a filtering field from the grid.
Once you've finished, click Save button to save the updates.
View SQL
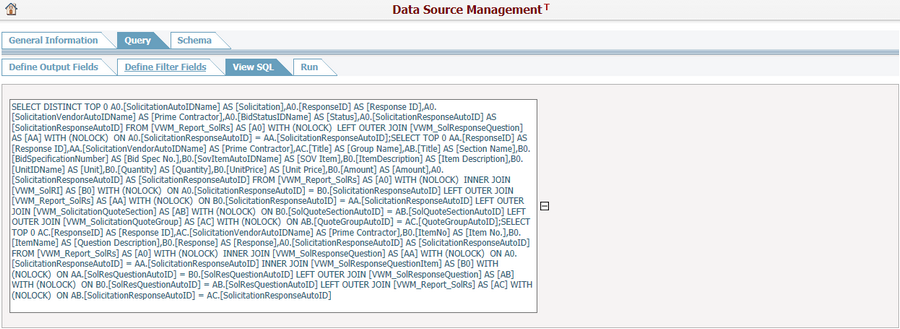
You can view the SQL statement which is automatically generated base on the previous definitions.
Run
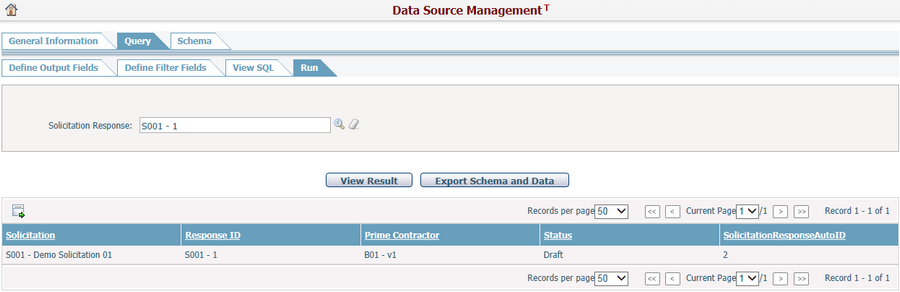
Based on previous definitions, you can run the query by inputting searching conditions and click View Result button. Different outputs will be shown in different data grids underneath.
You can click Export to Excel icon ![]() to export data into a default Excel template, and each output will be a separate Excel sheet.
to export data into a default Excel template, and each output will be a separate Excel sheet.
You can click Export Schema and Data button to export schema with data into an XML file for Crystal Report Designer. But if there is no result data, it will be disabled.
Schema
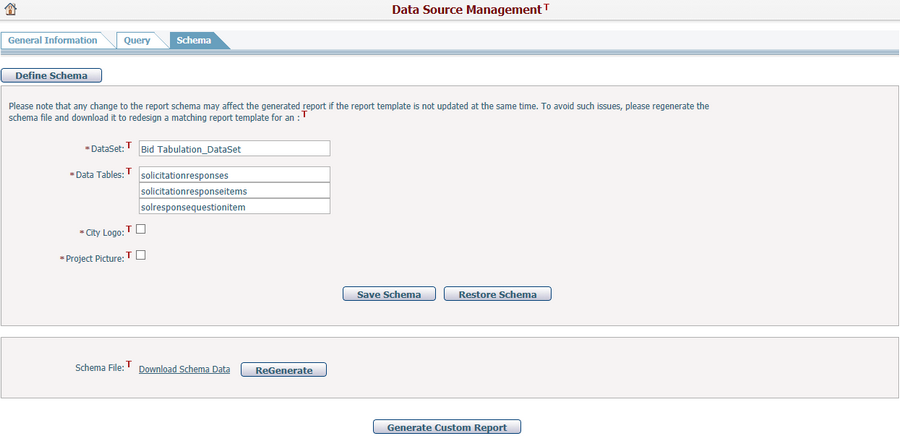
The schema can be used for Crystal Report Designer to design a custom report template. Please contact technical support for more detail if needed.