Navigate Here: Planning > Scoping > Conduct Project Scoping, click the Scope Project in Bulk button
The items selected on the Conduct Project Scoping page are displayed under different tabs base on scoping areas .
Below are instructions for scoping the scoping areas:
General Area
Under the General tab, the projects are listed in a table with Project Description, Project Justification and Status in Edit mode.
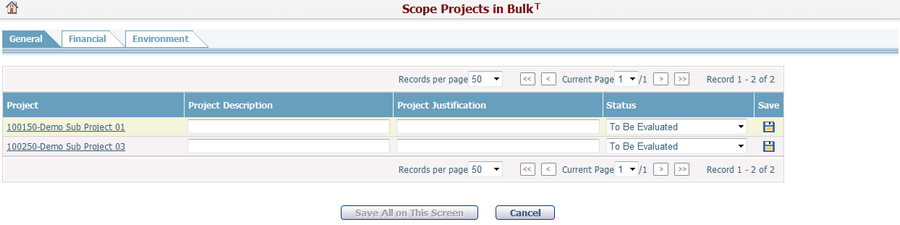
Click the Project Link in the first column of the table and the system will open the General tab of the Project Management page of the project.
Click the Save icon ![]() at the end of the row to save the general scoping data of the project.
at the end of the row to save the general scoping data of the project.
Click the Save All on this Screen button to save the general scoping data of all projects on the current screen.
Click the Cancel button to discard the inputs and return to the Conduct Project Scoping page.
Financial Area
Under the Financial tab, scoping data will be displayed in different sub tabs base on financial types.
Under each sub tab, the financial scoping detail information of the projects is displayed by tables.
Click the Project Link at the top center of the table and the system will then open the General tab of Project Management page of the project.
Mouse over the Project Link can view the Cycle, Scenario, and Scoping Scenario information of the project.
The Currency field at the top right of the table is populated automatically with the Project Currency.
The Scoping Status field at the top left of the table shows the financial scoping status of the current project. You can change to other statuses by the dropdown list.
Project financial data is in View Only mode by default. To scope a project, you can click the Edit icon ![]() beside the scoping status field.
beside the scoping status field.
Note: The first column contains icons of managing scoping line item, these icons includes ![]() ,
,![]() ,
, ![]() , and
, and ![]() . However this column may not be visible to certain projects that has limitation on managing scoping line item.
. However this column may not be visible to certain projects that has limitation on managing scoping line item.
Click the Add icon ![]() at the left of a line item. A blank line item will be inserted below the selected line item.
at the left of a line item. A blank line item will be inserted below the selected line item.
Click the Remove icon ![]() at the left of a line item and the selected line item will be removed.
at the left of a line item and the selected line item will be removed.
Click the Duplicate icon ![]() at the left of a line item. A new line item will be copied from this line item and inserted below for you to edit.
at the left of a line item. A new line item will be copied from this line item and inserted below for you to edit.
To rearrange a line item, drag the line item by its Move this row up or down icon ![]() and drop it above or below another line item.
and drop it above or below another line item.
If you want to discard the editing including scoping status change, click the Undo icon ![]() . The table will back to View Only mode again and with the scoping status before change.
. The table will back to View Only mode again and with the scoping status before change.
Click the Save icon ![]() to save the financial scoping data and the scoping status of the project.
to save the financial scoping data and the scoping status of the project.
Click the Save All on this Screen button to save the financial scoping data of all projects in Edit mode and the scoping status changes on the current screen.
Click the Cancel button to discard the inputs and return to Conduct Project Scoping page.
Environment, Public Safety, and Custom Areas
For Environment or other system / custom scoping areas, the projects are listed in a table with the Justification, Notes and Status in Edit mode.
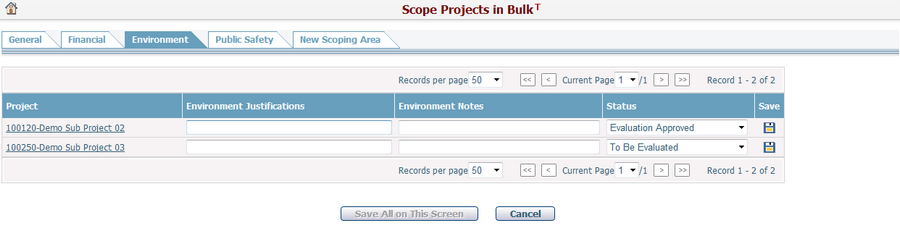
Click the Project Link in the first column in the table and the system will open the General tab of the Project Management page of the project.
Click the Save icon ![]() at the end of the row to save the scoping data of the project.
at the end of the row to save the scoping data of the project.
Click the Save All on this Screen button to save the scoping data of all projects on the current screen.
Click the Cancel button to discard the inputs and return to the Conduct Project Scoping page.