Navigate Here: Planning > Scoping > Conduct Project Scoping
On the Conduct Project Scoping page you can view which projects and their associated scoping areas have been assigned to you for scoping and select a project to perform scoping on.
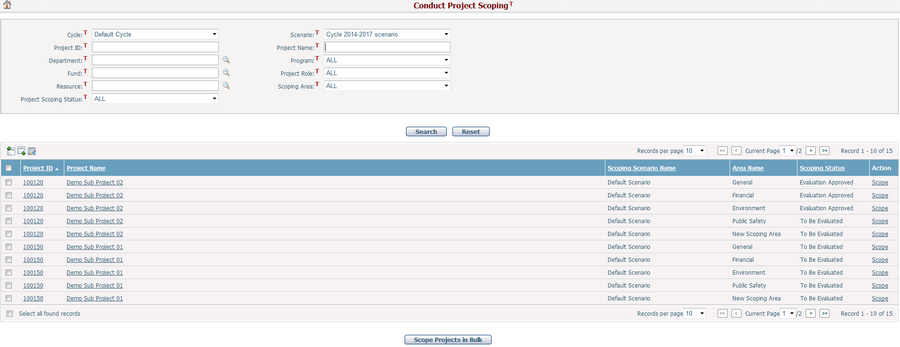
Assignments are listed in the table, with the information of Project ID, Project Name, Scoping Scenario Name, Area Name and Scoping Status. You may sort the list by clicking the linked column header. If there are too many records to be displayed on one page, you can use the navigation control to view the other pages, or you may increase the number of records per page.
You can quickly find the assignments you want by using the search function. Enter search conditions in the search fields and click the Search button. Assignments will be filtered and the table will show the records that match the search conditions. Click the Reset button to clear the latest input.
Click the Scope link at the end of a record and the system will open the Project Scoping tab page of that project to start scoping.
Click the Project ID or Project Name link and the system will go to the Planning Project General page for the selected project.
You can import project scoping data from an Excel file by clicking the Import Data icon ![]() and the system will open the Import Entity Data page.
and the system will open the Import Entity Data page.
Click the Export Data icon ![]() and the Export Entity Data window will popup. In Export Entity Data window, you can select a data template and export the scoping data to an Excel file by clicking the Export button. (Note: To export entity data, you need to add an entity data template first. You can add an entity data template on the Add Excel Data Template page.)
and the Export Entity Data window will popup. In Export Entity Data window, you can select a data template and export the scoping data to an Excel file by clicking the Export button. (Note: To export entity data, you need to add an entity data template first. You can add an entity data template on the Add Excel Data Template page.)
To batch update project scoping status, you can select project(s) by the checkbox in the first column and click the Batch Update ![]() icon, and the following batch update screen will be popped up.
icon, and the following batch update screen will be popped up.
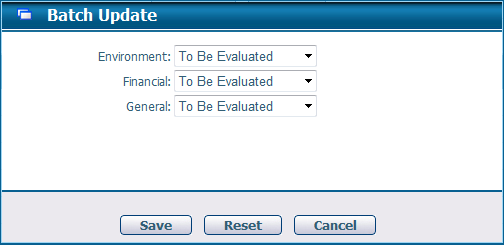
- The number of Scoping Areas displayed in this screen will be dynamic and dependent on the selected project scoping data for batch update.
- Select the scoping status in the dropdown list and click the Save button to apply the changes to all selected project scoping data.
- Click the Reset button will undo any change in this screen and the Cancel button will discard the changes and return to the previous screen.
To batch scope projects, select the check boxes of the project areas and click the Scope Project in Bulk button. The system will then go to Scope Projects in Bulk page.