Navigate Here: Projects > Browse Planning Projects; select a project > Click the Planning tab > Click the Scoping tab
You can scope a project on the Scoping tab page.
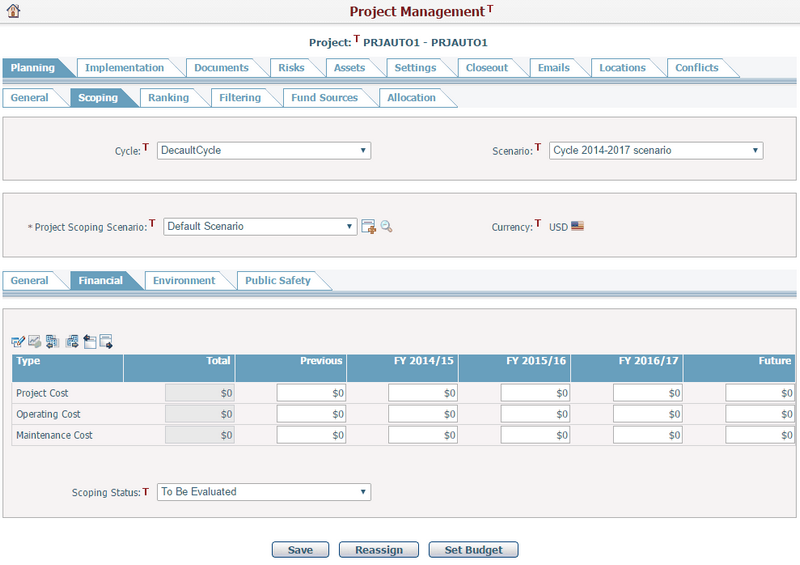
Before scoping, you need to select a project scoping scenario from the Project Scoping Scenario dropdown list. Each scenario stands for a "what-if" situation and maintains its own set of scoping data. If there are two bidders for the project, for example, two scenarios are necessary for assessing the two possible outcomes of the project.
The appropriate scoping scenarios which have been set up on Batch Default Scoping Scenario Setup page will automatically be assigned to the project.
The scenario being displayed is the current scenario by default. You can add a new project scoping scenario by clicking the Add icon
Beside the scoping scenario, you can find the Currency for scoping, it is populated automatically with the project currency, and it cannot be edited. |
The scoping areas that have been added to the system on the Scoping Areas Management page will display as linked tabs on the Project Scoping tab page.
General
The general scoping area displays the Project Description and Project Justification fields provided on the Planning Project General page. Evaluators can modify Project Description, Project Justification and Notes in the form. They can also change the current Scoping Status from a dropdown list.
Click the Save button to save the edited scoping data under the General tab. All evaluators can come back later and edit the information.
You can reassign other users to scope for the current project by clicking Reassign button. It will lead you to the Assign Projects to Scope page. Authorized users can also adjust scoping area evaluators in Project Assignment Management and reassigning the project.
The financial scoping area is used to estimate the project's expenditures. Appropriate evaluators can estimate the Project Cost, Operating Cost, and Maintenance Cost across the entire project. The Financial tab screen varies according to different default financial scoping modes.
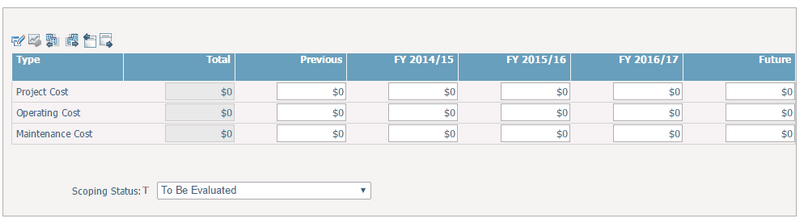
1. When the default financial scoping mode is Scoping Summary:
You can manually enter the cost amounts right in the Scoping Summary table for each fiscal year without specifying a Financial Scoping Template. The Total column will be updated automatically as you enter the cost amounts into the table. This column is grayed out and cannot be modified. You can also provide a more detailed financial breakdown on how each year's cost are composed by clicking the Scope Online icon
You can reassign other users to scope for the current project by clicking Reassign button. It will lead you to the Assign Projects to Scope page. Authorized users can also adjust scoping area evaluators in Project Assignment Management and reassigning the project.
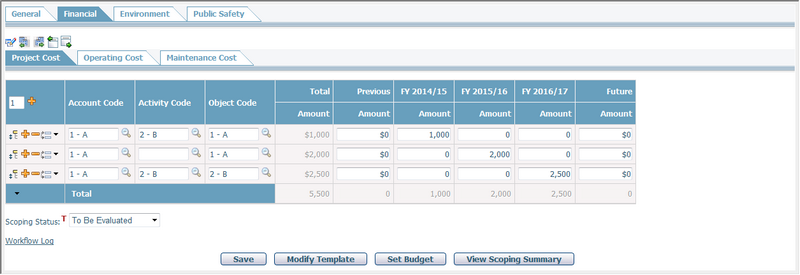
2. When the default financial scoping mode is Scoping Online:
You can manually enter the cost details right in the Scoping Detail table (same as the table in the Scope Online page) for each fiscal year after specifying a Financial Scoping Template. The scoping grid cannot be loaded if there is neither a specified template for this cost type in the current project nor a specified default template for this cost type in the system. You can add Financial Scoping Template on the Add Financial Scoping Template page or Add Excel Data Template page, and specify Financial Scoping Template for the projects under a (cycle) scenario on the Batch Default Scoping Scenario Setup page. To change or modify template for this project, you can click the Configure Scoping Template icon
You can switch the screen to the Scoping Summary by clicking the View Scoping Summary button, where you can view the scoping summary information and manually enter the cost amount. Please note that when scoping online has been completed, you can no longer fill in the Scoping Summary table manually; however, changes can still be made by scoping online.
CIPAce provides the following common functions of the Financial tab under Scoping Detail and Scoping Summary modes.
Click the Configure Scoping Template icon
Click the Copy Scoping Data from Another Project icon
Click the Copy Scoping Data to Another Project icon
Click the Import Data icon
Click the Export Data icon
Evaluators can change the current Scoping Status from a dropdown list.
After you complete any of the scoping options listed above, click the Save button to save the edited scoping data under the Financial tab. All evaluators can come back later and edit the information.
Authorized user can click the Set Budget button to trigger the Promote as Budget function which you can set the current financial scoping line items as budget line items.
If the current project belongs to a master project, the date grid of Financial Estimate Summary will be shown as below, the financial scoping summary of all sub projects under the same master project will be listed.
- Click the link under master project name to enter into its project General tab.
- Click the link under each sub project (except the current one) to enter into its Scope Online page.
Note: The Financial Estimate Summary table will utilize the longest scoping length by Year among all applicable projects, while financial scoping on a project basis will still utilize the scoping length defined in the corresponding Financial Scoping Template. When the scoping length of an applicable project is shorter than that of the Financial Estimate Summary table, the scoping fields of additional periods will display as "0". When the current project utilized a new longest scoping length by changing the Scoping Template, the Financial Estimate Summary table will also be updated. Click on the Save Interim Result button of the current project under the new template, the scoping length of the Financial Estimate Summary table will be updated to the new longest scoping length among all applicable projects.
Environment
This scoping area assesses the environmental impacts of the project. Evaluators can enter or modify Environment Justifications and Notes in the form. They can also change the current Scoping Status from a dropdown list.
Click the Save button to save the edited scoping data under the Environment tab.
You can reassign other users to scope for the current project by clicking the Reassign button. It will lead you to the Assign Projects to Scope page. Authorized users can also adjust scoping area evaluators in Project Assignment Management and reassigning the project.
Public Safety
This scoping area is designed to determine the working environment and the safety of facilities while the project is in progress. Evaluators can enter or modify Public Safety Justifications and Notes in the form. They can also change the current Scoping Status from a dropdown list.
Click the Save button to save the edited scoping data under the Public Safety tab.
You can reassign other users to scope for the current project by clicking the Reassign button. It will lead you to the Assign Projects to Scope page. Authorized users can also adjust scoping area evaluators in Project Assignment Management and reassigning the project.
|
|