Navigate Here: Projects > Browse Implementation Projects, select a project with planning phase and click Planning tab or
Projects > Browse Planning Projects > Planning tab > General tab
You can view and modify the project's general information on the Project General tab.
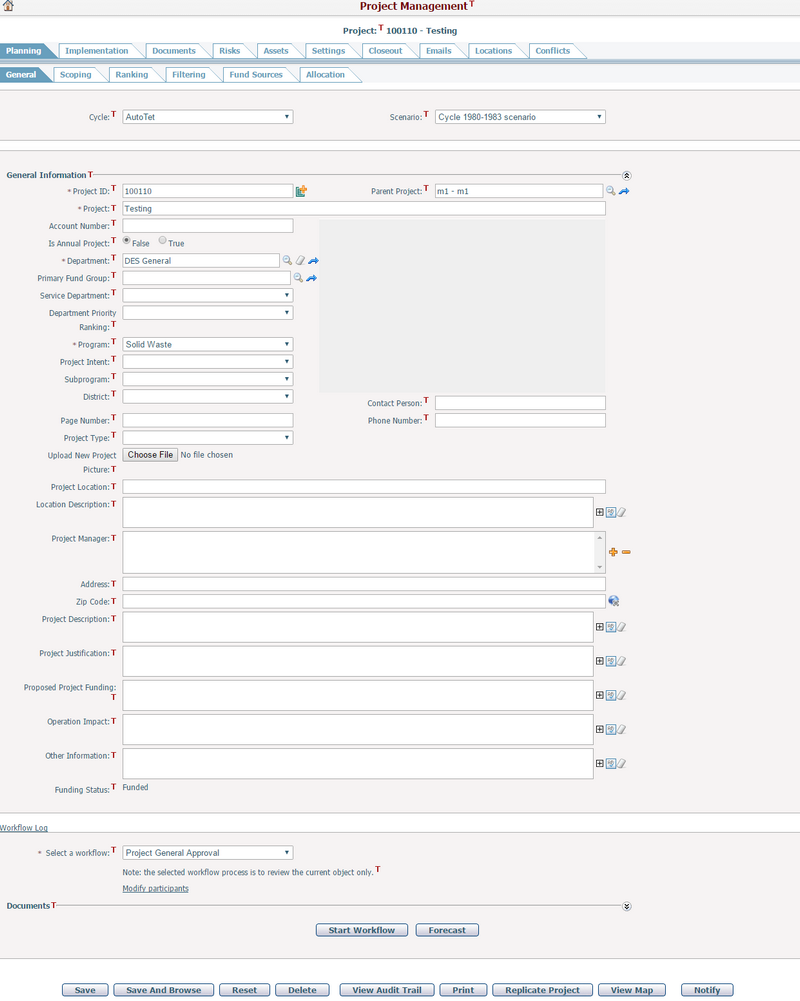
To edit a project's general information, update any of the following fields:
The required fields are noted with an asterisk (*).
Project ID*: The ID of the project. Project ID is automatically generated but can be manually entered. It must be unique.
Parent Project: The parent implementation project of the current project. When a parent project has been selected, the master-sub project relationship will be established in the Project Hierarchy Structure tab page, and you can click the View Implementation Project Information icon ![]() to enter the Project Management page for the parent project directly.
to enter the Project Management page for the parent project directly.
Project Name*: The name of the project. It must be unique.
Account Number: The account number of the project.
Is Annual Project: Specify whether this is an annual project by selecting either True or False.
Department*: Browse and select a department where the project falls under by clicking ![]() . You can click the View Department Information icon
. You can click the View Department Information icon ![]() to enter the Department Management page for the selected department directly.
to enter the Department Management page for the selected department directly.
Primary Fund Group: Select a fund group to attach to the project. You can click the View Group Information icon ![]() to enter the Fund Group General page for the selected fund group directly.
to enter the Fund Group General page for the selected fund group directly.
Service Department: Select a service department where the project falls under. Options can be configured in Dropdown List Management.
Currency*: Select a currency of the project. It will be populated automatically with the default currency of the selected Department, if the Department has no valid default currency, it will be populated automatically with the Default Organization Currency. You can also change it manually. This field will become read-only when project contains financial data (such as financial scoping, budget or FR etc.).
Department Priority Ranking: Select a priority to assign to the project. Options can be configured in Dropdown List Management.
Program*: Select a program where the project falls under. Options can be configured in Dropdown List Management.
Project Intent: Select an intent of the project. Options can be configured in Dropdown List Management.
Subprogram: Select a subprogram where the project falls under. A subprogram is related to the program selected above. Options can be configured in Dropdown List Management.
District: Select a district where the project is located or will take place. Options can be configured in Dropdown List Management.
Contact Person: The contact person of the project.
Phone Number: The phone number of the contact person specified above.
Page Number: This page number is a reference number used in the reporting section of the application, particularly the Project Index Report. For example, you may want run a large report with many projects listed. So a Project Index Report may be required for this report to help organized and list the projects. It will call the Page Number field that is supplied here for the project.
Project Type: Select a project type for the project. Options can be configured in Dropdown List Management.
Upload New Project Picture: The picture size is limited to 1MB. Click the Browse button to browse and select a file to upload to the project. The project image will be embedded into several different versions of the project description reports.
Project Location: The location of the project.
Location Description: A detailed description of the project location.
Project Manager: The resources assigned to the project as project manager role.
Address: The address of the project location.
Zip Code: The ZIP code of the project location. The ZIP code must be in the format of "#####" and only contain numbers. Any other format will not be accepted. You may also click the View Map button to view the project location on the map in GIS. To view the map a valid Address and Zip Code is required.
Project Description: The description for the project.
Project Justification: The justification for the project.
Proposed Project Funding Source: A description of the proposed funding source.
Operation Impact: A description of the operational impact.
Other Information: A description of any additional information required for the project.
Funding Status: Whether this project has been funded or not.
Click the Save button to save the changes.
Click the Save And Browse to save the changes and then go to the Browse Projects page.
Click the Reset button to reset values of the general information to last saved state.
Click the Delete button to delete the project. A dialog will prompt for confirmation before the project can be deleted from the system.
You can view the change history of this project by clicking the View Audit Trail button. The system will then open the Browse Audit Trail Details page in a new window.
You can print information of this project in Word or PDF format by clicking the Print button. The system will then open the Generate Dynamic Document page.
You can view project locations in GIS map by clicking View Map button. The system will then open the GIS page.
Click the Notify button to inform relevant persons about the project. The system will then go to the Send Notification page.
If the project related workflow type has been activated, you can click the Start Workflow button to initiate the workflow or Forecast button to see the workflow activities’ detail.
Replicate Project
You can create a new project by replicating from the current project by clicking the Replicate Project button. The information that will be replicated includes all the information under General tab and optional data such as Scoping, Risk, Schedule and Documents. After you click the Replicate Project button, a window as below pops out.
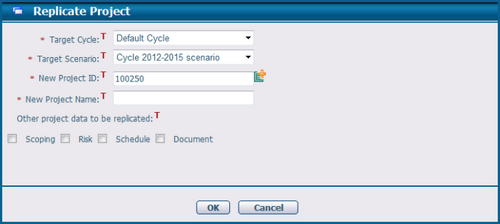
To replicate a project, fill in the following fields:
The required fields are noted with an asterisk (*).
Target Cycle and Target Scenario*: Specify the (cycle) scenario for the new project (the default value is the current user’s working cycle and scenario).
New Project ID*: The ID of the new project. Project ID is automatically generated but can be manually entered. It must be unique.
New Project Name*: The name of the new project. It must be unique
Other project data to be replicated: Select the additional data to be replicated. The system offers 4 options: Scoping, Risk, Schedule and Documents.
Scoping: By checking this checkbox, system will replicate the scoping data and structures under the current project to the new project. If Scoping option is not selected, the new project will be created with default scoping template, no data and structures are replicated.
Risk: By checking this checkbox, each risk associated with the current project will be cloned with a new Risk ID (as Risk ID must be unique) and those newly created risks will be associated with the new project. Meanwhile, all the documents attached to the risks associated with the current project will be also replicated with new document names (as Document Name must be unique).
Schedule: By checking this checkbox, schedule data will be replicated to the new project. You can also specify the schedule start date for the new project from the Schedule starts from date picker (the date picker is hidden if the Schedule checkbox is not selected. Start date is defaulted to the day when the replication occurs). The dates of the schedule tasks will be adjusted relatively according to this new schedule start date.
Documents: By clicking this checkbox, all the documents associated with current project will be replicated with new document names (as Document Name must be unique). If the document is also replicated in other processes like Risk replicating, the document is replicated only once.
Click the OK button to start creating the new project.
Click the Cancel button to cancel your operation and return to the Project Management page.