Navigate Here: Click the Notify button on a form if available or
click Add Notification icon ![]() in Emails tab (Project, etc)
in Emails tab (Project, etc)
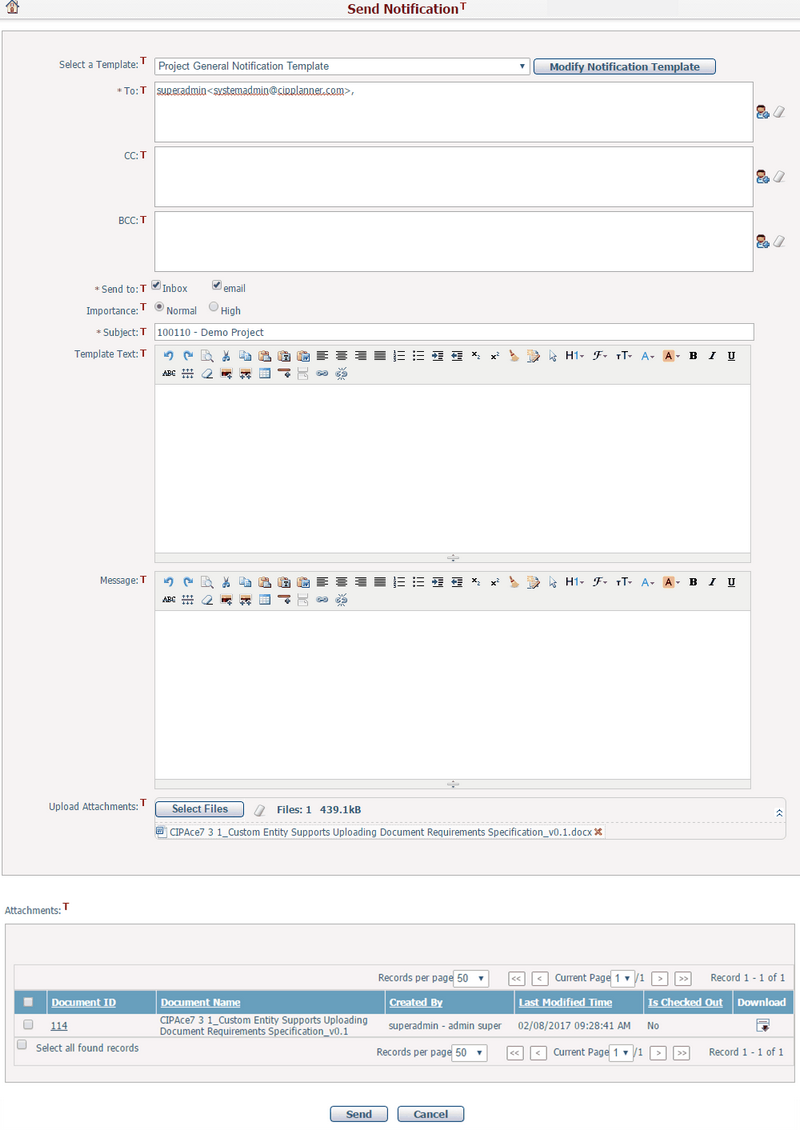
You can send a notification on the Send Notification page.

If there is a default template for the current page, its Template Name will be displayed in the field Select a Template, otherwise you can select a template from the dropdown list. After a template is specified, the page will refresh and display the notification details of the selected template. If you are an authorized user, you can modify the selected template by clicking the Modify Notification Template button beside the template name. The system will then go to the Notification Template Management page.
To send a notification, fill in the following fields (If a notification template has been specified, these fields will use default contents from the template):
The required fields noted with an asterisk (*).
To*/CC/BCC: The recipients of the notification. You can browse and select recipients from the current system users by clicking ![]() on the right side of the box. Or click
on the right side of the box. Or click ![]() to clear all recipients in the box.
to clear all recipients in the box.
Send To*: You can specify where the notification will be sent to for the recipients: Inbox or Email account. By default, both are selected.
Importance: Select whether the notification is of Normal or High importance. Notifications of high importance will be marked with a important sign ![]() in the system.
in the system.
Subject*: The subject of the notification.
Template Text: The contents of the notification, it will load from default Message Text of the notification template when specified, you can edit the contents if necessary.
Message: Optional contents of the notification, it will be attached to the end of Template Text.
Upload Attachments: You can upload multiple document(s) as notification attachments from your local PC folder by clicking Select Files button, the uploaded file(s) will be list in a box below, you can see the total number and size beside the button, or click the icon ![]() beside the file name to delete any of them.
beside the file name to delete any of them.
If there are any files associated with the business entity of the current page, they will be displayed in the Attachments section, you can select them as notification attachments by their checkboxes. You can browse a document by clicking the Document ID link and the system will go to the Document Management page or download it by clicking the icon ![]() in the Download column.
in the Download column.
Once you've finished editing the notification, click the Send button to send it and the system will return to the previous page.
Note, if a notification is failed to be delivered to the receiver, a notification about the failed delivery will be sent to the sender's Notification Inbox, as well as his/her email account registered in the system.
Click the Cancel button to cancel the current operation and return to the previous page.