Navigate Here: Documents > Browse Documents; click on the Document ID or Document Name link of a document
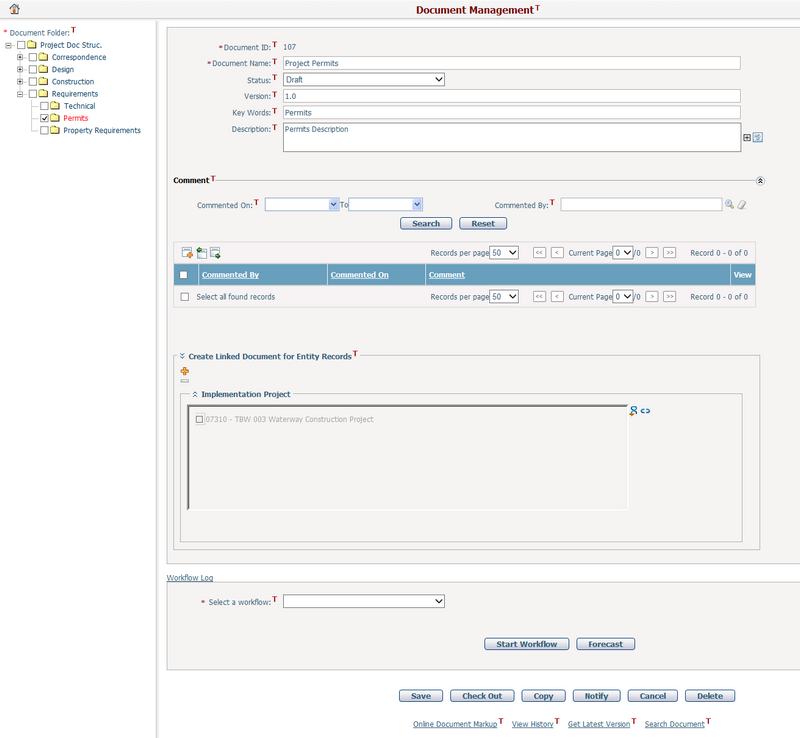
You can edit or view the document details on the Document Management page.

To edit a file, update any of the following fields:
The required fields are noted with an asterisk (*).
Document Folder : It specifies the folder in which the current document is placed.
Is Linked Document: Indicates whether or not the document is linked document. If document(s) is created by uploading from local file directory or copying from system existing documents, it is called non-linked document(physical documents). If document(s) is created by Create Linked Documents In operation, it is called linked document.
Document ID*: The ID of the document, it is auto generated by the system and read-only.
Document Name*: The name of the document.
Status: The status of the document. The values of the Status drop down list can be configured in Utilities > Drop Down List Management > Status Management > Document Status. After a new document is saved successfully, its default status is Draft.
Version: The version of the document.
Key Words: Any key words associated with the document. These key words can be used when you search for a document.
Description: The description of the document.
Comment Section: The Comment Section allows you to directly add your comments against the current document via the page.
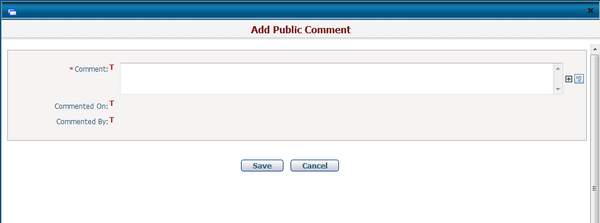
❖Users can enter their comments through clicking the Add icon![]() to pop up the Add Public Comment window:
to pop up the Add Public Comment window:

❖Enter your comment words into the Comment field and then click the Save button to submit your comments or Cancel to abort the changes. Note: This is a required field, that is, the Save action for a blank comment will be invalid.
❖After the save action, the submitted comments will be listed in the data grid of the comment section, illustrating who has created the comment in the Commented By column; when the comment is created in the Commented On column and contents of the comment in the Comment column respectively.
❖If there are too many comment records to be shown in the data grid, you can use the navigation control for the page-switching or change the number of displaying records per page.
❖Besides, you can quickly find the desired comments by using the search function above the data grid. Specify the Commented On and/or the Commented By criteria and click the Search button. Filtered records which match the search criteria will then list in the data grid for your reference. You can also click the Reset button to redefine the search criteria.

❖You can click the Edit icon ![]() in the View column to further edit the comment. Note: You will be only allowed to edit the comments that you create. The Save button will be disabled if the current log-in user is not equal to the person who submits the comment.
in the View column to further edit the comment. Note: You will be only allowed to edit the comments that you create. The Save button will be disabled if the current log-in user is not equal to the person who submits the comment.
❖In the Edit Public Comment popup, modify the comment in the Comment filed, then click the Save button to confirm your modifications. The Commented On field will be updated every time when the Save button is pressed.
❖You can also click the Delete to delete the comment, or Cancel to abort the modifications.

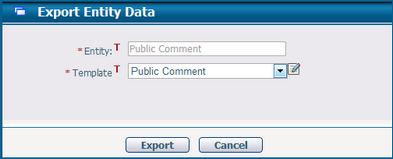
❖The Comment section will also support Excel Import and Export functions, which facilitate the batching function for comments. The checkbox beside each comment record is available for selecting specific records to export. Check the checkbox for corresponding records that you want to export and then click the Export Data icon![]() in the upper left corner of the data grid to export requested comments, the system will popup an Export Entity Data window for you to specify a template to export. Please refer to Excel Data Template for more information.
in the upper left corner of the data grid to export requested comments, the system will popup an Export Entity Data window for you to specify a template to export. Please refer to Excel Data Template for more information.

❖For the Import, click the Import Data icon![]() in the upper left corner of the data grid to go to the Excel Import Data page, select a template from the *Template field dropdown and then upload the excel file through the Browse button in the Upload File filed for a further import. For more information, please refer to the Import Excel Data page.
in the upper left corner of the data grid to go to the Excel Import Data page, select a template from the *Template field dropdown and then upload the excel file through the Browse button in the Upload File filed for a further import. For more information, please refer to the Import Excel Data page.

Lock Section: Show whether the document has been locked by other users. If it has been checked out by one user(for example: ritayu) in the system, this field will display "This document is being checked out by ritayu - rita yu at 2/13/2014 9:59:08 AM; if it has not been checked out, Lock Section information will be invisible.
Create Linked Document for Entity Records: Create linked document(s) to data records for a single business entity or multiple business entities by the following steps.
❖Click the ![]() icon to pop up "Select Entities" window.
icon to pop up "Select Entities" window.
❖On the left section of "Select Entities" window is a list of "Available Entities". You can check one or more business entities and click the ![]() icon, the selected entities will be moved to the right section -- "Selected Entities". Click the OK button to confirm your selection. (You can also check entities in "Selected Entities" section and click the
icon, the selected entities will be moved to the right section -- "Selected Entities". Click the OK button to confirm your selection. (You can also check entities in "Selected Entities" section and click the ![]() icon, then the selected entities will be moved back to "Available Entities". After you click the OK button, objects of these deselected entities will be disassociated with the current document.)
icon, then the selected entities will be moved back to "Available Entities". After you click the OK button, objects of these deselected entities will be disassociated with the current document.)
❖After you click the OK button, subsections of the Selected Entities will display below ![]() icon one by one. These subsections are collapsible, by default they are expanded, you can click on
icon one by one. These subsections are collapsible, by default they are expanded, you can click on ![]() icon to collapse the subsection and click the
icon to collapse the subsection and click the ![]() icon to expand it. At the top left corner of each subsection, there is a
icon to expand it. At the top left corner of each subsection, there is a ![]() icon, by clicking on it you can remove the business entity from associating with the current document. On the right of each subsection, there are two icons. By clicking the
icon, by clicking on it you can remove the business entity from associating with the current document. On the right of each subsection, there are two icons. By clicking the ![]() icon, you can select objects of the specific business entity to associate with the current document on a pop-up window. By selecting objects of the specific business entity and then clicking the
icon, you can select objects of the specific business entity to associate with the current document on a pop-up window. By selecting objects of the specific business entity and then clicking the ![]() icon, you can disassociate these objects with the current document.
icon, you can disassociate these objects with the current document.
Click the Save button will save the changes.
Click the Check Out button to check out the document to your local machine for editing. When a document is checked out by a user, the document will be locked and the original Check Out button will be a) replaced by Check In button and Undo Check Out button for the user who has checked out the document; b) replaced by Undo Check Out button for the superadmin-role user ; c) invisible for other non-superadmin role users. Other users cannot check out the document until it is checked back in.
You can click the Check In button to upload the document back to the CIPAce application, or click the Undo Check Out button to cancel the document check out.
Click the Copy button to add a new document by copying the current document. The system will go to Add Document page.
Click the Notify button to notify someone about information about the current document and the system will go to the Send Notification page.
Click the Cancel button to cancel the current operation and the system will go to the Browse Documents page.
Click the Delete button to delete the current document and the system will go to the Browse Documents page.
There are a number of features when you modify a specific document on this page:
You can track the file activities by clicking the View History link.
You can download the document for review by clicking the Get Latest Version link.
Clicking the Search Document link will take you to the Browse Documents page.
|
In the Workflow module, various document review process can be defined as workflow processes. If the corresponding workflow has been defined and deployed, and if the process type is not set to inactive, you can initiate a workflow process to review this document by selecting a desired workflow in the Workflow dropdown list and then clicking the Start Workflow button. Then designated participants will take required action, driving the flow forward. Only one review process can be run for the same document at the same time.
|