Navigate Here: Planning > Scoping > Assign Projects to Scope
You can assign projects to evaluators on the Assign Projects to Scope page.
Before this, you may consider reviewing the systems scoping areas in Scoping Area Management.
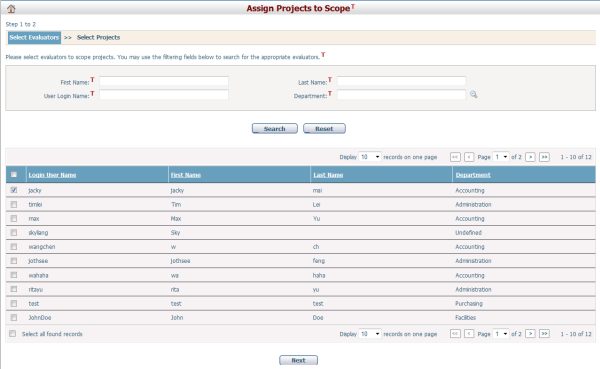
The first step is to select users whom you would like to be evaluators.
You may filter the list of users using the search function. Then click the Next button at the bottom of this page or click the Select Projects link at the top of the page, and choose the projects you would like to assign to the evaluators on the following page.
Note: If you have just added a new project to the system and you have come to the Scoping Assignment page via the Projects Scoping tab, this page looks slightly different. The project you entered will display in the table. The first step is to Select the Scoping Areas, which you would like to assign to the evaluators for this project. Then click the Select Evaluators link and the top of the page or the Next button, and choose the users you would like to assign as evaluators on the following page. When you finished, click the Finish button and the system will return to the Scoping tab under the Project Management page. |
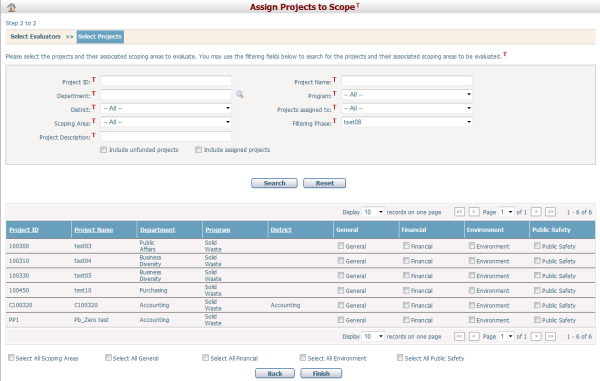
The next step is to select the projects and associated scoping areas which you would like to assign to the evaluators selected in the previous step.
The table lists the projects to which the selected users have access rights to. You may filter the list of projects by using the search function. By default, only funded projects are displayed. However, you may check the Include unfunded projects checkbox to include them. Also, the System scoping areas of a project will be auto assigned to the project creator so the projects will not be shown here. However, you can check the Include assigned projects checkbox, so that you can assign its other scoping areas to other evaluators or change the assignation.
Scoping areas can vary between projects. You just need select those needed in the projects which will be assigned to the evaluators. Projects without a selected scoping area will not be assigned. You can select scoping areas for projects in two ways. You can check the scoping area checkbox in the table for the associated project. You can also check the "Select All XXX" checkbox at the bottom of the table, which will select the scoping area for all the projects listed in the table.
After selecting projects and scoping areas, click the Finish button. If assigned projects are selected, you will be asked whether or not to withdraw the selected scoping areas from their previous assignees. If you want to replace the previous assignees with the new evaluators, select "OK", otherwise select "Cancel".
Selected evaluators will be able to perform scoping on the scoping areas of the project assigned to them by going to the menu Planning > Scoping > Conduct Project Scoping. The assignation can be viewed from Planning > Scoping > Project Assignment Management. Repeat the whole assigning process if there are more assignations.
|