Navigate Here: Implementation > Project Statuses > Add Multiple Project Statuses
You can add statuses for multiple projects on the Add Multiple Project Statuses page.
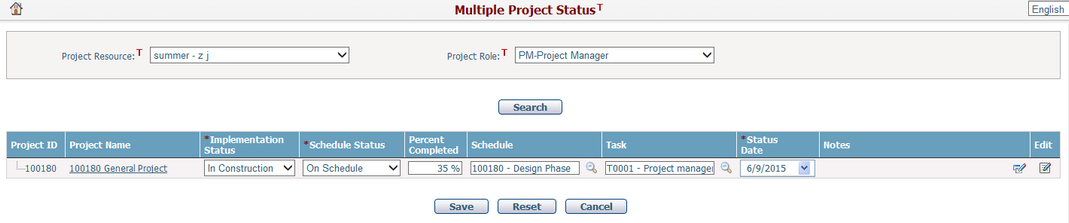
If you logged into the system as a project manager and entered this page, the system will select Project Manager option in the Project Role dropdown list by default and your name will be selected in the Project Resource dropdown list as well. The table will hierarchically list all projects, which belong to you.
If you are a project manager, you can also select a project role from the Project Role dropdown list. The Project Resource dropdown list will then list all the resources of the selected role. Click the Search button and the table will show associated projects with the selected resource hierarchically.
The table lists a summary of the project statuses and you may enter the status options of these projects in the table:
Project ID: The ID of the project.
Project Name: The name of the project.
Implementation Status*: The implementation status of the project. It is a required field. The options can be configured in Dropdown List Management.
Schedule Status*: The schedule status of the project. It is required.
Percent Completed: Enter the implementation progress of the project. Percentage can be selected from 1% to 100%. It is optional
Schedule: Select a schedule of the selected project by clicking ![]() . It is optional.
. It is optional.
Task: Select a task in the selected schedule by clicking ![]() . It is optional.
. It is optional.
Status Date*: The date when the project status was tracked. It is required. Note: if the date is LATER THAN the "As of" date in Schedule Status of the selected project, the current Schedule Status ("Schedule Status", "Percent Complete", and "As of" fields) of the project will be updated with information in the to-be-added project status ("Schedule Status", "Percent Completed", and "Status Date" fields); otherwise, the current Schedule Status will NOT be updated.
Notes: Click the Edit Notes icon ![]() and the system will popup the Notes window for adding or modifying a description of the project status. It is optional.
and the system will popup the Notes window for adding or modifying a description of the project status. It is optional.
❖Click the OK button to add new notes or modify the existing notes. Click the Cancel button to close the dialog box without making any changes.
❖Click the Project Name of a project and the system will go to the Project Schedule page.
Click the Edit icon ![]() to go to the Project Implementation Status Management page for the selected item.
to go to the Project Implementation Status Management page for the selected item.
Click the Save button to save any changes. If all the fields of a project status record are blank or unchanged, no project status entry is generated for the specific project(s) on the page.
If at least one field is changed, a new project status entry will be generated for the specific project(s) on the page.
Click the Cancel button and the system will reset the status data to previous saved values.