Navigate Here: Resource > Resources > Assign Resources
You can assign resources to a project or contract on the Assign Resources page.
After a resource is assigned to a project or contract, it can later be assigned to the tasks of the project or contract schedules, and then timesheets can be filled in for it.
Initially, only empty Entity field will be shown when you enter into the page, you need to select an entity from the drop down list. After you made your selection, a dynamic Project or Contract field will be displayed underneath. You can click the icon ![]() to open a lookup screen to search and select a project or contract record, and then the resource data grid will be shown with all current resource assignments.
to open a lookup screen to search and select a project or contract record, and then the resource data grid will be shown with all current resource assignments.
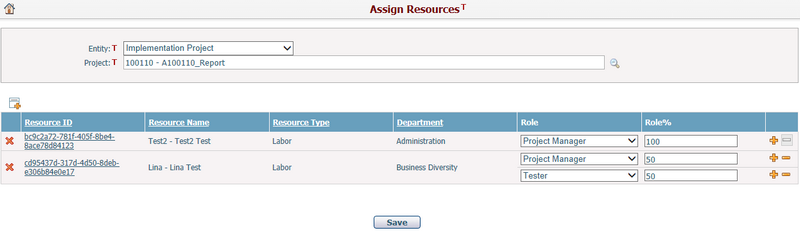
The summary of each assigned resource includes: Resource ID, Resource Name, Resource Type, Department, Role, and Role%.
You can click the Resource ID link and the system will go to the Resource Management page of the corresponding resource.
To assign resources to the selected project or contract, click the icon ![]() and the Resources lookup window will be popped up, listing all resources with those that have already been selected. Then you can search and select/deselect multiple resources to add into the resource data grid.
and the Resources lookup window will be popped up, listing all resources with those that have already been selected. Then you can search and select/deselect multiple resources to add into the resource data grid.
You can specify Role and Role% information for each resource in the data grid:
- The available Role options are specified on the Project Settings or Contract Settings page.
- Role% represents percentage of time a resource spends on the specified role. Select a Role for the resource, and then Role% will be entered “100” automatically. You can change this value by entering a new one.
A resource can have multiple roles in a project, click the icon ![]() at the end of a row , then a new empty role will be added for the same resource.
at the end of a row , then a new empty role will be added for the same resource.
Note: The system will perform below validations when saving the changes.
- If the total Role% of a resource is larger than 100, meaning the resource will get to “Overtime”, a confirmation message will be shown.
- If the same role has been assigned to the same resource more than once, a alert message will be shown and block the action.
You can remove a Role from a resource by clicking the icon ![]() at the end of the row. If the resource has only one role, this operation is not available. After a Role is removed, it will be removed from the resource's assignments in any schedule tasks.
at the end of the row. If the resource has only one role, this operation is not available. After a Role is removed, it will be removed from the resource's assignments in any schedule tasks.
You can remove an assigned resource by clicking the icon ![]() at the first column of each row. The resource's assignments will be removed from project or contract schedule tasks at the same time, but the associated timesheet records will be kept intact if exist.
at the first column of each row. The resource's assignments will be removed from project or contract schedule tasks at the same time, but the associated timesheet records will be kept intact if exist.
Click the Save button to save the updates on the assigned resources.