Navigate Here: Reports > Custom Report Management > Report Definition, select a custom report
You can manage General Information, Template and Subscriptions of a custom report in the Custom Report Management page.
General Information

To edit a data source, fill in the following fields:
The required fields are noted with an asterisk (*).
Report Name*: The name of the custom report, it is read-only.
Data Source*: The selected data source for this custom report. You can click the link to go to Data Source Management page.
Report Category*: Specify the category which the custom report belongs to. The available selections in the drop down list are managed under Report Category in Classification Management.
Publish to Menu*: You can select if the report will be published into Reports > Custom Reports menu and grouped by different report categories. By default it is No.
Description: The detail description of the custom report.
Template

A brief summary of each custom report template is displayed in the table by Template Name, Description and Default Template information.
Click the icon ![]() at the end of the row to delete a template. Note, the default template cannot be deleted.
at the end of the row to delete a template. Note, the default template cannot be deleted.
Click the Add Template icon ![]() to add a new template on the Add Template popup screen.
to add a new template on the Add Template popup screen.
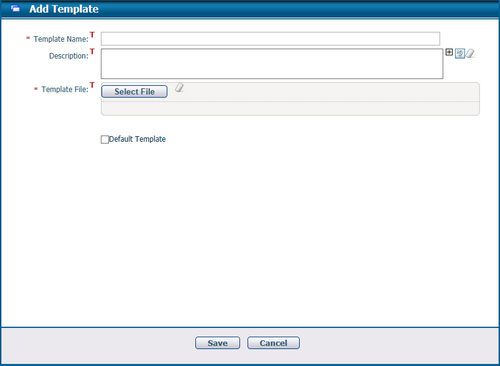
To add a new template, fill in the following fields:
The required fields are noted with an asterisk (*).
Template Name*: The name of the template, it must be unique under the same custom report.
Description: The detail description of the template.
Template File*: You can click the Select File button to select a template file from your local PC folder. The file name will be displayed in a list under the button, then you can clear it by clicking the Clear List icon ![]() and select again.
and select again.
Default Template: This option is used to set the current template as the default template. Once set, it will override other default template setting for the same custom report, so there is just one default template always.
Once you've finished, click the Save button to save the new template or click Cancel button to return without saving.
Click the icon ![]() in the Edit column to edit a template on the Edit Template popup screen.
in the Edit column to edit a template on the Edit Template popup screen.
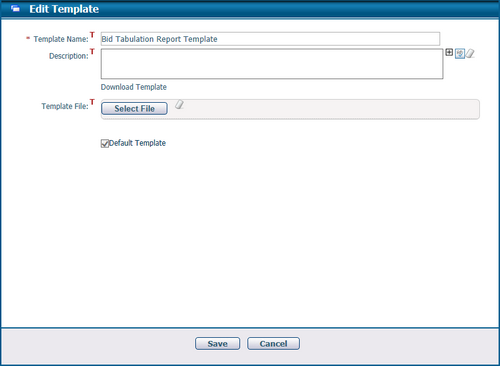
To edit a template, fill in the following fields:
The required fields are noted with an asterisk (*).
Template Name*: The name of the template, it must be unique for the same custom report.
Description: The detail description of the template.
Download Template: Click this link to download the current template file.
Template File*: You can click the Select File button to select a template file from your local PC folder, the file name will be displayed in a list under the button, then you can clear it by clicking the Clear List icon ![]() and select again. Note, this new template file will replace the old one once saved successfully.
and select again. Note, this new template file will replace the old one once saved successfully.
Default Template: This option is used to set the current template as the default template. Note, for a default template, it cannot be unchecked..
Once you've finished, click the Save button to save the new template or click Cancel button to return without saving.
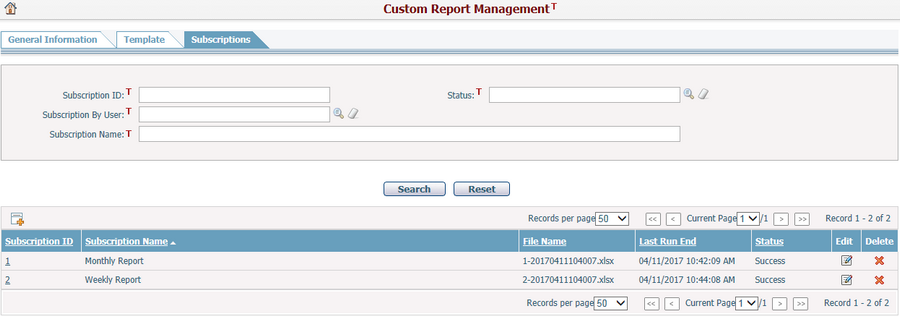
You can quickly find the custom report subscriptions you want by using search function. Enter search conditions in the search fields and click the Search button. The custom report subscriptions will be filtered and the table will show the records that match the search conditions. Click the Reset button to clear the latest input search conditions.
A brief summary of each custom report subscription is displayed in the table. The summary includes Subscription ID, Subscription Name, File Name, Last Run End and Status. The records are sorted by Subscription ID by default but you can also sort them by clicking other underlined column headers. If there are too many records to display on one page, you can use navigation control to view the other pages.
The existing subscriptions will automatically run according to their schedule to send emails to the subscribers and update the File Name, Last Run End and Status in timely manner.
Click the icon ![]() at the end of the row to delete a subscription.
at the end of the row to delete a subscription.
Click the Add Subscription icon ![]() to add a new subscription in the following screen.
to add a new subscription in the following screen.
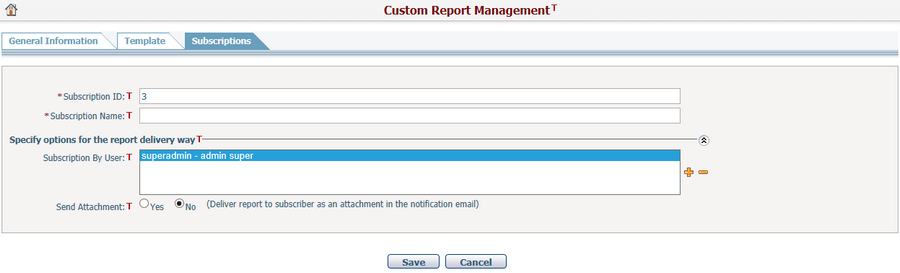
To add a new subscription, fill in the following fields:
The required fields are noted with an asterisk (*).
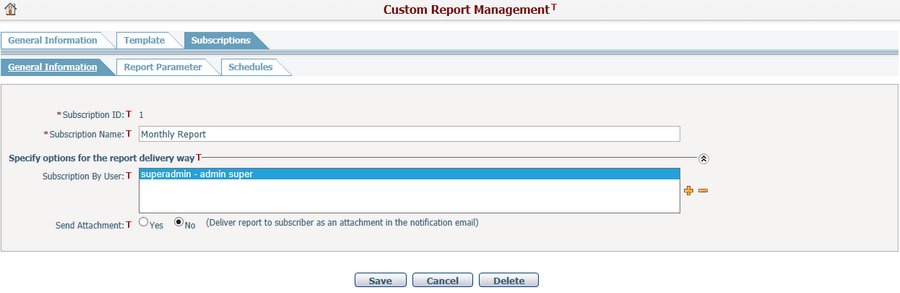
Subscription ID*: The ID of the subscription. It will be automatically generated as a sequence number by the system, and it must be unique for the same custom report.
Subscription Name*: The name of the subscription.
Subscription By User: The user involved in this subscription. The current user will be added automatically by default. You can click the icon ![]() to open a popup search screen and select multiple users into the list box, or select multiple users in the list box and click the icon
to open a popup search screen and select multiple users into the list box, or select multiple users in the list box and click the icon ![]() to remove them.
to remove them.
Send Attachment: This option is used to decide if the custom report will be delivered as an attachment or an URL in the subscription email.
❑ No (by default): The custom report will show as an URL in the subscription email which will be obsolete one week after the email has been sent.
❑ Yes: The custom report will send as an attachment in the subscription email. Note, the maximum size of the attached file(s) is 10MB, the system will discard those beyond the maximum size automatically.
Once you've finished, click the Save button to save the new subscription or click Cancel to return without saving.
Click the icon ![]() in the Edit column to edit a subscription in the following screen.
in the Edit column to edit a subscription in the following screen.
General Information
You can update Subscription Name, Subscription By User and Send Attachment for the current subscription.
Once you've finished, click the Save button to save the new subscription or click Cancel to return without saving, or you can click the Delete button to delete the current subscription.
Report Parameter
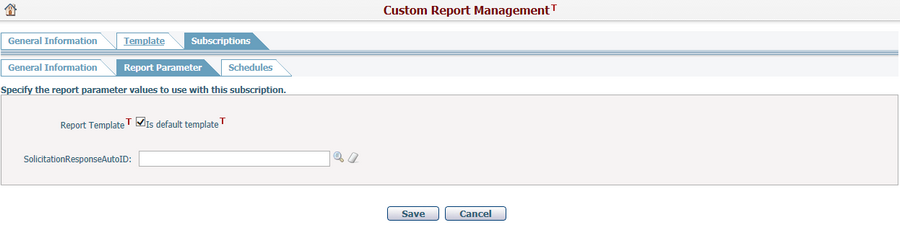
You can specify a Report Template for the custom report to be generated by this subscription, there are two options:
❑ Is default template = True, that means the custom report will use the latest default template automatically in this subscription.
❑ Is default template = False, a drop down list will be displayed for you to select an existing report template for the custom report in this subscription. Note: If no report template has been selected, system will generate a default Excel report with source data only.
Pre-defined report parameters will be displayed under the Report Template field, and you can input their default values for this subscription.
Once you've finished, click the Save button to save the new subscription or click the Cancel button to return without saving.
Schedules
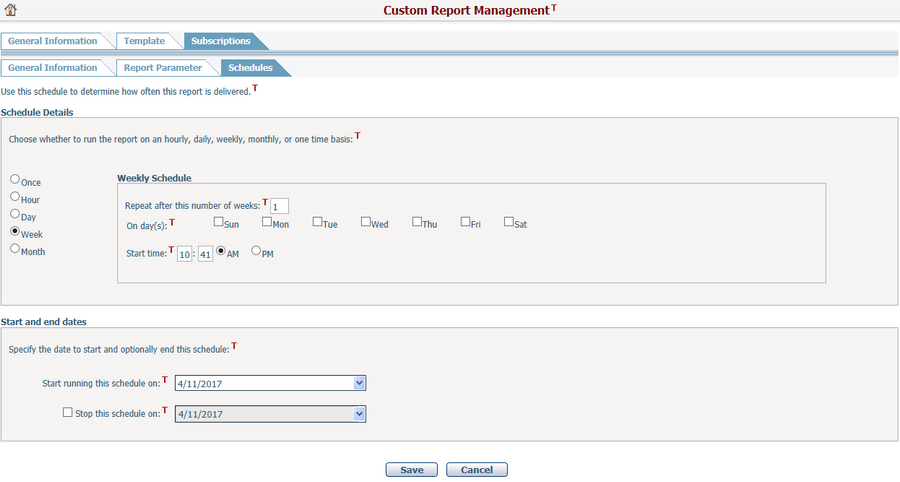
You can specify the interval and timing to run this subscription by options including Once (by default), Hour, Day, Week and Month.
You can specify the start and end dates to run this subscription. If the option "Stop this schedule on" is unchecked, it means that the subscription will run continuously without an end date.
Once you've finished, click the Save button to save the new subscription or click Cancel to return without saving.