After creating a dynamic document template, you can edit it in the Microsoft Word application.
You can download a template by clicking the Download link on the Browse Dynamic Document Templates screen. Then save the file to your local machine.
Please do not open the file on the browse page, or it will not function properly.
|
Edit Template in Microsoft Word 2013
Open the downloaded file with Microsoft Word 2013.
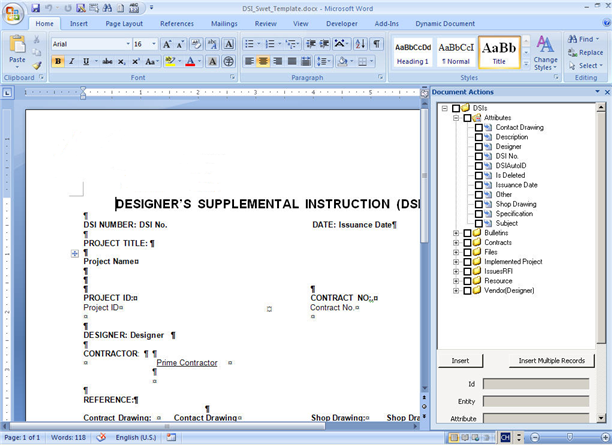
You can see the Document Actions tool panel on the right.
The upper section of the panel is the Metadata in tree view structure. The Primary Entity is the one specified in the specific dynamic document template. The Attributes of the Primary Entity are displayed by default and the Related Entities of the Primary Entity are listed with a Collapsed label. You can click “+” to expand a related entity to display its Attributes and Related Entities.
For example, we are going to make a “Designer’s Supplemental Instruction (DSI)” form, as shown above.
Insert a field
First type a label for the field. Then move the cursor after the label, and select the corresponding Metadata attribute from the right and click the Insert button, or double-click the attribute.
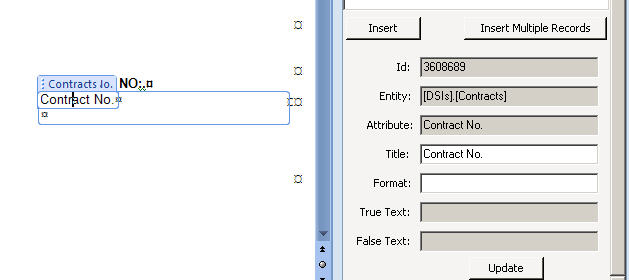
Insert multiple records for a dynamic value
Select a Metadata attribute and click the Insert Multiple Records button. And the dynamic value will be wrapped in a bigger frame:
The label on top of the frame is the name of the Entity which the dynamic value falls under.
Insert multiple records for multiple dynamic values within the same entity
Select multiple Metadata attributes and click the Insert Multiple Records button. The selected dynamic values will be displayed in a table.
The first row of the table is the column header so you do not need to type those words beforehand. The second row is the corresponding attribute.
Insert multiple records for multiple dynamic values across multiple entities
For example, “Project ID and Contract No.”. First draw a table that consists of two rows and two columns.
Type “Project ID” and “Contract No.” into Row One, and then insert multiple records in Row Two.
The lower section of the Panel is for management of the selected dynamic value.
Field Definition:
ID: Auto sequence number generated by Word. It is read-only.
Entity: The Entity which the dynamic value falls under. The format is [Primary Entity].[Related Entity].[Related Entity]…. It is read-only.
Attribute: The Display Name of the attribute. It is read-only.
Title: Default is the Attribute Display Name. You can change this name by entering another name. This will change the display name of the dynamic value, for example:
Format: The format of the dynamic value shown in the generated document.
For example, “DBE Participation Goal” has no special format originally, and it is shown as:
After changing the format to:
The new format will become:
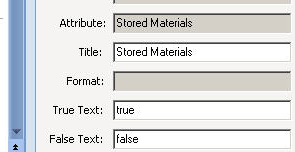
True Text/False Text: The display text for the Boolean type attributes.
For example, the default True Text and False Text for “Stored Materials” are “true” and “false”. You can change them to “yes” and “no”, which will be displayed in the generated document accordingly.
You can also insert a header or footer into the dynamic document if you'd like to.
You must click the Update button to save the changes.
|


There is a Dynamic Document toolbar in the Control Panel.
Clicking Download New Version will get the latest version of the specific dynamic document template from CIPAce.
Clicking Upload Template will upload the current template to CIPAce. And the template will be saved automatically before uploading.
Clicking Preview will preview the document based on the current template. And the template will be saved automatically before previewing. The system will list ten records of the Primary Entity and you can select one to preview.
Show Tool Panel/Hide Tool Panel: Show/hide the Document Actions tool panel.
Design Mode: Show the document in design mode.
|
