Navigate Here: Utilities > Scenarios > Browse Scenarios > Select a scenario from the table
You can view and modify the scenario information on the Scenario Management page.
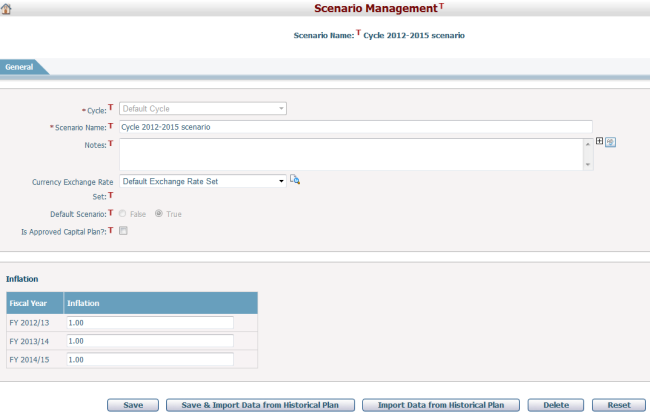
To edit a scenario, first provide the general information by filling in the following fields:
The required fields are noted with an asterisk (*).
Cycle cannot be modified.
Scenario Name*: The name of the scenario and it must be unique.
Notes: Description of the scenario.
Currency Exchange Rate Set: The currency exchange rate set for the to-be-added scenario. You can view the details of the selected exchange rate set by clicking the view icon next to the dropdown box.
Default Scenario: Select the radio button labeled "True" will set the new scenario as the default scenario.There can be only one default scenario for a cycle at any given time. Before the new scenario can become the system default scenario you will be required to log out of the application. When you click the Save button, the system will automatically log you out and then log you back in and display the application's homepage. Note: if the current scenario is already a default one, the two radio buttons will be disabled.
Is Approved Capital Plan: When a scenario is created and the planning numbers are correct, the system Admin should check this check box to officially set up the “Approved Capital Plan” scenario to pull planning numbers into the FR line items for creating a Funding Request. Only one scenario can be selected as “Approved Capital Plan” scenario under a cycle .
Inflation: this section is to define inflation rates for each fiscal year in the selected planning cycle. By default, Inflation is "1.00", meaning that there is no inflation in each fiscal year. Settings made in this section may be used for generating various financial reports that take inflation into consideration.
Click the Save button to save any changes to the scenario. The system will then go to the Browse Scenarios page. If you have selected to make the scenario the default scenario, you will be forwarded to the application's homepage.
Click the Delete button to delete the scenario. The system will then go to the Browse Scenarios page. A scenario can be deleted only if it is not a default scenario or a working scenario.
Click the Reset button to clear the latest changes.
Click the Save & Import Data from Historical Plan button to save the changes made to this scenario and import data from an existing scenario to this scenario. The system will then go to the Import Data from Historical Plan page. This button will appear only if there is at least one other scenario in the system.
Click the Import Data from Historical Plan button to import data from an existing scenario to this scenario if no changes were made to this scenario. The system will then go to the Import Data from Historical Plan page. This button will appear only if there is at least one other scenario in the system.