Navigate Here: Under the Main Panel of pages for entities that support workflow engine
Workflow Section is a special functional area on the page for an entity that supports workflow engine in CIPAce application, where authorized users can initiate a predefined workflow process, modify participants prior to initiating a workflow, accept and process workflow tasks, reassign workflow tasks, and manage (suspend/resume/terminate) individual workflow instances.
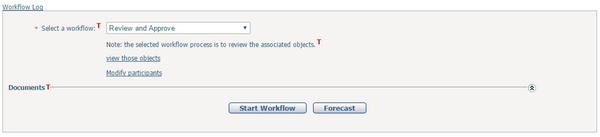
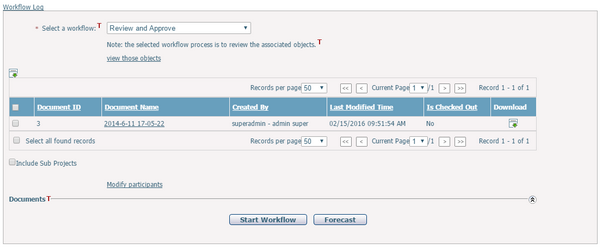
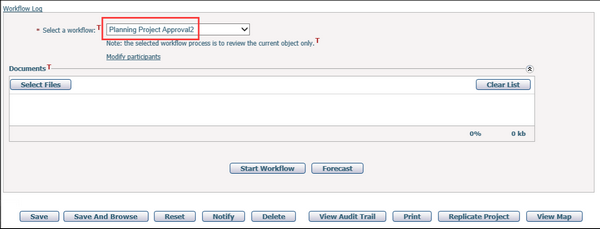
Before starting a workflow, the "Select a workflow" dropdown list includes all active workflow process types created for the current entity with the default process selected.
The Note below the dropdown list indicates the review type of the selected workflow process:
to review the current object only: Only the current entity object will be reviewed under the selected workflow process
to review the associated objects: Both the current entity objects and its associated objects will be reviewed in bulk under the selected workflow process. If this type of workflow process is selected, a "view those objects" link will also appear. By clicking this link, a table including major information of the associated objects will be shown.
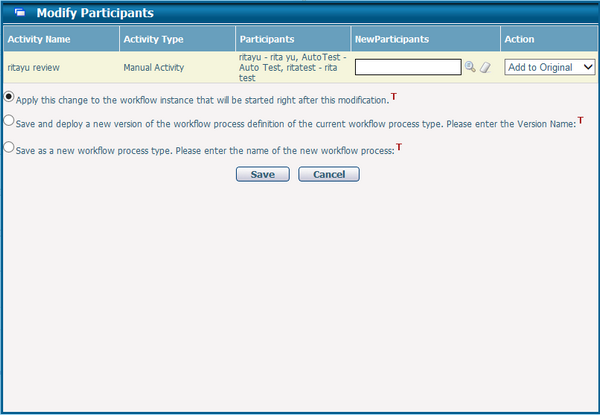
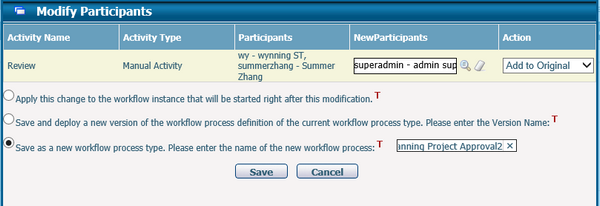
If you want to view or modify participants for the selected workflow process, you can click the link "Modify Participants", and a pop-up dialog like below will prompt.
The pop-up dialog lists the Activity Name, Activity Type, and Participants of all manual, replicator, auto email activities (except those under a conditional control) of the selected workflow process. Click the magnifier icon to specify the new participants for one or more activities under the New Participants column. Under the Action column, choose "Add to Original" to add the new participants to the original participants or choose "Replace Original" to replace the original participants with the new ones.
After the modifications are done, you can select one of the three options below:
•If the option "Apply this change to the workflow instance that will be started right after this modification" is selected, the modification will be saved and applied to the current workflow instance only. Note: If user doesn't start the workflow right away after modifying the participant, such as redirects to another page and then returns , in this case, the changes will be no longer available when user starts the workflow next time.
•If the option "Save and deploy a new version of the workflow process definition of the current workflow process type. Please enter the version name:" is selected, enter the version name, and then click Save button to save your changes. The current workflow process will be refreshed as the latest version.
•If the option "Save as a new workflow process type. Please enter the name of the new workflow process:" is selected, please enter the name of the new workflow process and then click Save button to save your changes. The process type list of workflow panel will refresh and the new added process type will be selected.
After the Save button is clicked, the dialog will be closed and the workflow section will be refreshed.
While starting a workflow, you are able to attach documents to this workflow in the document section. The attached files will be associated to and carried along with the current workflow instance. This section in workflow panel is collapsed by default.
To upload a document, please follow the steps below:
1.Click the Select Files button to select the file(s) from your local PC folder for uploading; 2.Or drag the file(s) from local PC folder into the section directly; 3.You can remove a file by clicking the icon 4.Click the Start Workflow buttons to start the workflow with attached file(s).
By clicking on Forecast button, you can view the workflow forecast information (Activity Name, Activity Type, Participants, etc.) based on Forecast setups (assumed review result, estimated normal duration, estimated maximum duration) of each Manual and/or Replicator activity defined in the selected workflow process.
|
Click on the Start Workflow button, a workflow instance will be created based on the selected workflow process type. Note: The system will save all information in the entity form and workflow section and verify if the required fields have been entered by user before starting the workflow instance. If any required fields are missing, the system will ask the user to fill in such information before starting the workflow. |

When a workflow instance is running, the workflow section will look different to different users and at different stages.
Note, normally you need to select a task first to proceed in the workflow section, the select one will be highlighted in blue.
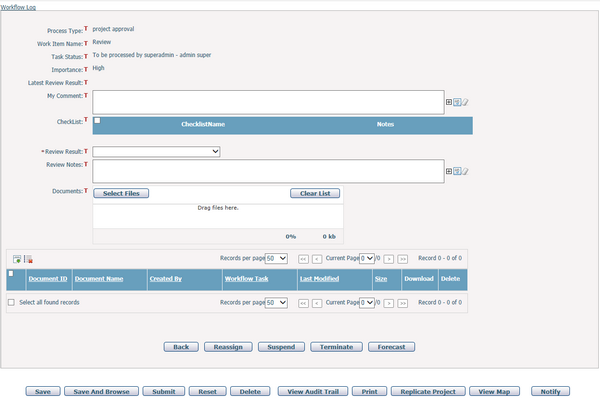
If the Task Status of current task is New and you are not a owner of current task, but you can access to Reassign/Suspend/Terminate/Forecast functions, the workflow section will be shown as below:
If the Task Status of the current task is New and you are a owner of the current task, and you can access to Accept/Reassign/Suspend/Terminate/Forecast functions, the workflow section will be shown as below:
By clicking the Accept button, the Task Status of the current task will change to "To be processed", and the workflow section will change into a detail form as below: (Note: If there is just one participant in the current task, the Accept action can be bypassed and the Task Status will become "ToBeProcessed" directly).
You can switch between above screen with workflow section by clicking Back button in this screen or clicking Workitem continue to be processed icon. (Note: Each time you log out and log in again, the workflow section will be shown initially.)
You can perform Reassign/Suspend/Terminate/Forecast in this screen or in the workflow section if you have the access right.
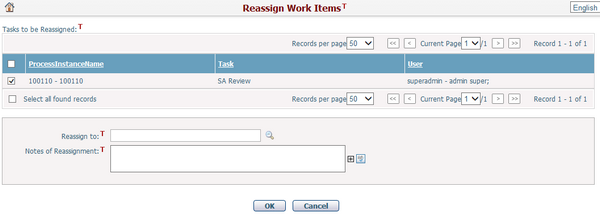
By clicking on Reassign icon/button, you will be directly to the Reassign Work Items page where you can reassign the current task to another user in the system. Select new participants and click on the OK button, it will prompt a confirmation message and return to the workflow section screen if successfully reassigned.
By clicking on Suspend icon/button, you can suspend the current workflow instance. Task Status of the current task will become "Suspended", and thus the task owners can no longer do anything with the task. At this time, the Suspend button will be replaced by Resume button. By clicking on Resume button, the workflow instance will continue running from the suspended step, and owners of current task can accept/process the task again. At this time, the Resume button will be replaced by Suspend button.
By clicking on Terminate button, you can directly terminate the workflow instance. In that case, the workflow section will change back to what it looks like before starting workflow.
As long as you have the necessary access rights, the buttons Reassign, Suspend, Terminate and Forecast are always available.
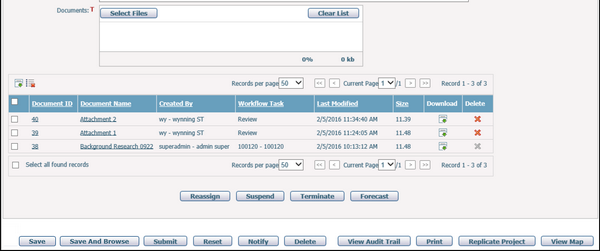
You can attach documents during the review process by clicking the Select Files button and upload the documents to the workflow instance, and then click Save or Submit buttons. All the attached file(s) will be listed in the grid as shown below:
A brief summary of each document is displayed in the table. The column headers include: Document ID, Document Name, Created By, Workflow Task, Last Modified, Size, Download, Delete. The records are sorted by Last Modified Time in descending order grouped by Workflow Task by default but you can also sort them by clicking other underlined column headers. If there are too many records to display on one page, user can use the navigation control to view the other pages.
To Batch download or Batch delete multiple uploaded documents, you can select documents by selecting the checkbox in the first column and click icon
To download or delete a specific single file, you can go to the download/delete column of the document record and click icon
Note: You can only delete the documents that were uploaded by yourself in the current workflow task. The icon
Once you've completed your review of this work item, you can click the Save button to save all information in the entity form and workflow section, or click the Submit button to save all and move to the next step in the workflow process. The system will verify all required fields first and highlight the missing ones for you, if there's any.
Workflow Log link is always available at the upper left corner of workflow section, by clicking which you can go to view workflow logs of the current object.
Multiple Tasks
If there are multiple tasks in the current workflow step, the workflow section will displays all these tasks at the same time:
- Replicate tasks will be grouped under the same work item. - Parallel tasks will be separate as different work items.
You can select one of these tasks to process as the same as above single task case.
|