Navigate Here: Utilities > Cycles > Add Cycle
You can add a cycle on the Add Cycle page.
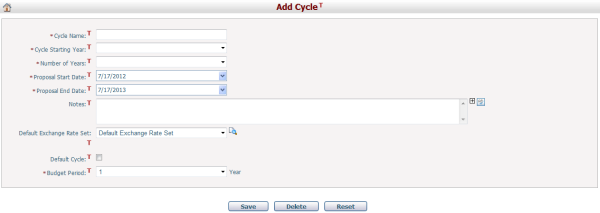
To add a cycle, first provide the general information by filling in the following fields:
The required fields are noted with an asterisk (*).
Cycle Name*: Name of the cycle. It must be unique.
Cycle Starting Year*: The first year of the new cycle.
Number of Years*: How many planned years in this cycle. Maximum is 50.
Proposal Start Date* & Proposal End Date*: Define the period the proposal will take effect. If the current date is earlier than the Proposal Start Date, or later than the Proposal End Date, then you cannot add a new proposal in this cycle.
Notes: Description of the cycle.
Default Exchange Rate Set: The default exchange rate set for the default scenario that is to be automatically created under the current cycle. The default value is the default exchange rate set in the system. Beside the dropdown box is a View icon whereby you can view the selected exchange rate set.
Default Cycle: It indicates if you would like to set the new cycle as the system default cycle. Data will be updated to the default cycle only. You will be required to log out of the application before the new cycle can be set as the system default cycle. When you click the Save button, the system will automatically log you off and then log you back and display the application's homepage with the new Default Cycle.
Budget Period*: To define how many years the budget is for each cycle. Note: You cannot have two cycles where the budget periods overlap.
Click the Save button to save the new cycle. The system will then go to the Browse Cycles page. If you have selected to make the cycle the default cycle you will be forwarded to the application's homepage.
Click the Reset button to clear the latest input of changes.
Click the Save & Import Data from Historical Plan button to initialize the new cycle with data from an existing cycle. The system will then go to the Import Data from Historical Plan page. The Save & Import Data from Historical Plan button is available on this page only if there is at least one other cycle in the system and the Scenario license is not acquired. If the Scenario license is acquired, you may import data on the Add Scenario or Scenario Management page.
Note: Any cycle that is set as the default working cycle on this page will be the system default for all users. However, each system user can view and change user own workspace settings without affecting the system's workspace. That is, they can set a cycle to view by default when they log into the system. To learn how a user can customize personal workspace, please review the Change Workspace section of the user manual.