Navigate Here: Financials > Purchase Orders > Browse Purchase Orders; select a PO
You can manage a purchase order on the Manage Purchase Order page.
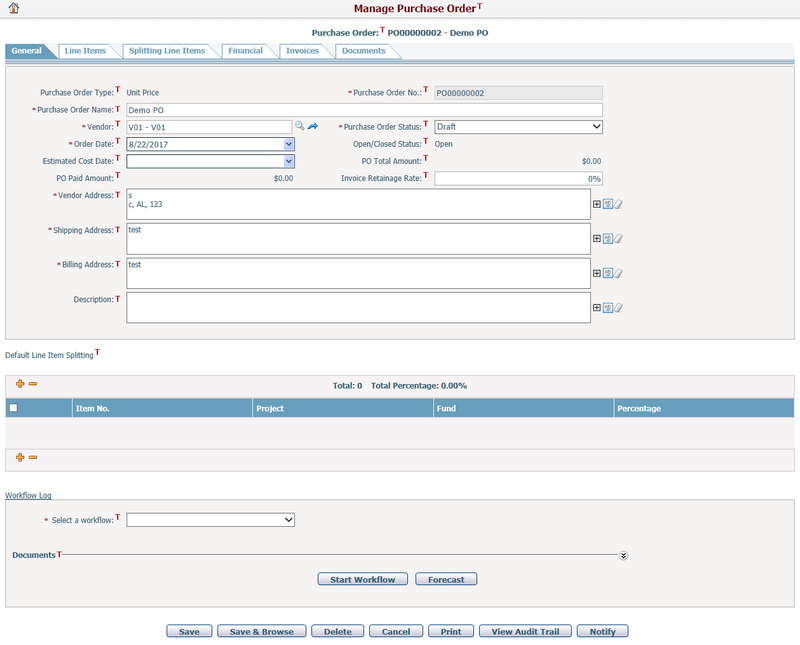
A purchase orders general information cannot be edited when the Status is not Open.
The required fields are noted with an asterisk (*).
Purchase Order Type: The type of the purchase order.
Purchase Order No.*: The number of the purchase order.
Purchase Order Name*: The name of the purchase order.
Vendor*: The vendor of the purchase order. Vendor Address below will be automatically populated according to the vendor you selected. When a vendor is selected, you can click the View Vendor Information icon to enter the Manage Vendor page directly.
Purchase Order Status*: System statuses for purchase order: Draft, Under Review, Approved, and Rejected. When adding a purchase order, it is set to Draft by default.
Open/Closed Status: A system controlled indicator for purchase order opening and closing. It is a read-only field and its value is set to Open by default.
- Open: Indicates that the purchase order is effective. When the purchase order status is being Approved, you can close it by clicking Close This P.O. button.
- Closed: Indicates that the purchase order is finished or ineffective. You can reopen a closed PO by clicking the Reopen This P.O. button.
Order Date*: Date of issuing the purchase order.
Estimated Cost Date: Date of paying the purchase order.
PO Total Amount: Total PO value. As a calculated field, it is the latest sum of all PO line items including change orders.
Invoice Retainage Rate: Default retainage rate of the invoices billed against this PO.
PO Paid Amount: Amount of the PO that has been paid. As a calculated field, it is the sum of Paid Amount of all PO line items.
Vendor Address*: Full address of the vendor. It defaults to the address on the Vendor Management page.
Shipping Address*: It defaults to the shipping address on the Customer Profile page.
Billing Address*: It defaults to the billing address on the Customer Profile page.
Description: Description of the purchase order.
Once you finish, click the Save button to save the PO.
You may then want to Edit PO Line Items by clicking the Line Items tab.
Click the Save & Browse button to save the PO and then go to the Browse Purchase Orders page.
Click the Delete button to delete the purchase order. The system will then go to the Browse Purchase Orders page.
Click the Cancel button to withdraw any changes. The system will then go to the Browse Purchase Orders page.
You can print information of this PO in Word or PDF format by clicking the Print button. The system will then open the Generate Dynamic Document page.
You can view the change history of this PO by clicking the View Audit Trail button. The system will then open the Browse Audit Trail Details page in a new window.
Click the Notify button to Send Notification about the changes of this PO.
If PO related workflow is activated, you can click the Start Workflow button to initiate the workflow or the Forecast button to see the workflow activities’ detail.
Default Line Item Splitting
If the default line item splitting is enabled by configuration, the Default Line Item Splitting section will be shown under the general form.
You can click the Add icon ![]() at the top left corner of the line item grid to add a new split line item or edit an existing split line item on the grid.
at the top left corner of the line item grid to add a new split line item or edit an existing split line item on the grid.
Item No.: Split line item sequence number. It is automatically generated by the system.
Project: The implementation project linked to the split line item. Browse and select an implementation project by clicking ![]() .
.
Fund: The fund linked to the split line item. Browse and select a fund by clicking ![]() .
.
Percentage: The default percentage of this split line item.
Note: The system will automatically calculate the percentage for each new line item by [100% - the total of existing split line items’ percentages]. If the result is negative, system will show zero instead.
You can select multiple split line items by their checkboxes and delete them by clicking the Delete![]() icon.
icon.