Navigate Here: Utilities > Templates > Financial Scoping Templates; select a template
You can update a financial scoping template on the Financial Scoping Template Management page.
Define Template
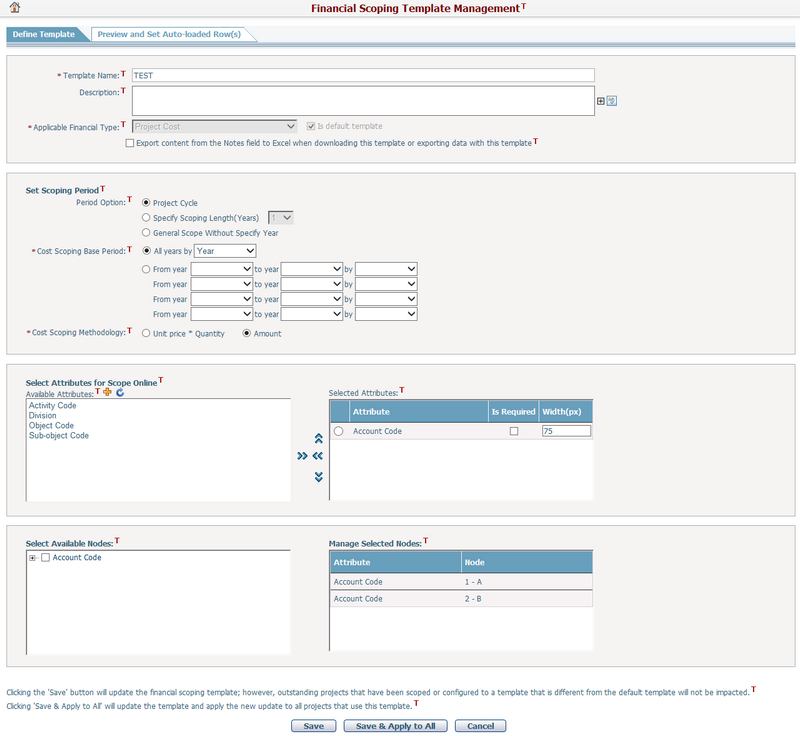
To add a new financial scoping template, fill in the following fields:
The required fields are noted with an asterisk (*).
Template Name*: The name of the template.
Description: The description of the template.
Export content from the Notes field to Excel when downloading this template or exporting data with this template : Select this checkbox if you want to export the content of the Description field to Excel when downloading this template or exporting data with this template.
Applicable Financial Type*: Specifies which type of financial scoping the template is applicable for.
Is default template: Select this checkbox if you want to make the template the default financial template of the selected financial type.
Period Option: The length of scoping. You can set the scoping period, which includes Project Cycle, Specify Scoping Length (Years) and General Scope without Specify Year options.
Project Cycle: if you select the Project Cycle radio button, the scoping length and start year will be the same as the current cycle’s length and start year.
Specify Scoping Length (Years): If you select the Specify Scoping Length (Years) radio button, you can decide the scoping length. The scoping period will start from the current beginning year by default.
General Scope without Specify Year: The option is for the users who prefer to use the scoping for general scope without specifying information year by year. If you select this radio button, in the scoping financial summary interface and the scope online interface, there will be just one column for the scoping data input and the ‘Year’ row on the top will be hidden.
Cost Scoping Base Period*: The scoping base period:
All Years By (Year/Half Year/Quarter/Month): if you select this option, scoping base period will be either a year, a half year, a quarter or a month through out the entire scoping length depending on your selection.
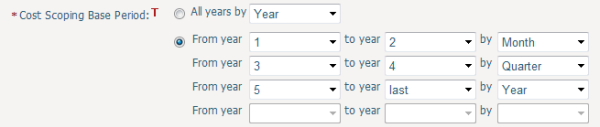
If you decide to specify scoping base period in more details, select the second radio button, specify the range of years for the base period, then select the base period (Year/Half Year/Quarter/Month). This way, scoping base period may vary depending on which year it is within the scoping length. For example, the below configuration shows that from Year 1 to Year 2, scoping base period is Month; from Year 3 to Year 4, scoping base period is Quarter; from Year 5 to the last year of the scoping length, base scoping period is Year. Each scoping base period takes up a column in the Scoping in Details table.
Cost Estimate Methodology*: Whether to enter scoping data with just Amount or with Unit Price * Quantity.
Select Attribute for Scope Online: You can select available attributes for the Scoping in Details table. The selected attributes will be displayed as columns in the Scoping in Detail table. Classification, entities look up, text field, pick list and date type attributes are supported in this version.
This section consists of two list boxes: Available Attributes list box and Selected Attribute list box.You can move the attribute between these two list boxes by clicking ![]() and
and ![]() .
.
If you cannot find the attributes you want in the Available Attributes list box, you add attributes by clicking the Add New Attribute icon ![]() above the Available Attributes list box; system will pop up the Add Attribute page.
above the Available Attributes list box; system will pop up the Add Attribute page.
Once a new attribute has been added, go back to the Scoping template interface and click the Refresh Attribute icon ![]() , the newly added attribute will be shown in the Available Attributes section.
, the newly added attribute will be shown in the Available Attributes section.
Select Nodes Section: You have to select nodes that will be used for the attribute on this section. All the nodes of the classifications in Customized Classifications section will be listed in the Select Available Nodes section. Select and check the checkbox of the desired nodes on the Select Available Nodes section. All the eligible selected nodes will be listed in the Manage Selected Nodes section as the available selection of this attribute.
Click the Save button to save the new financial scoping template and the system will go to the Browse Financial Scoping Templates page.
By clicking Save, the financial scoping template will be updated, and a historical version of this template will be generated if it has been already used by a project. Projects configured to a template different from the default template will be left unaffected.
Click the Save & Apply to All button to save the new financial scoping template and the system will go to the Browse Financial Scoping Templates page.
By clicking Save & Apply to All, the updates will apply to all projects which have applied a historical version of this system template. Please note that the project scoping data, which was scoped previously with a historical version of this system template, may be carried over by applying the UTD version of this system template.
Comparing to the template in use, if the following settings are modified, then scoping data will be carried over from system historical template to the system template according to the following rule:
1. Change on attributes:
Comparison |
Result |
||
Source template attribute |
< |
Target template attribute |
Display additional column(s) as blank. Refer to figure - Scoping Data Carryover Result 1-A |
Source template attribute |
≠ |
Target template attribute |
Roll up source scoping data to one line item in the target, following the same period and base period carryover rule as described below. The attribute column(s) in the target will be blank. Refer to figure - Scoping Data Carryover Result 1-B |
Source template attribute |
> |
Target template attribute |
Roll up data to target. Refer to figure - Scoping Data Carryover Result 1-C |
Source template attribute |
= |
Target template attribute |
Carry over data normally |
Please note that the “<” and “>” in the above table refer to the source/target template contains additional attributes besides all attributes of the target/source template.
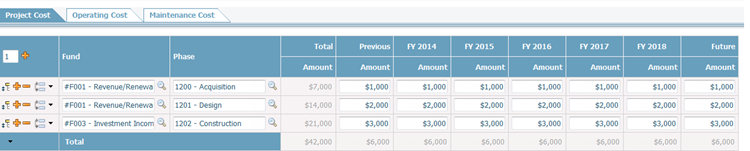
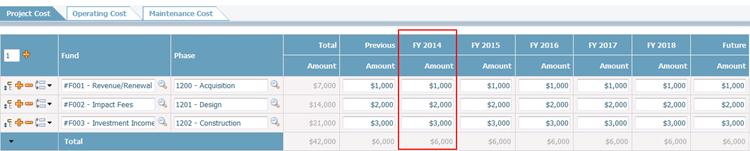
Source Template Sample 1

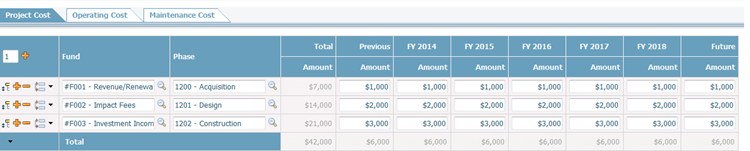
Scoping Data Carryover Result 1-A

Scoping Data Carryover Result 1-B
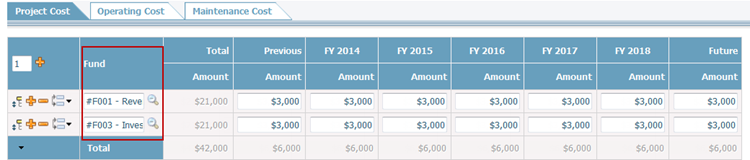
Scoping Data Carryover Result 1-C
2. Change on base period:
Comparison |
Result |
||
Source template base period |
< |
Target template base period |
Display additional column(s) as blank. Refer to figure - Scoping Data Carryover Result 2-A |
Source template base period |
> |
Target template base period |
Put the amount of base period of the source template into target's every first grid cell by base period of the source template. Refer to figure - Scoping Data Carryover Result 2-B. |
Source template base period |
= |
Target template base period |
Carry over data normally |

Source Template Sample 2
Scoping Data Carryover Result 2-A

Scoping Data Carryover Result 2-B
3. Change on scoping period:
Comparison |
Result |
||
Source template scoping period |
< |
Target template scoping period |
Display additional column(s) as blank. Refer to figure - Scoping Data Carryover Result 3-A. Please note that when the source template scoping period is “General Scope Without Specify Year”, the general amount shall be put into the target’s first grid cell of the first fiscal year. |
Source template scoping period |
> |
Target template scoping period |
Roll up the missing periods of the source template to the Future column of the target template. Refer to figure - Scoping Data Carryover Result 3-B. Please note that when the target template scoping period is “General Scope Without Specify Year”, all the periods, previous, and future amount shall be rolled up to the general Amount column of the target template. |
Source template scoping period |
= |
Target template scoping period |
Carry over data normally |
Source Template Sample 3

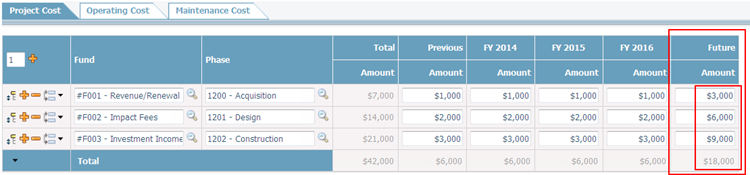
Scoping Data Carryover Result 3-A
Scoping Data Carryover Result 3-B
4. If the Cost Estimate Methodology is changed from Unit Price * Quantity to Amount, only the amount data will be retained, the unit price and quantity information will be discarded.
Click the Cancel button to return to the Browse Financial Scoping Templates page.
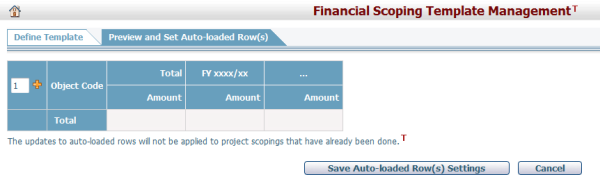
Preview and Set Auto-loaded Row(s)
You can preview the financial scoping template and set auto-loaded rows for the template on this tab.

You may experience different Grid table if the Previous and Future columns are not applicable in your case (as shown below).
- Enter a number in the Lines text box and then click the Add icon ![]() to its right. The specified number of blank line items will be added below the existing rows.
to its right. The specified number of blank line items will be added below the existing rows.
- Click the Add icon ![]() at the left of a line item. A blank line item will be inserted below the selected line item.
at the left of a line item. A blank line item will be inserted below the selected line item.
- Click Remove icon ![]() at the left of a line item, the line item will be removed.
at the left of a line item, the line item will be removed.
- To rearrange the line item, drag the line item by its Move this row up or down icon ![]() and drop it above or below another line item.
and drop it above or below another line item.
Click the Save & Apply to All button to save the settings. The updates will only be applied to the project scoping data that have not been done yet.
Click the Cancel button to return to the Browse Financial Scoping Templates page.