Navigate Here: Planning > Risks > Browse Risks; select a risk or
Projects > Browse Projects; select a project > Risk tab; select a risk
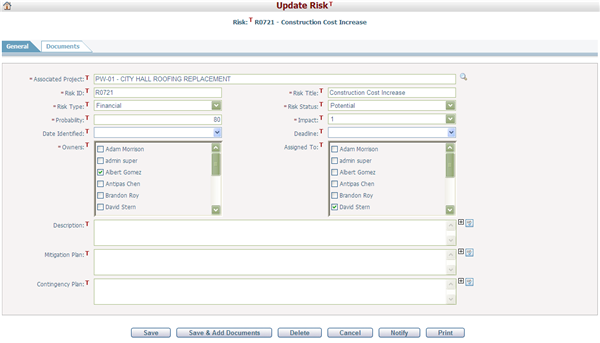
On the General Info tab page, you can edit the risk by modifying any of the following fields:
The required fields are noted with an asterisk (*).
Project*: Which project the risk belongs to. If you access this page from Project Risks Management, this field will default to that project's name, you can't edit it.
Risk ID*: The ID of the risk. It must be unique.
Risk Title*: The name of the risk.
Risk Type*: Type of the risk. Authorized users can add or delete a type in Dropdown List Management.
Risk Status*: Specifies the current state of the risk. The status used to determine the risk's signal (red, yellow, green) in the risk list. Authorized users can add or delete a status (and customize the colors of a status) in dropdown List Management.
Probability*: Specifies the probability that the risk may occur with a percentage value between and inclusive of 0 and 100.
Impact*: Specifies the severity of adverse effects should the risk actually happen, using a value from 1 to 10. One being least severe and Ten being most severe.
Date Identified: Date the risk identified.
Deadline:The deadline when the risk should be resolved.
Owners*: Persons responsible for the risk.
Assigned To: Persons who assigned to manage the risk.
Description: Specifies the nature of the risk.
Mitigation Plan: Specifies the plans to mitigate the risk.
Contingency Plan: Specifies the fallback plans in case the risk occurs.
Click the Save button to save the changes. The system will then go to the Browse Risks page.
Click the Save & Add Documents button to save the changes and add documents the associated to the risk. The system will then go to the Document tab on the Update Risk page.
Click the Cancel button to go to the Browse Risks page without saving any changes.
Click the Delete button to delete the risk. The system will then go to the Browse Risks page.
Click the Notify button to inform someone about this risk update. The system will then go to the Send Notification page.
Click the Print button the system will direct to Generate Dynamic Document page. You can choose a predefined template to generate a standard form.
Before you can generate a Dynamic Document, you need to define a template. To know more about how to define a Dynamic Document Template, please click here
