Navigate Here: Utilities > System Management > Application Settings > AppSetting tab
Under the AppSettings tab page, you can specify various settings that are fundamental to the application.
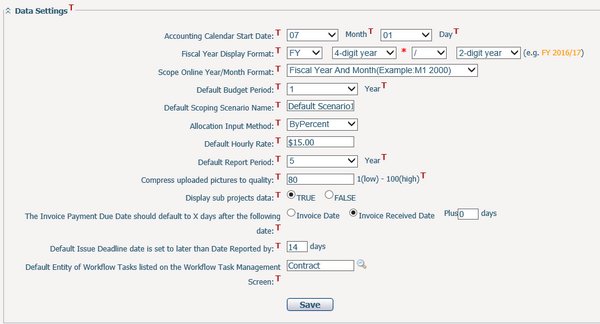
Accounting Calendar Start Date: It specifies the start date of a fiscal year.
Fiscal Year Display Format: It specifies the fiscal year display format of the system.
Scope Online Year/Month Format: It specifies the scope online display format of the system.
Default Budget Period: The system will fill in the Budget Period field with this number on the Add Cycle page.
Default Scoping Scenario Name: The default name of the automatically created batch scoping scenario for the newly added Cycle.
Allocation Input Method: It indicates the default input method of allocation data, either By number or By Percentage. Whichever is selected, you can still use the other one by switching to the corresponding tab on the Fund Allocation pages.
Default Hourly Rate: This is the default user pay rate when adding a user to the system.
Default Report Period: This is the default value of the Number of Years field on the report configuration pages.
Compress uploaded pictures to quality: It specifies the compression quality when uploading project pictures on the Project General page.
Display sub projects data: It specifies whether the system should display sub projects' data by default.
The Invoice Payment Due Date should default to X days after the following date: This selection specifies how many days after either the Invoice Date or the Invoice Received Date should the Invoice Payment Due Date be defaulted to when creating an invoice.
Default Issue Deadline date is set to later than Date Reported by: This selection specifies how many days after the Date Reported should the Issue Deadline date be defaulted towhen adding an issue.
Default Entity of Workflow Tasks listed on the Workflow Task Management Screen: It specifies the default entity to be shown on the Workflow Task Management screen for the Read Only access rights user.
|
Password Format: This field allows the system administrator to specify which password format is the valid format for logging into CIPAce. |

Maximum Upload File Size: It specifies the maximum file size allowed for uploading a file to CIPAce, such as an image file or a document file. |

You can select one of the four available options as the the login mode for logging into CIPAce:
❖CIP Account ❖Domain account automatically (single domain only) ❖Domain account ❖CIP account and domain account ❖No encryption for LDAP connection ❖Kerberos encryption for LDAP connection
CIP Account: Uses a CIPAce (application level) account to login. If this option is selected, enter the CIPAce account’s User name and Password when logging in.
Domain Account automatically (Single domain only): With this option, only one domain is configured in CIPAce. When you access the system with a domain account that associates with a CIPAce account, the system will retrieve the information of the domain account and log into the system automatically without the need for entering the user name and password.
Additionally, you need to set Internet Browser configurations as below:
Your Browser > Tools > Internet Options > Security > select a zone according to the situation > click Customer Level > User Authentication or Set Authentication > select the Automatic logon with current user name and password option
If the domain account does not have permission to access the system, the system will alert the user.
Domain Account: Select this option if you have associated multiple domains with CIPAce. Users can log in to the system by the domain account with the available domains in the Domain dropdown list. For example: select a domain in the Domain dropdown list, and enter User Name and Password for the selected domain.
CIP account & domain account: This option allows you to log in with a CIPAce account or with a domain account. To log in with a CIPAce account, select the CIPAce System option from the Domain dropdown list and enter the user name and password for the CIPAce account; to log in with a domain account, select a domain from the Domain dropdown list and enter the user name and password for the domain account.
Kerberos encryption for LDAP connection: To import a domain account, connect a domain account to a CIP account, or verify a domain account, the CIPAce Web Application must establish a connection with the Domain Controller, and one must specify whether to encrypt the data in this connection by means of Kerberos.
|

Select “True” to set the Remember Me option available on the CIPAce login page. Selecting the Remember Me option will keep you logged in automatically unless you manually log out of CIPAce or close the browser. |

|
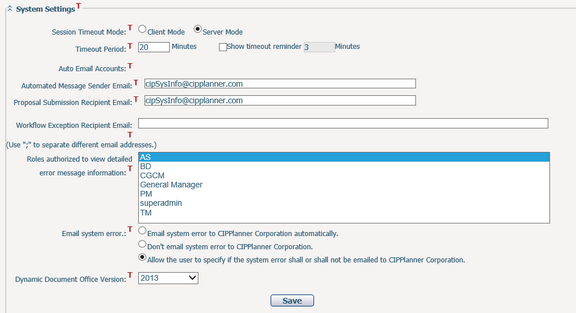
Session Time Out Mode: Specifies which session timeout mode to use. There are two modes to choose from: Client Mode and Server Mode. The difference is that in Client Mode, the timeout clock resets to zero on keyboard input or mouse move on any CIPAce screen; in Server Mode, the timeout clock resets to zero when a CIPAce screen is opened or refreshed.
Timeout Period: Specifies how many minutes it will take before a session times out. Timeout means that if a logged-in user has been idle for the amount of time specified here, the system will automatically log out the user.
Show timeout reminder: If checked, timeout reminder will pop up X (X is the entered number) minutes before a session timeout. If the user clicks OK on the timeout reminder, the session timeout clock will reset to zero immediately. If unchecked, there will be no timeout reminder.
Auto Email Accounts: The first email address will receive all administration related emails. The second email address will receive an e-mail notification when a new public proposal is added. To add multiple email addresses in the fields, separate them with semi-colons.
Workflow Exception Recipient Email: You can enter email address(es) for receiving workflow exception notification emails. Once workflow exception occurs, an automatic notification email will be sent to the email address(es) specified herein. Validation of a legal email address will be executed once the Save button is clicked.
Roles authorized to view detail error message information: The users of the selected role can see detailed error message information. To select more than one role, hold down the Ctrl key while you choose from the list.
Email System Error: It defines whether you want the system to email the error message automatically or manually to CIPPlanner Corporation when an application error occurs while using CIPAce.
Dynamic Document Office Version: It defines the dynamic document application and MS Word version to be used by the system.
|
You can click the Save button in a particular section to save the settings for that section.
You can save all the settings by clicking the Save All button at the bottom of the page. After saving all the settings, the system will go to the system’s homepage.