Navigate Here: Implementation > Contracts > Browse Contracts; select a contract or
Projects > Browse Projects; select a project > Contract tab; select a contract
You can manage a contract on the Contract Management General tab page.
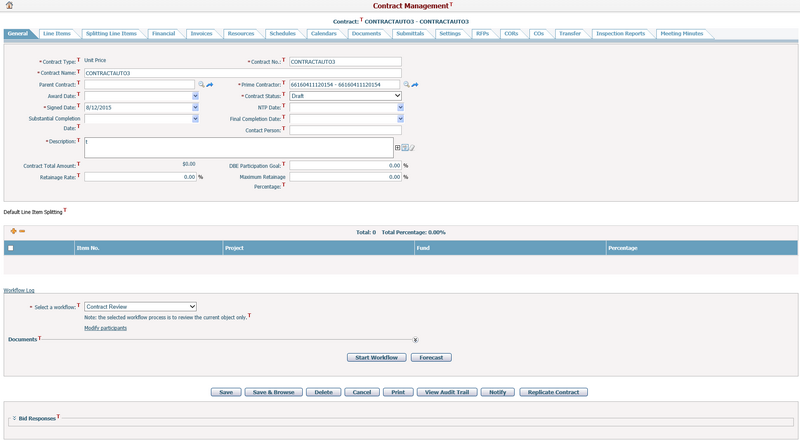
The operations allowed are determined by the Contract Status. There are five statuses: Draft, Under Review, Approved, Rejected and Closed.
Draft: Indicates the initial phase when the contract is being facilitated. Under this status, you can edit contract general information, delete the contract, and add/edit/delete contract line items.
Under Review: Indicates the interim phase when the contract is under approval. Under this status, you can edit contract general information, delete the contract, and add/edit/delete contract line items.
Approved: Indicates that the contract is in effect. Under this status, contract general information, contract line items or split line items cannot be edited. Expenses, invoices and change orders can be generated for these contracts under this status.
Rejected: Indicates that the contract fails to get approval. Under this status, you can edit contract general information, delete the contract, and add/edit/delete contract line items.
Closed: Indicates that the contract is finished. Under this status, contract general information, line items or change orders are read-only for reviewing.
The required fields are noted with an asterisk (*).
Contract Type*: The contract type selected by user when adding a new contract. Different contract types may have different contract general form formats and line item structures, which is pre-configured by system administrator.
Contract No.*: Contract number. It must be unique.
Contract Name*: Name of the contract. It must be unique.
Parent Contract: Select a parent contract for sub contract only, whose relationships shall be pre-defined by system configuration as below. When a Parent Contract is selected, you can click the View Contract Information icon to enter its Contract Management Page directly.
❖Unit Price sub contract can select GMP contract only as its parent contract.
❖Job Order sub contract can select Job Costing Master only as its parent contract as well.
Prime Contractor*: Select a vendor as the prime contractor of the contract. If a vendor is not in the list, you can add it in Add Vendor. When a Prime Contractor is selected, you can click the View Vendor Information icon to enter its Manage Vendor page directly.
Contract Status*: System statuses for contract.
Award Date: Date of awarding the contract.
Signed Date*: Date of signing the contract.
NTP Date: Date of notice to proceed. Normally used in GMP or Unit Price contracts by Dynamic Form configuration.
Signatories: Persons who sign the contract.
Start Date, Substantial Completion Date, Final Completion Date, End Date, Duration: Specify the period in which the contract is active. Substantial Completion Date and Final Completion Date are normally used in GMP or Unit Price contracts by Dynamic Form configuration.
Contact Person: Contact person of the contract.
Description: Description of the contract.
Contract Total Amount: Total contract value automatically calculated by system. It is the latest sum of all contract line items including change orders. If it is a GMP parent contract, it will also include the sum of all its sub contracts.
DBE Participation Goal: Goal of contract amount that DBE (Disadvantaged Business Enterprises) contribute to.
Retainage Rate: Default retainage rate of the invoices billed against this contract. Its initial value is the retainage rate of the prime contractor.
Maximum Retainage Percentage: The percentage of contract total amount that can be kept as retainage.
Once you finish, click the Save button to save the contract.
Click the Save & Browse button to save the contract and then go to the Browse Contracts page.
Click the Delete button to delete the contract. The system will then go to the Browse Contracts page.
Click the Cancel button to abort the current operation and go to the Browse Contracts page or return to the original entrance.
You can print information of this contract in Word or PDF format by clicking the Print button. The system will then open the Generate Dynamic Document page.
You can send notifications to relevant persons by clicking the Notify button. The system will open the Send Notification page.
You can view the change history of this contract by clicking the View Audit Trail button. The system will then open the Browse Audit Trail Details page in a new window.
If the contract related workflow type has been activated, you can click the Start Workflow button to initiate the workflow or Forecast button to see the workflow activities’ detail.
Replicate Contract
You can create a new contract by replicating from the current contract and its related data.
Click the Replicate Contract button, a popup window will be displayed for replication process.
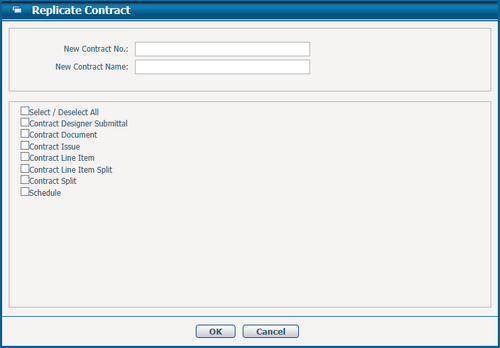
To replicate a contract, input the following fields or options:
New Contract No.: The contract number of the replicated contract. It is required and must be unique.
New Contract Name: The name of the replicated contract. It is required and must be unique.
Other related data to be replicated: Select the relative data to be replicated. The system offers dynamic options which can be configured by the system administrator, you can select any one by checking its checkbox or select / deselect all by checking the checkbox of Select / Deselect All.
Contract Split / Contract Line Item / Contract Line Item Split: These data are subordinate to contract, by checking their checkboxes, the system will duplicate the data in the replicated contract. (Note, when Contract Line Item Split has been checked, the system will check Contract Line Item automatically; Or when Contract Line Item has been unchecked, the system will uncheck Contract Line Item Split at the same time.)
Submittal / Document: These data are associated with contract, by checking their checkboxes, the system will duplicate the associated data relationships with the replicated contract instead of copying them.
Schedule: By checking this checkbox, all schedules, schedule tasks, contract calendars, contract resources and contract roles will be copied into the replicated contract.
Click the OK button to start creating the new contract.
Click the Cancel button to cancel your operation and return to the Contract Management page.
Default Line Item Splitting
For different contract types, if the default line item splitting is enabled by configuration, you can add new contract level split line items in the Default Line Item Splitting section by clicking the Add icon ![]() at the top left corner of the split line item grid or edit any existing split line items on the grid.
at the top left corner of the split line item grid or edit any existing split line items on the grid.
Item No.: Split line item sequence number. It is automatically generated by system.
Project: The implementation project linked to the split line item. Browse and select an implementation project by clicking ![]() .
.
Fund: The fund linked to the split line item. Browse and select a fund by clicking ![]() .
.
Percentage: The default percentage of this split line item.
Note: System will automatically calculate the default split line item percentage for every new entry by [100% - the total of existing split line items’ percentages]. If the result is negative, system will show zero instead.
You can select multiple split line items by the checkbox in front of each line and delete them by clicking ![]() button.
button.
Related Information
You can associate/disassociate bid responses to/from the current contract in the Bid Responses association view. By default, this association view is collapsed when there is no bid records. You can collapse or expand it by clicking ![]() or
or ![]() next to the section title.
next to the section title.
Bid Responses
The bid response(s) associated with the current contract display in the table. A brief summary of each related bid response includes Solicitation, Response ID, Prime Contractor, and Status (These columns in the data grid can be configured by Dynamic View). You may sort the records by clicking the linked column header.
You can view the detailed information of a bid response by clicking the View icon ![]() at the last column of a row. The system will direct into the Edit Solicitation Response page.
at the last column of a row. The system will direct into the Edit Solicitation Response page.
You can associate the existing bid response(s) with the current contract by clicking the Associate icon ![]() . The system will pop up a window for you to search and select among those unassociated bid response(s) with the current contract.
. The system will pop up a window for you to search and select among those unassociated bid response(s) with the current contract.
You can disassociate the associated bid response(s) from the current contract by selecting the bid response(s) and clicking the Disassociate icon ![]() .
.