Navigate Here: Projects > Browse Planning Projects; select a Project > Click the Planning tab > Click the Allocation tab
You can allocate funding from qualified funding sources to fulfill the financial requirement of the capital project on the Allocation tab page.
First, browse and select a project by clicking ![]() . The project list will display all the funded projects in the current working cycle. After a project is selected, the allocation table will be displayed below the selected project in the same window.
. The project list will display all the funded projects in the current working cycle. After a project is selected, the allocation table will be displayed below the selected project in the same window.
If you navigate to this page via the Allocation tab under project management, you will not need to select a project. You can browse the allocation table for the current project directly.
You can click ![]() beside the selected project to open the Planning Project General page of the selected project in a new window.
beside the selected project to open the Planning Project General page of the selected project in a new window.
In the allocation table, you can find either a ![]() or a
or a ![]() sign beside the fund group name. Clicking
sign beside the fund group name. Clicking ![]() will expand the fund group to list the funds in this fund group that are selected to allocate funding to the selected/current project; clicking
will expand the fund group to list the funds in this fund group that are selected to allocate funding to the selected/current project; clicking ![]() will hide the funds in this fund group.
will hide the funds in this fund group.
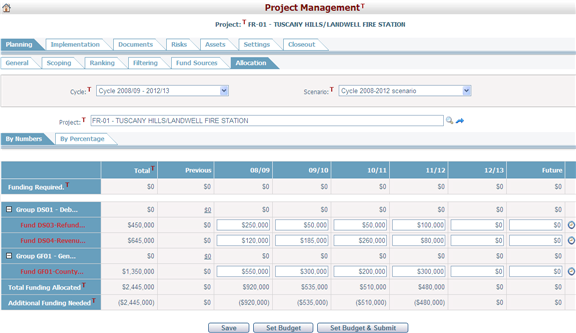
Below are the information contained in the table:
Funding Required: List the financial requirement for the selected/current project over the entire working cycle. These numbers come from the data entered in the Financial Scoping section for the project. Once the financial estimates are approved, the Project Cost estimate data will be displayed in this row.
The qualified funding sources for the project: List the funding sources and their funding amounts for the project. You can allocate funding by entering funding amounts from each fund across the planning years or update the numbers in the white colored cells in the table. You can also double-click these cells to open the Fund Allocation Detail page in a new window. If funding in detail has been done previously, you can not modify the funding amounts directly in the table for that fund. You must double-click any of the white colored cells to open the Fund Allocation Detail page where you can make modifications.
You can hover your mouse over a fund name to display the fund's ending balance in each year throughout the planning years in a display layer. If a fund is over-allocated, the fund name will appear in red to signal a negative balance in that fund.
Note: for the calculated Previous field, it is the Previous allocation number plus allocation numbers of the first N (budget period) fiscal years in the default scenario of last cycle.
Total Funding Allocated: Calculated based on allocated amounts on this page. It is the sum of the funding amount of each fund by year across the planning years.
Additional Funding Needed: Calculated by Funding Required minus Total Funding Allocated by year across the planning years. If the number is in parenthesis, it indicates that the funding amount for the project has exceeded its financial requirement.
You can click a fund name in the table to open the Fund Allocation by Fund page of that fund in a new window where you can browse its allocation information for different projects.
You can double-click a fund name to open the Fund General Management page of that fund in a new window.
You can click the View Audit Trail icon ![]() at the end of a fund row to view the change records of that fund. The system will open the Browse Audit Trail Details page in a new window.
at the end of a fund row to view the change records of that fund. The system will open the Browse Audit Trail Details page in a new window.
You can click a fund group name in the table. The system will open the Fund Allocation By Group page of that fund group in a new window, where you can browse the allocation information of this fund group for different projects.
You can double-click a fund group name to open the Fund Group General Management page of that fund group in a new window.
Click the Save button to save the changes.
Click the Set Budget button to set the allocation detail line items into budget for the current project if you get into this page via the Allocation tab under project management. The system will pop up a window and asks you to specify when the budget is approved and when it becomes effective. After these dates are provided, click the OK button. The budget with the latest Approved Date becomes the active budget for the project.
Click the Set Budget & Submit button to set the allocation detail line items into budget for the current project and submit them.
If you have deleted an existing budgeted allocation line item and set budget again on this page or on the Fund Allocation Detail page, the system will pop up a message and list that budget line item for further action. You can either select Unchanged, meaning that the original budget line item will remain unchanged in the system, or select Clear, meaning that the original budget line item will be included into the budget being created but its budget amount will be set to zero and its approval date will be updated to the current budget approval date.