Navigate Here: Implementation > Inspection Reports > Browse Inspection Reports; Select an inspection report or
Implementation > Contracts > Browse Contracts; select a contract > Inspection Reports tab; select an Inspection Report or
Projects > Browse Implementation Projects; select a project > Inspection Reports tab; select an Inspection Report
You can edit inspection report general information and record labor, equipment and material line items on Edit Inspection Report page.
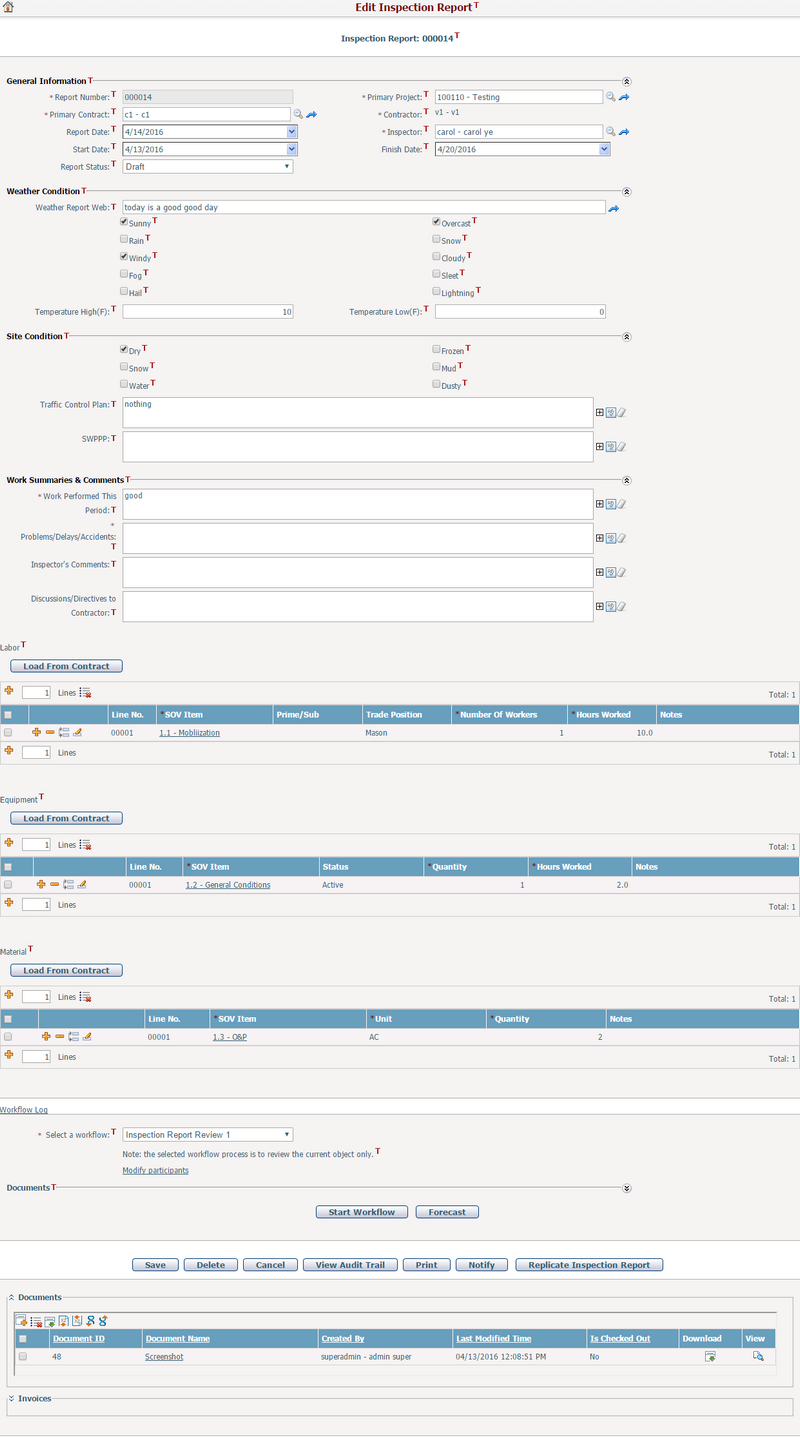
Once you've finished input General and Line Item information, you can:
Click the Save button to save the inspection report.
Click the Delete button to delete the inspection report. The system will then go to the Browse Inspection Report page.
Click the Cancel button to abort current operation and then go to the Browse Inspection Report page.
Click the View Audit Trail button to view change history of this inspection report. The system will then open Browse Audit Trail Details page in a new window.
Click the Print button to print the inspection report through predefined document template. The system will then open Generate Dynamic Document.
Click the Notify button to send notification to relevant persons. The system will then go to Send Notification page.
Click the Replicate Inspection Report button to replicate the inspection report to a new one by copying its general information as well as Labor, Material and Equipment line items.
You can also check the related Association Views to the inspection report in this page.
To edit the general information, update any of the following fields except the read-only ones:
The required fields are noted with an asterisk (*).
Report Number*: The number of the inspection report.
Primary Project*: The particular implementation project for which the inspection report is created.
Primary Contract*: The particular contract for which the inspection report is created.
Contractor*: As soon as the Primary Contract has been selected, it will be automatically filled with the Prime Contractor of the selected Primary Contract.
Report Date: To record the reporting date. Default is the current date.
Inspector*: The inspector of the inspection report, click ![]() to select a specified resource defined in Resource Management.
to select a specified resource defined in Resource Management.
Start Date: The start date of the inspection reporting period.
Finish Date: The finish date of the inspection reporting period.
Report Status: System statuses for inspection report: Draft, Under Review, Approved and Rejected. When adding a new inspection report, the initial status is always set to Draft.
Weather Report Web: A hyperlink of weather forecast is placed here to browse the weather report directly.
Sunny, Cloudy, Windy, Snow, Rain, Sleet, Lightning, Hail, Fog, Overcast: A bunch of checkboxes to log weather conditions.
Temperature Low(F): The lowest temperature in Fahrenheit measure.
Temperature High(F): The highest temperature in Fahrenheit measure.
Dry, Frozen, Snow, Dusty, Water, Mud: A bunch of checkboxes to log site conditions.
Traffic Control Plan: Description of the traffic control plan in place during the inspection reporting period.
SWPPP: Description of the Storm Water Pollution Prevention Plan.
Work Performed This Period*: Description of the work performed during the inspection reporting period.
Problems/Delays/Accidents: Description of any problems or delays or accidents taking place during the inspection reporting period.
Inspector’s comments: Inspector’s comments about the work performed during inspection period.
Discussions/Directives to contractor: The matters that need to be discussed or directives to contractor from inspector.
You can click the Save button to save the new inspection report and the system will be directed to Edit Inspection Report page.
You can click the Cancel button to abort the current operation and go to Browse Inspection Report page or return to original entrance.

This data grid is configurable. Default grid layout contains the following fields.
Line No.: Line item number. It is automatically generated by system and cannot be edited.
SOV item*: Schedule of Value item that describes the work supports Load From Contract, Load From SOV template or manually selected.
Prime/Sub: This is to specify the labor source is either Prime (primary contractor) or Sub (sub-contractor), you can manage it on Manage Picklist page.
Trade Position: This is to specify the type of the labor, e.g.,mechanical,roofer,plumber etc. You can manage it on Manage Picklist page.
Number of Workers*: Number of workers involved.
Hours Worked*: Number of working hours that the worker has spent.
Notes: Notes for other information.

This data grid is configurable. Default grid layout contains the following fields.
Line No.: Line item number. It is automatically generated by system and cannot be edited.
SOV item*: Schedule of Value item that describes the work supports Load From Contract, Load From SOV template or manually selected.
Quantity*: Quantity of the equipment.
Status: This is to specify the status of the equipment is either Active or Standby. You can manage it on Manage Picklist page.
Hours Worked*: Number of working hours the equipment has been used.
Notes: Notes for other information.

This data grid is configurable. Default grid layout contains the following fields.
Line No.: Line item number. It is automatically generated by system and cannot be edited.
SOV item*: Schedule of Value item that describes the work supports Load From Contract, Load From SOV template or manually selected.
Unit*: Unit of the material.
Quantity*: Quantity of the material.
Notes: Notes for other information.
The inspection line items are in viewing mode by default. To edit a line item, you need to enter editing mode by clicking the Edit icon ![]() at the front of the line or double-clicking the line.
at the front of the line or double-clicking the line.
You can add a line item by clicking the Add icon ![]() and if you want to add multiple line items in one go, you can enter the number into the input field next to the add icon.
and if you want to add multiple line items in one go, you can enter the number into the input field next to the add icon.
You can select a batch of line items and then clicking the Batch Delete icon ![]() to batch delete.
to batch delete.
Click the Update button to save the inspection report.
Click the Delete button to delete the inspection report. The system will then go to the Browse Inspection Report page.
Click the Cancel button to abort current operation and then go to the Browse Inspection Report page.
Click the Notify button to send notification to relevant persons. System will then go to Send Notification page.
Click the Replicate Inspection Report button to replicate the inspection report to a new one by copying its general information as well as Labor, Material and Equipment line items
Click the View Audit Trail button to view change history of this inspection report. System will then open Browse Audit Trail Details page in a new window.
Click the Print button to print the inspection report through predefined document template. The system will then open Generate Dynamic Document.
Association Views

Documents
The document(s) associated with the current inspection report display in the table. A brief summary of each related document includes Document ID, Document Name, Owner, Last Modified Time, Status, Is Checked Out, and Size (These columns in the data grid can be configured by Dynamic View).You may sort the records by clicking the linked column header.
You can upload a new file and associate it with the current inspection report by clicking ![]() . The system will go to the Add Document page.
. The system will go to the Add Document page.
You can view the detailed information of a document by clicking ![]() . The system will open the Document Management page of the document in a new window.
. The system will open the Document Management page of the document in a new window.
You can batch copy document(s) into the current inspection report by clicking ![]() . The system will go to "Create Documents by Copying from Existing Documents" page for your selection of document(s).
. The system will go to "Create Documents by Copying from Existing Documents" page for your selection of document(s).
You can batch copy document(s) from the current inspection report to another entity by selecting the document(s) and clicking ![]() . The system will go to "Batch Copy Documents To Another Entity Record" page for your selection of target entity.
. The system will go to "Batch Copy Documents To Another Entity Record" page for your selection of target entity.
You can batch associate document(s) with the current inspection report by clicking ![]() . The system will go to Browse Documents page for your selection of document(s).
. The system will go to Browse Documents page for your selection of document(s).
You can batch associate document(s) from the current inspection report to another entity by selecting the document(s) and clicking ![]() . The system will go to "Batch Associate Documents To Another Entity Record" page for your selection of target entity.
. The system will go to "Batch Associate Documents To Another Entity Record" page for your selection of target entity.
You can batch delete the document(s) associated with the current inspection report by selecting the document(s) and then clicking ![]() .
.
You can download document files associated with the current inspection report by clicking ![]() .
.
You can redline the document by clicking the Markup icon ![]() , the system will then direct you to the Online Document Markup page in a new page.
, the system will then direct you to the Online Document Markup page in a new page.
Invoices
The invoices associated with the current inspection report display in the table. A brief summary of each related invoice includes Invoice No., Invoice Type, Invoice Status, Invoice Date, Contract Name, Purchase Order Name, Invoice Total Amount, and Retainage Amount (These columns in the data grid can be configured by Dynamic View). You may sort the records by clicking the linked column header..
You can view detailed information of an invoice by clicking ![]() . System will open Manage Invoice page of the invoice in a new window.
. System will open Manage Invoice page of the invoice in a new window.
You can associate existing invoices with the current inspection report by clicking ![]() . The system will pop up a window for selecting invoice(s), listing all invoices associated with the primary contract except those that are already associated with the current inspection report.
. The system will pop up a window for selecting invoice(s), listing all invoices associated with the primary contract except those that are already associated with the current inspection report.
You can disassociate invoice(s) with the current inspection report by selecting the invoice(s) and clicking ![]() .
.