Navigate Here: Implementation > Supplier Requests > Browse Designer Supplementary Instructions; select a DSI or
Implementation > Supplier Requests > Browse Contractor Requests for Information; select a RFI > DSI subsection; select a DSI
You can edit the General Information and Related Information of a DSI on the Update DSI page.
The Update DSI page is mainly composed of two sections. The middle section is the General Information of a DSI, and the lower section contains the Related Information of the DSI.
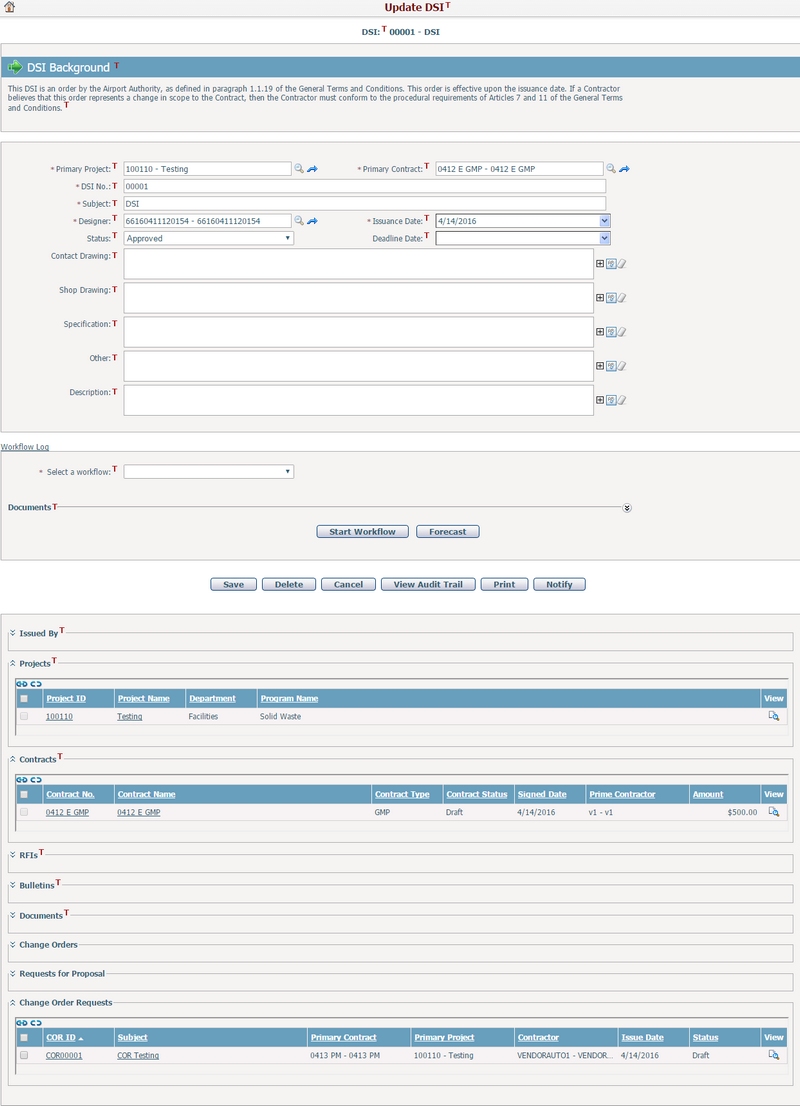
To edit the general information of a DSI, fill in the following fields:
The required fields are noted with an asterisk (*).
Primary Project*: The primary project that the DSI is associated with. It is read-only.
Primary Contract*: The primary contract that the DSI is associated with. It is read-only.
DSI No.*: The number of the DSI. It is auto-generated by the system and not editable.
Subject*: The subject of the DSI. Subject does not have to be unique.
Designer*: The Designer initiating the DSI. It ties to system Vendors. You can browse and select a vendor by clicking
Status: Select a status for the DSI. Authorized users can add or delete a customized status in Dropdown List Management.
Issuance Date *: The date when the DSI is issued. Default is the current date.
Contact Drawing: You can describe the contact drawing that needs to be interpreted in the DSI.
Shop Drawing: You can describe the shop drawing that needs to be interpreted in the DSI.
Specification: You can describe the Specification that needs to be interpreted in the DSI.
Other: The other information of the DSI.
Description: The description of the DSI.
Click the Save button to save the changes. The page will refresh and display the updated data.
Click the Delete button to delete the DSI. The DSI Status will be triggered to Deleted and you cannot view this DSI on the Browse DSIs page.
Click the Cancel button to abort the current operation. The system will go to the Browse DSIs page. If you enter this page via the Edit a RFI entrance, the system will return to that page.
Click the View Audit Trail button to view the change history of the current DSI. The system will open the Browse Audit Trail Details page in a new window.
Click the Print button to open the Generate Dynamic Document page where you can print the current DSI in Word or PDF format.
Click the Notify button to notify people about the DSI information. The system will go to the Send Notification page.
Click the Submit button to trigger the workflow if a DSI workflow has been defined and set as Active. |
You can add or edit related information of the current Bulletin. Each subsection is collapsible. You can collapse or expand the contents of the subsection by clicking
Issued By
Issued By is the person(s) issuing the DSI. It ties to system Resources.
A brief summary of each Issued By resource displays in the table. The summary includes Resource ID, Resource Name, Resource Type, Department, Associated User ID, Vendor Name, and Status (these columns in the data grid can be configured by Dynamic View). You may sort the records by clicking a linked column header.
You can view the detailed information of a resource by clicking
You can associate resource(s) as Issued By with the current DSI by clicking
You can disassociate resource(s) as Issued By from the current DSI by checking the checkbox and clicking
Projects
The project(s) associated with the current DSI display in the table. A brief summary of each related project includes Project ID, Project Name, Department, and Program (these columns in the data grid can be configured by Dynamic View). You may sort the records by clicking the linked column header.
You can view the detailed information of a project by clicking
You can associate project(s) with the current DSI by clicking
You can disassociate project(s) with the current DSI by checking the checkbox and clicking
Contracts
The contract(s) associated with the current DSI display in the table. A brief summary of each related contract includes Contract ID, Contract Name, Type, Contract Status, Signed Date, and Prime Contractor (these columns in the data grid can be configured by Dynamic View). You may sort the records by clicking the linked column header.
You can view the detailed information of a contract by clicking
You can associate contract(s) with the current DSI by clicking
You can disassociate contract(s) with the current DSI by checking the checkbox and clicking
RFIs
The RFI(s) associated with the current DSI display in the table. A brief summary of each related RFI includes Category, RFI ID, RFI Title, Date Reported, Deadline, Date Resolved, and Status (these columns in the data grid can be configured by Dynamic View). You may sort the records by clicking the linked column header.
You can view the detailed information of a RFI by clicking
You can associate RFI(s) with the current DSI by clicking
You can disassociate RFI(s) with the current DSI by checking the checkbox and clicking
Bulletins
The Bulletin(s) associated with the current DSI display in the table. A brief summary of each related Bulletin includes Bulletin No. and Issuance Date (these columns in the data grid can be configured by Dynamic View). You may sort the records by clicking the linked column header.
You can view the detailed information of a Bulletin by clicking
You can associate Bulletin(s) with the current DSI by clicking
You can disassociate Bulletin(s) with the current DSI by checking the checkbox and clicking
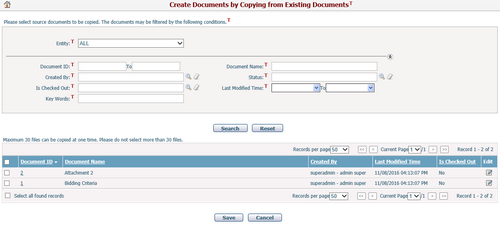
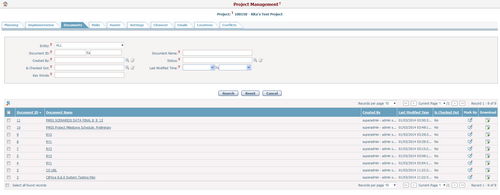
Documents
A brief summary of each associated document displays in the table. The summary includes Document ID, Document Name, Created By, Last Modified Time, Is Checked Out, Is Linked Document, Mark Up and Download. You can sort the files by clicking the linked column headers. If there are too many records to display on one page, you can use the navigation control to view another page, or you may increase the number of records per page.
You can add an external document to the current DSI by clicking
You can delete multiple documents in batch by clicking the Batch Delete icon You can download documents in batch into the local path by clicking the Batch Download icon You can redline the document by clicking the Markup icon You can create document(s) to the current DSI via copying from existing document(s) by clicking the Batch Copy Documents In icon
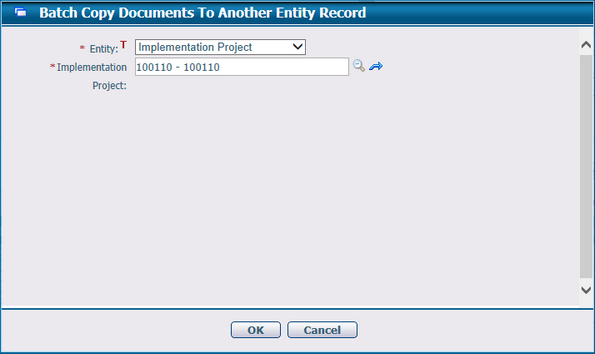
You can find the documents you want by specifying the search conditions and pressing the Search button. Select the documents to be copied and click the Save button. New documents will be created for the current DSI. You can batch copy documents of the current DSI to another business entity record (as new documents) by selecting the specific documents and then clicking the Batch Copy Documents Out icon
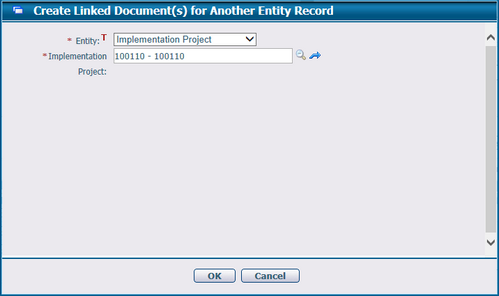
You can create linked documents from existing documents in CIPAce to the current DSI by clicking the Create Linked Documents In icon
You can create linked documents to another entity record by clicking the Create Linked Documents Out
|