Navigate Here: Enter into Schedule Gantt Chart, double click a cell of an existing task
The cell will change into edit mode as shown below.

Note: System will determine if the cell is editable based on task scheduling calculation logic. For example, the finish date and duration of a "Fixed Work" task cannot be edited.
Navigate Here: Enter into Schedule Gantt Chart, double click a task bar to pop up Task Information screen or right click an existing task and select Task information... option in the menu
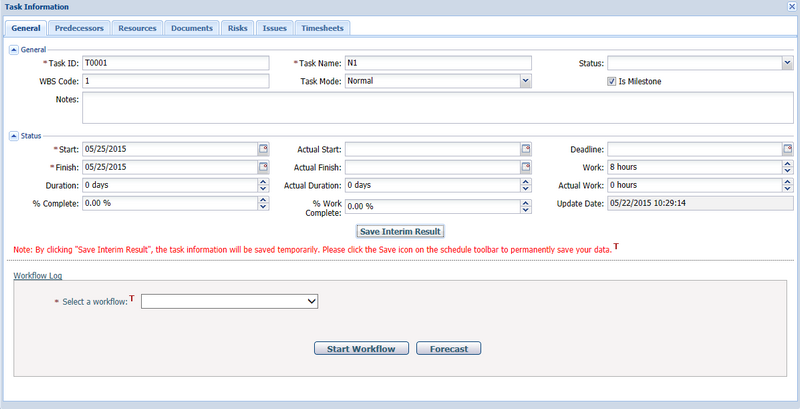
Once you've finished editing, click the Save Interim Result button to save the task temporary.
You can select and remove a task by using Remove Task icon![]() on the tool bar. But if the task links to any workflow instance or timesheet records, it cannot be deleted.
on the tool bar. But if the task links to any workflow instance or timesheet records, it cannot be deleted.
Note, you must click the Save icon ![]() on the tool bar to save all the changes to the current schedule.
on the tool bar to save all the changes to the current schedule.
There are different tabs on the Task Information screen, for a new task without saving, only General, Predecessors and Resources are available.
General
To update a task's general information, modify any of the following fields:
The required fields are noted with an asterisk (*).
Task Name*: The name of the task.
Task ID*: The ID of the task. It must be unique in a schedule. The system will automatically generate the ID for a new task with the rule: “T” + (Four numbers in sequence).
Status: The status of the task, including five options: Draft, Under Review, Approved, Started and Finished.
WBS Code: The Work Breakdown Structure code of the task. The system will automatically generate or update it by the definition rule as: Parent task's WBS code + “.” + (Unique number in sequence).
❖When a parent task’s WBS code is changed, it will be inherited by all its sub tasks automatically.
❖When a sub task’s WBS code is changed, it will be updated automatically by the definition rule again, with the exception when user inputs a WBS code in format of “#.#”.
Task Mode: It is the basis of how to schedule a task. The choices control the calculation logic between its duration, work, and assigned resource & unit. It includes:
❖Normal: It is the default mode. It means the task will be scheduled based on its start/finish dates and the applied calendar. Duration, Work and assigned Resource & Unit have no interrelated calculation.
❖Fixed Duration: It means the task has fixed start and finish dates, but its Work will be computed dynamically based on the assigned resources. So Work cannot be edited manually under this mode.
❖Fixed Work: It means the task has fixed work and computed duration. The more resources assigned to this task, the shorter its Duration will be. So Duration cannot be edited manually under this mode.
❖Fixed Duration & Work: It means that both Duration and Work of the task are fixed, and the Units of the Resources assigned will be computed dynamically by evenly distributing the task’s workload among them.
❖Manual: It means the task will be scheduled based only on its start and finish dates, and the task dependencies will have no impact on it unless user uses Reschedule Tasks function on the Gantt chart.
Is Milestone: If it is checked, the task will become a milestone task which has the same start & finish date and the duration is zero. No resource is allowed to be assigned to a milestone task.
Notes: The detail description of the task.
Start*: The start date of the task. It controls the task bar start date in the Gantt Chart.
Finish*: The finish date of the task. It controls the task bar finish date in the Gantt Chart.
Duration: The working period of the task, calculated using the formula [Finish Date - Start Date - Non-working period + 1].
Note: You can input the unit of the duration with a number at the same time, these units including: ms(micro second), s(second), m(minute), h(hour), d(day), w(week), mo(month), q(quarter), y(year), the default unit is day.
Actual Start: The actual start date of the task. Once you fill in the Actual Start date, the Start date will be updated to the same date, and these two dates will be synchronized when any of them is changed.
Note: Once the % Complete gets a value, the Actual Start will be updated to the same date as Start automatically.
Actual Finish: The actual finish date of the task. Once you fill in the Actual Finish date, the Finish date will be updated to the same date, and these two dates will be synchronized when any of them is changed.
Note: Once the % Complete becomes 100%, the Actual Finish will be updated to the same date as Finish automatically. And the Duration, Actual Duration, % Complete, % Work Complete will be locked for edit.
Actual Duration: The actual working period of a task,calculated using the formula [Actual Finish Date - Actual Start Date - Non-working period + 1].
Note: The unit of the actual duration is by default the same as duration.
Work: The total amount of working hours scheduled for a task.
Actual Work: The total amount of working hours already spent for a task.
% Complete: The percentage of the task’s duration that has been completed, calculated using the formula [(Actual Duration / Duration) * 100], you can also update it by the % Complete Quick Update function on Gantt Chart tool bar.
Note: Once a task gets an Actual Finish date, its % Complete will be set to 100% automatically.
% Work Complete: The percentage of the task’s work that has been complete, computing by formula [(Actual Work / Work) * 100]
Note: Once a task gets an Actual Finish date, its % Work Complete will be set to 100% automatically.
Deadline: The deadline date of the task.
Update Date: The last update date of a task. It is a read-only field and will be updated by the system automatically.
If a task related workflow is activated, you can click the Start Workflow button to initiate the workflow or Forecast button to see the workflow activities’ detail.
After the authorized user receives the workflow task and enters into Task Information screen for processing, he can update task general information or input processing information for workflow task at the same time.
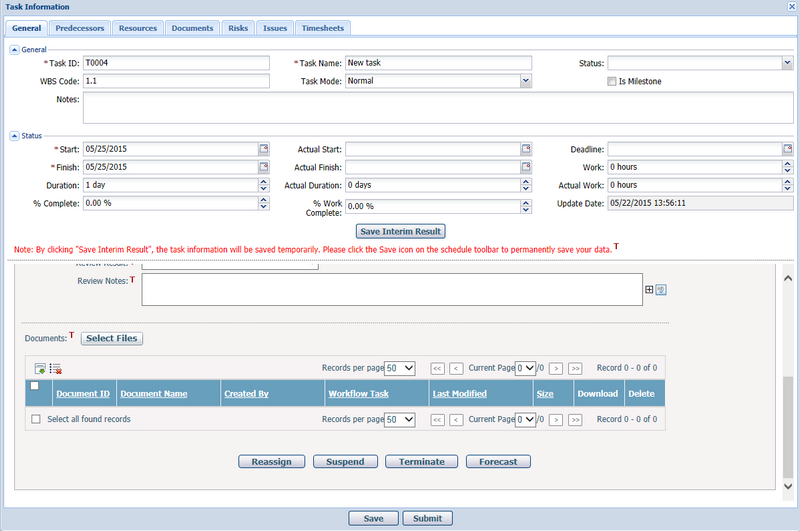
When you've finished your updates, you can click the Save button at the bottom of the screen to save the whole schedule immediately.
Or you can click Submit button at the bottom of the screen to save the whole schedule and submit the workflow task at the same time.
Predecessors
In a project schedule, you must be aware of the way tasks depend on each other. A task dependency is a relationship between two tasks in which the predecessor task controls the start or finish date of its successors. A task can have multiple predecessors, each with a different relationship to it.

You can click Add new icon to add a new predecessor to the current task with the following information:
SN: Same as # (Task Order No.).
Task Name: Select an existing task by name as a new predecessor. It is a required field and it cannot be empty.
Type: The type of task relationship, there are four types as below:
❖Finish-To-Start (FS): A relationship in which the start of a successor task depends on the completion of its predecessor task. It is the default task relationship.
❖Start-To-Start (SS): A relationship between tasks in which the start of a successor task depends on the start of its predecessor.
❖Finish-To-Finish (FF): A relationship in which the finish of a successor task depends on the finish of its predecessor task.
❖Start-To-Finish (SF): A relationship between tasks in which a successor task cannot complete until its predecessor task starts.
Lag: The time interval between a successor task and its predecessor task, the default unit is day, you can use other units just as those with Duration.
You can select an existing predecessor and click the Remove icon to delete it.
You can also add/update the predecessors on the Task Grid or Gantt Chart.

Note: The rule to input the predecessor is: Task Order No. + FS (same as empty)/ FF/ SS/ SF + Lag. If there are multiple predecessors, using “;” as separator.
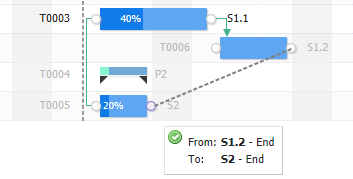
After setting the predecessors, the start date and finish date of the current task will be adjusted according to the start date or finish date of its predecessor as well as the lag time.
Note: The following operations will be blocked:
❖Link a summary task as successor.
❖Having the same task as predecessor and successor.
❖A circuit is formed.
Resource
Before you can assign resources to a task, you must assign resources to the project first. This can be done under the Project Resource Management.

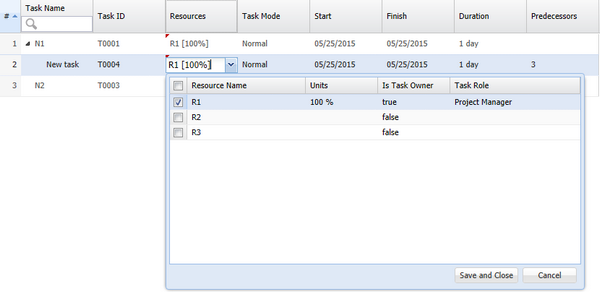
You can click Add new icon to add a new resource to the current task with the following information:
Resource Name: Select an existing project resource by name as new task resource. It is a required field and it cannot be empty.
Units: The percentage of the assigned resource’s allocation to the task, its default value is 100%. Note: For below task modes, change resource or resource unit will trigger the task duration or work change at the same time.
❖Fixed Duration: If more resource(s) are added or resource unit(s) are increased, the work will be increased automatically, vice versa.
❖Fixed Work: If more resource(s) have been added or resource unit(s) are increased, the duration will be decreased automatically, vice versa.
❖Fixed Duration & Work
❑If new resource(s) are added, their units will be automatically and evenly decreased by the system, vice versa.
❑If task duration or work is increased, the resource unit(s) will be automatically and evenly increased by the system, vice versa.
Is Task Owner: If it is checked, it means that the resource is the task owner.
Task Role: The role of the resource in this task, only project role(s) assigned to the specific project resource(s) can be selected here.
You can select an existing resource and click the Remove icon to remove it from the task.
You can also add/update the resources on the Task Grid, but Is Task Owner and Task Role cannot be edited in this mode.
Documents

The document(s) associated with the current task display in the table. A brief summary of each related document includes Document ID, Document Name, Created By, Last Modified Time and Is Checked Out (These columns can be configured by Dynamic View). You may sort the records by clicking the linked column header.
You can upload a new file and associate it with the current task by clicking ![]() . The system will open the Add Document page in a new window.
. The system will open the Add Document page in a new window.
You can view detailed information of a document by clicking ![]() . The system will go to the Document Management page of the document.
. The system will go to the Document Management page of the document.
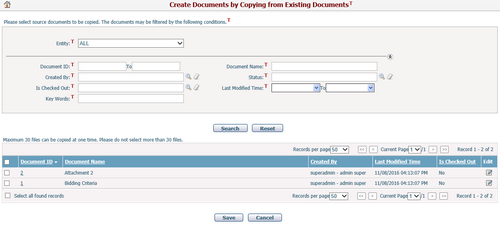
You can batch copy document(s) into the current task by clicking ![]() . The system will open the "Create Documents by Copying from Existing Documents" page in a new window for your selection of document(s).
. The system will open the "Create Documents by Copying from Existing Documents" page in a new window for your selection of document(s).
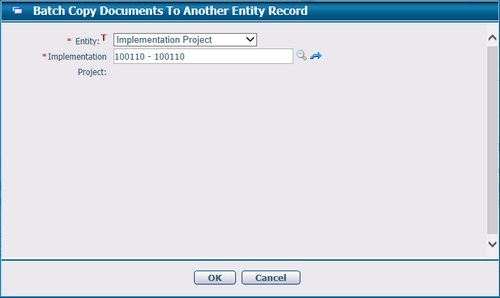
You can batch copy document(s) from the current task to another entity by selecting the document(s) and clicking ![]() . The system will pop up the "Batch Copy Documents To Another Entity Record" page for your selection of target entity record.
. The system will pop up the "Batch Copy Documents To Another Entity Record" page for your selection of target entity record.
You can batch associate document(s) with the current task by clicking ![]() . The system will open the Browse Documents page in a new window for your selection of document(s).
. The system will open the Browse Documents page in a new window for your selection of document(s).
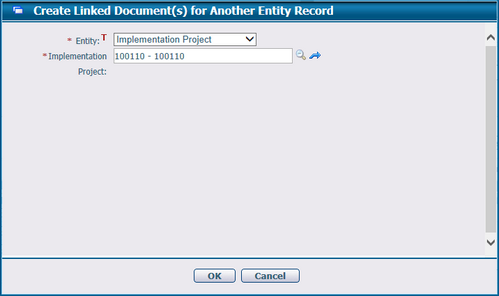
You can batch associate document(s) from the current task to another entity by selecting the document(s) and clicking ![]() . The system will pop up the "Create Linked Document(s) To Another Entity Record" page for your selection of target entity record.
. The system will pop up the "Create Linked Document(s) To Another Entity Record" page for your selection of target entity record.
You can batch delete document(s) from the current task by selecting the document(s) and clicking ![]() .
.
You can redline the document by clicking the Markup icon ![]() . The system will then open Online Document Markup page in a new window.
. The system will then open Online Document Markup page in a new window.
You can download document file(s) associated with the current task by clicking ![]() .
.
Risks

The risk(s) associated with the current task display in the table. A brief summary of each related risk includes Risk ID, Risk Title, Risk Type, Probability, Impact and Risk Status (These columns can be configured by Dynamic View). You may sort the records by clicking the linked column header.
You can add a new risk and associate it with the current task by clicking ![]() . The system will open the Add Risk page in a new window.
. The system will open the Add Risk page in a new window.
You can view detailed information of a risk by clicking ![]() . The system will go to the Update Risk page of the risk.
. The system will go to the Update Risk page of the risk.
You can associate risk(s) with the current task by clicking ![]() . The system will pop up a window for selecting risk(s), listing all risks in the system except those already associated with current task.
. The system will pop up a window for selecting risk(s), listing all risks in the system except those already associated with current task.
You can disassociate risk(s) with the current task by selecting the risk(s) and clicking ![]() .
.
Issues

The issue(s) associated with the current task display in the table. A brief summary of each related issue includes Issue ID, Issue Title, Description, Type, Status and Deadline (These columns can be configured by Dynamic View). You may sort the records by clicking the linked column header.
You can add a new issue and associate it with the current task by clicking ![]() . The system will open the Add Issue page in a new window.
. The system will open the Add Issue page in a new window.
You can view detailed information of an issue by clicking ![]() . The system will go to the Edit Issue page of the issue.
. The system will go to the Edit Issue page of the issue.
You can associate issue(s) with the current task by clicking ![]() . The system will pop up a window for selecting issue(s), listing all issues in the system except those already associated with the current task.
. The system will pop up a window for selecting issue(s), listing all issues in the system except those already associated with the current task.
You can disassociate issue(s) with the current task by selecting the issue(s) and clicking ![]() .
.
Timesheets

The timesheet record(s) associated with the current task display in the table. A brief summary of each related issue includes Project, Task, Resource, Start Date, End Data, Timesheet Type, Working Hours and % Complete (These columns can be configured by Dynamic View). You may sort the records by clicking the linked column header.
You can add a new timesheet record for the current task by clicking ![]() . The system will open the Add Timesheet page in a new window.
. The system will open the Add Timesheet page in a new window.
You can view detailed information of a timesheet record by clicking ![]() . The system will go to the Timesheet Management page of the timesheet record.
. The system will go to the Timesheet Management page of the timesheet record.