Navigate Here: Implementation > Change Order Management > Browse Change Orders; select a CO or Implementation > Contracts > Browse Contracts; select a contract > CO tab; select a CO or
Projects > Browse Implementation Projects; select a project > CO tab; select a CO
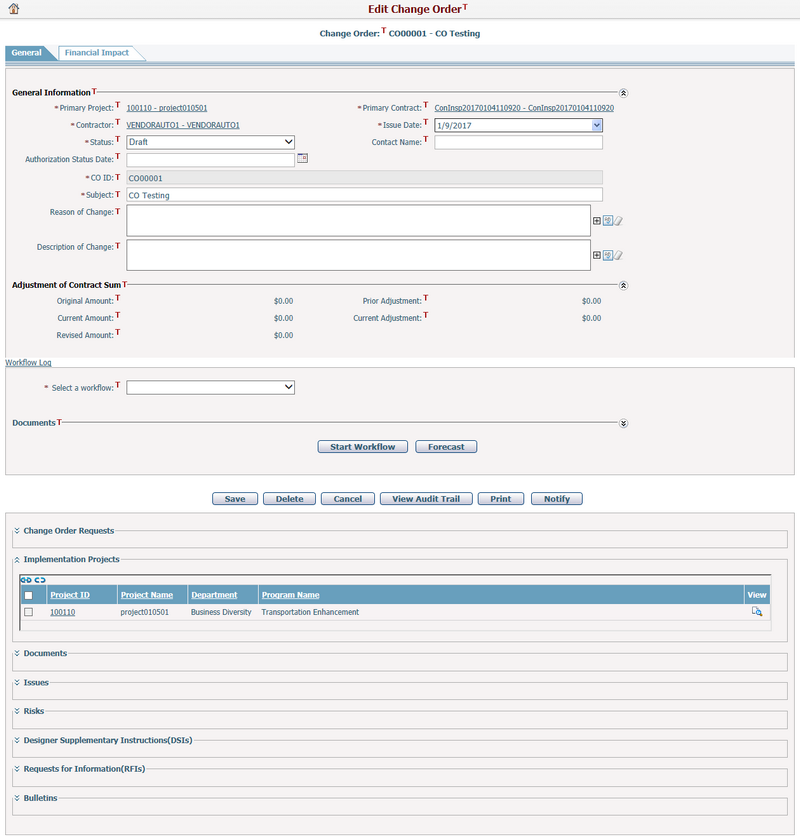
You can edit a CO general information on Edit Change Order Request page - General tab.
The operations allowed are determined by the CO Status. There are four statuses: Draft, Under Review, Approved, Rejected and Implemented.
Draft: Indicates the initial phase when the CO is being facilitated. Under this status, you can edit CO general information, delete the CO, and add/edit/delete CO line items.
Under Review: Indicates that the CO is in a review process. This status is normally used by workflow process automatically.
Approved: Indicates that the CO is authorized to be in effect. Under this status, CO general information and its line items cannot be modified again. If auto-implement process is enabled by configuration, the system will implement the CO into the corresponding contract as soon as it is being Approved, and change the CO status into Implemented automatically.
Rejected: Indicates that the CO is void. You can change the CO for review again as in Draft status.
Implemented: Indicates that the CO is executed to put the changes into corresponding contract. Under this status, CO general information, line items are read-only.
General Information
General information can be edited when the CO Status is Draft, Under Review or Rejected.
The required fields are noted with an asterisk (*).
Primary Project*: The particular implementation project for which the CO has been created. It is read-only in edit mode.
Primary Contract*: The particular contract for which the CO has been created. It is read-only in edit mode.
Contractor*: The contractor which is associated with the CO. It is read-only in edit mode.
Issue Date*: The date when the CO is issued.
Status*: The status of the CO. It is normally auto updated by workflow process, but if workflow is deactivated, user can manually edit.
Contact Name: The contact person for the CO.
Authorization Status Date: The date when the CO is approved or rejected. It is normally auto updated by workflow process, but if workflow is deactivated, user can manually edit.
CO ID*: A unique ID for the CO. It is auto generated and cannot be edited.
Subject*: Subject of this CO.
Reason for Change: The change reason for this CO.
Description of Change: The brief description of this CO.
Original Amount: The initial amount of the primary contract associated with the CO. It is always read-only.
Current Amount: The latest amount of the primary contract associated with the CO. It is always read-only.
Prior Adjustment: Total adjusted amount which has been applied to the primary contract to date. It is real-time calculated by the system as [Current Amount - Original Amount] and read-only.
Current Adjustment: Total adjusted amount of all line items in current CO. It is real-time calculated by the system and read-only.
Once you've finished editing, click the Save button to save the CO.
You can click the Delete button to delete the COR. A dialog will prompt for confirmation before the CO can be deleted from the system. The system will then go to the Browse Change Orders page.
You can click the Cancel button to abort the current operation and go to the Browse Change Orders page or return to the original entrance.
You can view the change history of this CO by clicking the View Audit Trail button. The system will then open the Browse Audit Trail Details page in a new window.
You can print information of this CO through pre-defined document template by clicking the Print button. The system will then open the Generate Dynamic Document page.
You can click the Notify button to send notification to relevant persons about the CO. The system will then go to the Send Notification page.
If the CO related workflow is activated, you can click the Start Workflow button to initiate the workflow or Forecast button to see the workflow activities’ detail.
Related Information
You can add and edit related information of the current CO. By default, all subsections are collapsed when there is no contents. You can collapse or expand the contents of the subsections by clicking ![]() or
or ![]() beside the section titles.
beside the section titles.
Change Order Requests
The COR(s) associated with the current CO display in the table. A brief summary of each related project includes COR ID, Subject, Primary Project, Project Contract, Contractor, Issue Date and Status (These columns can be configured by Dynamic View). You may sort the records by clicking the linked column header.
You can view detailed information of a COR by clicking ![]() . The system will open the Edit COR General page of the project in a new window.
. The system will open the Edit COR General page of the project in a new window.
Implementation Projects
The project(s) associated with the current CO display in the table. A brief summary of each related project includes Project ID, Project Name, Department, and Program Name (These columns in the data grid can be configured by Dynamic View). You may sort the records by clicking the linked column header.
You can view the detailed information of a project by clicking ![]() . The system will open the Project Management page of the project in a new window.
. The system will open the Project Management page of the project in a new window.
You can associate project(s) with the current CO by clicking ![]() . The system will pop up a window for selecting project(s), listing all non-closeout projects in the system except those that are already associated with the current CO.
. The system will pop up a window for selecting project(s), listing all non-closeout projects in the system except those that are already associated with the current CO.
You can disassociate project(s) with the current CO by selecting the project(s) and clicking ![]() . Please note that it’s not allowed to disassociate Primary Project which is defined in CO general.
. Please note that it’s not allowed to disassociate Primary Project which is defined in CO general.
Contracts

The contract(s) associated with the current CO of Transfer type display in the table. A brief summary of each related project includes Contract No., Contract Name, Contract Type, Contract Status, Signed Date, Prime Contractor and Amount (These columns can be configured by Dynamic View). You may sort the records by clicking the linked column header.
You can view detailed information of a contract by clicking ![]() . The system will open the Edit COR General page of the project in a new window.
. The system will open the Edit COR General page of the project in a new window.
Issues
The issue(s) associated with the current CO display in the table. A brief summary of each related issue includes Issue ID, Issue Title, Description, Type, Status, and Deadline (These columns in the data grid can be configured by Dynamic View). You may sort the records by clicking the linked column header.
You can add a new issue and associate it with the current CO by clicking ![]() . The system will go to the Add Issue page.
. The system will go to the Add Issue page.
You can view the detailed information of an issue by clicking ![]() . The system will open the Edit Issue page of the issue in a new window.
. The system will open the Edit Issue page of the issue in a new window.
You can associate issue(s) with the current CO by clicking ![]() . The system will pop up a window for selecting issue(s), listing all issues in the system except those that are already associated with the current CO.
. The system will pop up a window for selecting issue(s), listing all issues in the system except those that are already associated with the current CO.
You can disassociate issue(s) with the current CO by selecting the issue(s) and clicking ![]() .
.
Request for Information(RFIs)
The RFI(s) associated with the current CO display in the table. A brief summary of each related RFI includes Category, RFI ID, RFI Title, Date Reported, Deadline, Date Resolved and Status (These columns in the data grid can be configured by Dynamic View). You may sort the records by clicking the linked column header.
You can add a new RFI and associate it with the current CO by clicking ![]() . The system will go to the Add Request for Informatio(RFI) page.
. The system will go to the Add Request for Informatio(RFI) page.
You can view the detailed information of a RFI by clicking ![]() . The system will open the Edit Request for Information(RFI) page of the RFI in a new window.
. The system will open the Edit Request for Information(RFI) page of the RFI in a new window.
You can associate RFI(s) with the current CO by clicking ![]() . The system will pop up a window for selecting RFI(s), listing all RFIs in the system except those that are already associated with the current CO.
. The system will pop up a window for selecting RFI(s), listing all RFIs in the system except those that are already associated with the current CO.
You can disassociate RFI(s) with the current CO by selecting the RFI(s) and clicking ![]() .
.
Designer Supplementary Instructions(DSIs)
The DSI(s) associated with the current CO display in the table. A brief summary of each related DSI includes DSI No., Subject, and Issuance Date (These columns in the data grid can be configured by Dynamic View). You may sort the records by clicking the linked column header.
You can add a new DSI and associate it with the current CO by clicking ![]() . The system will go to Add Designer's Supplementary Instruction(DSI) page.
. The system will go to Add Designer's Supplementary Instruction(DSI) page.
You can view the detailed information of a DSI by clicking ![]() . The system will open Update DSI page of the DSI in a new window.
. The system will open Update DSI page of the DSI in a new window.
You can associate DSI(s) with the current CO by clicking ![]() . The system will pop up a window for selecting DSI(s), listing all DSIs in the system except those that are already associated with the current CO.
. The system will pop up a window for selecting DSI(s), listing all DSIs in the system except those that are already associated with the current CO.
You can disassociate DSI(s) with the current CO by selecting the DSI(s) and clicking ![]() .
.
Bulletins
The bulletin(s) associated with the current CO display in the table. A brief summary of each related bulletin includes Bulletin No. and Issuance Date (These columns in the data grid can be configured by Dynamic View). You may sort the records by clicking the linked column header.
You can add a new bulletin and associate it with the current CO by clicking ![]() . The system will go to the Add Bulletin page.
. The system will go to the Add Bulletin page.
You can view the detailed information of a bulletin by clicking ![]() . The system will open the Update Bulletin page of the bulletin in a new window.
. The system will open the Update Bulletin page of the bulletin in a new window.
You can associate bulletin(s) with the current CO by clicking ![]() . The system will pop up a window for selecting bulletin(s), listing all bulletins in the system except those that are already associated with the current CO.
. The system will pop up a window for selecting bulletin(s), listing all bulletins in the system except those that are already associated with the current CO.
You can disassociate bulletin(s) with the current CO by selecting the bulletin(s) and clicking ![]() .
.
Risks
The risk(s) associated with the current CO display in the table. A brief summary of each related risk includes Risk ID, Risk Title, Risk Type, Probability, Impact and Risk Status (These columns in the data grid can be configured by Dynamic View). You may sort the records by clicking the linked column header.
You can add a new risk and associate it with the current CO by clicking ![]() . The system will go to the Add Risk page.
. The system will go to the Add Risk page.
You can view the detailed information of a risk by clicking ![]() . The system will open the Update Risk page of the risk in a new window.
. The system will open the Update Risk page of the risk in a new window.
You can associate risk(s) with the current CO by clicking ![]() . The system will pop up a window for selecting risk(s), listing all risks in the system except those that are already associated with the current CO.
. The system will pop up a window for selecting risk(s), listing all risks in the system except those that are already associated with the current CO.
You can disassociate risk(s) with the current CO by selecting the risk(s) and clicking ![]() .
.

The document(s) associated with the current CO display in the table. A brief summary of each related document includes Document ID, Document Name, Created By, Last Modified Time, and Is Checked Out (These columns in the data grid can be configured by Dynamic View). You may sort the records by clicking the linked column header.
You can upload a new file and associate it with the current CO by clicking ![]() . The system will go to the Add Document page.
. The system will go to the Add Document page.
You can view the detailed information of a document by clicking ![]() . The system will open the Document Management page of the document in a new window.
. The system will open the Document Management page of the document in a new window.
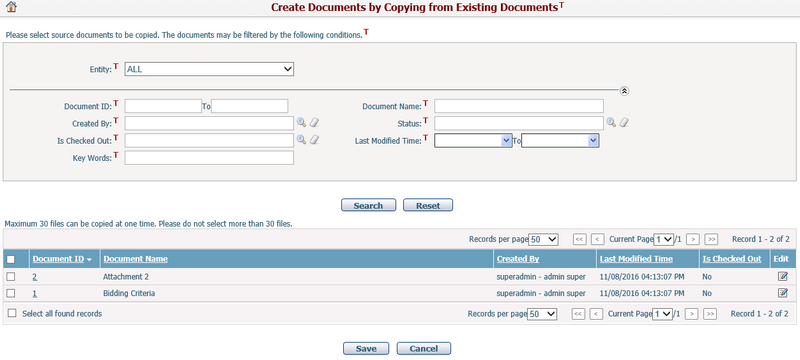
You can batch copy document(s) into the current CO by clicking ![]() . The system will go to "Create Documents by Copying from Existing Documents" page for your selection of document(s).
. The system will go to "Create Documents by Copying from Existing Documents" page for your selection of document(s).
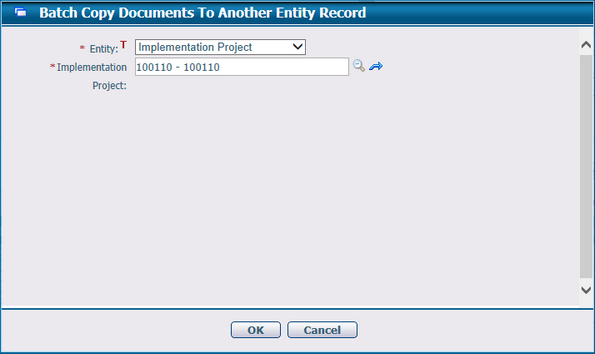
You can batch copy document(s) from the current CO to another entity by selecting the document(s) and clicking ![]() . The system will pop up "Batch Copy Documents To Another Entity Record" page for your selection of target entity.
. The system will pop up "Batch Copy Documents To Another Entity Record" page for your selection of target entity.
You can batch associate document(s) with the current CO by clicking ![]() . The system will go to the Browse Documents page for your selection of document(s).
. The system will go to the Browse Documents page for your selection of document(s).
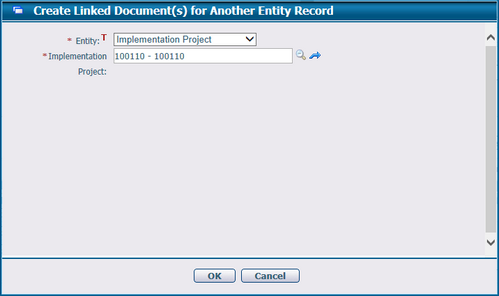
You can batch associate document(s) from the current CO to another entity by selecting the document(s) and clicking ![]() . The system will pop up "Create Linked Document(s) To Another Entity Record" page for your selection of target entity.
. The system will pop up "Create Linked Document(s) To Another Entity Record" page for your selection of target entity.
You can batch delete document(s) with the current CO by selecting the document(s) and clicking ![]() .
.
You can redline the document by clicking the Markup icon ![]() . The system will then open the Online Document Markup page in a new window.
. The system will then open the Online Document Markup page in a new window.
You can download document file(s) associated with the current CO by clicking ![]() .
.